background image


50 


WPL 406 User Manual 

Baud Rate 

4/9


>


9600 bps


19200 bps


38400 bps


Parity 

1/4


>


None


Odd


Even


Data Bits 

2/3


7


>


8


Exit


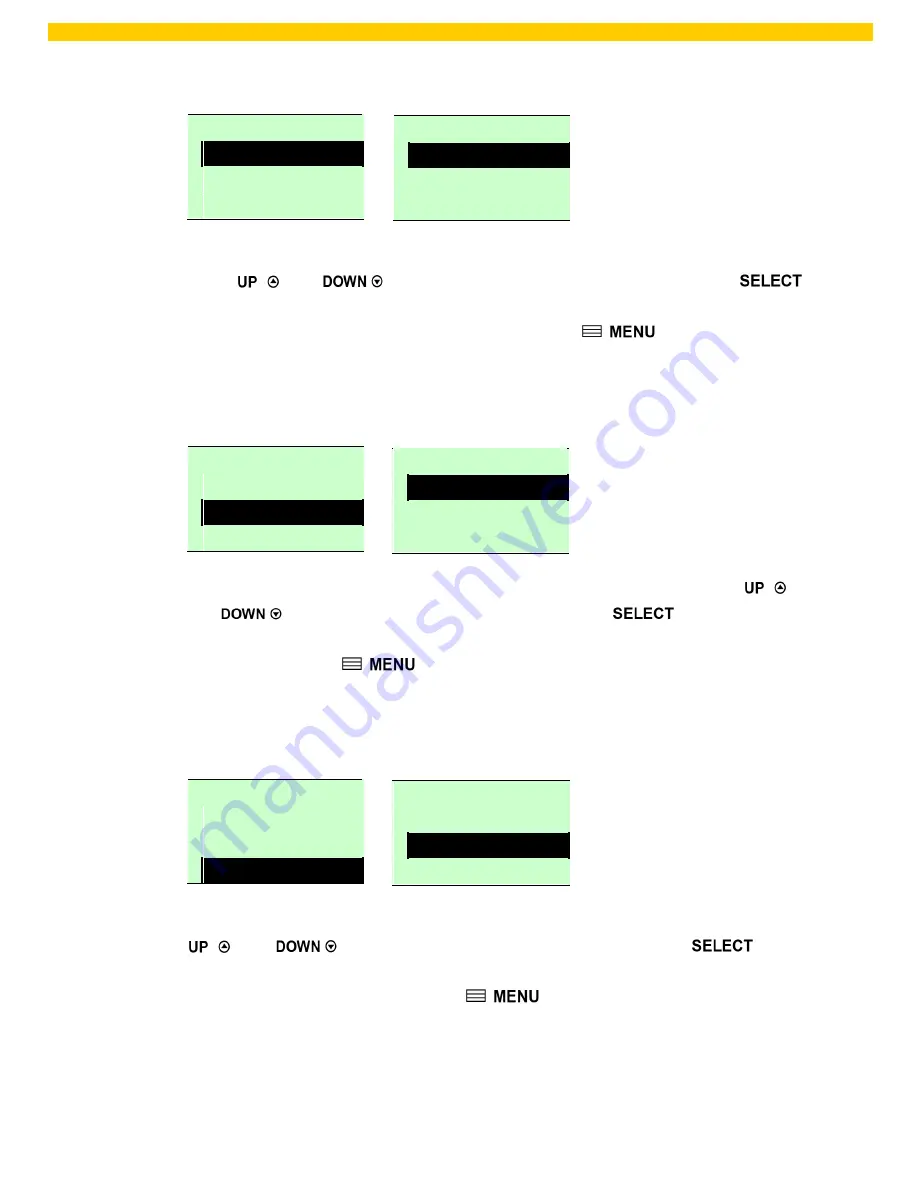
3.1.3.1 Baud Rate


Serial Comm. 

1/5


>


Baud Rate


Parity


Data Bits


This option is used to set the RS-232 baud rate. The default setting is 9600 bps. 
Press  


and  


buttons to select the different baud rate and press  


button to set the value into printer. When you enter this list, the baud rate value in the right 
side of “

>

” icon is the current setting in the printer. Press  


key to cancel the 

setting and return to the previous menu. 


3.1.3.2 Parity


Serial Comm. 

2/5


Baud Rate


>


Parity


Data Bits


This option is used to set the RS-232 parity. The default setting is “None”. Press  


and  


buttons to select the different parity and press  


button to set the 

value into printer. When you enter this list, the parity in the right side of “

>

” is the printer 

current setting. Press  


key to cancel the setting and return to the previous 

menu. 


3.1.3.3 Data Bits:


Serial Comm. 

3/5


Baud Rate


Parity


>


Data Bits


This option is used to set the RS-232 Data Bits. The default setting is “8” data bits. Press 


and  


buttons to select the different Data Bits and press  


button 

to set the value into printer. When you enter this list, the Data Bits in the right side of “

>

” 

icon is the printer current setting. Press  


key to cancel the setting and return to 

the previous menu. 

Содержание WPL 406

Страница 1: ...WPL 406 User Manual WPL406...

Страница 2: ...material create a derivative work from a licensed program or use a licensed program in a network without written permission from Wasp Technologies The user agrees to maintain Wasp Technologies copyri...

Страница 3: ...00 4 SERIES REQULATIONS FCC CFR Title 47 Part 15 Subpart B 2009 Section 15 107 and 15 109 ICES 003 Issue 4 2004 Class A AS NZS CISPR 22 2009 CLASS A GB4953 2001 GB9254 2008 CLASS A GB17625 1 2003 A UL...

Страница 4: ...2 Operations Overview 6 2 1 Unpackingand Inspection 6 2 2 Printer Overview 7 2 2 1 Front View 7 2 2 2 Interior view 8 2 2 3 Rear View 9 2 3 Operator Controls 11 2 3 1 Front Panel Keys 11 2 3 2 LED Ind...

Страница 5: ...tter 58 3 4 Language 59 3 5 Service 60 3 5 1 Initialization 60 3 5 2 Mileage Info 60 4 Diagnostic Tool 61 4 1 Start the Diagnostic Tool 61 4 2 Printer Function 62 5 Setting Ethernet by Diagnostic Util...

Страница 6: ...d barcodes can be printed in any one of the four directions This printer is built in the high quality high performance MONOTYPE IMAGING True Type font engine and one CG Triumvirate Bold Condensed smoo...

Страница 7: ...oder sensor LED indicators Real time clock USB 2 0 full speed interface Serial RS 232C 2400 115200 bps interface 8 MB SDRAM memory 4 MB FLASH memory SD FLASH memory card reader for memory expansion up...

Страница 8: ...atrix QR code Aztec 1 2 2 Printer optional features The printer offers the following optional features Product option feature User options Dealer options Factory options LCD display graphic type 128x6...

Страница 9: ...203 dpi models 300 dpi models Print head resolution 203 dots inch 8 dots mm 300 dots inch 12 dots mm Printing method Thermal transfer and direct thermal Dot size width x length 0 125 x 0 125 mm 1 mm...

Страница 10: ...ace outside wound Media width label liner Max 118 mm 4 6 Min 25 4 mm 1 0 Media thickness label liner Max 0 28 mm 11 mil Min 0 06 mm 2 36 mil Media core diameter 25 4 mm 76 2 mm 1 3 Label length 5 2 28...

Страница 11: ...ter Please retain the packaging materials in case you need to reship the printer Unpacking the printer the following items are included in the carton One printer unit One Windows labeling software Win...

Страница 12: ...06 User Manual 2 2 Printer Overview 2 2 1 Front View 1 2 6 3 4 7 5 1 LED indicators 2 LCD 3 Keys for LCD module Option 4 Paper exit chute 5 Lower front cover 6 Media viewer 7 Printer right side cover...

Страница 13: ...bbon supply spindle 3 Print head pressure adjustment knob 4 Ribbon end sensor 5 Print head release lever 6 Label roll guard 7 Label supply spindle 8 Ribbon guide bar 9 Media guide bar 10 Print head 11...

Страница 14: ...the interfaces availability Recommended SD card specification SD card spec SD card capacity Approved SD card manufacturer V1 0 V1 1 128 MB SanDisk Transcend V1 0 V1 1 256 MB SanDisk Transcend Panason...

Страница 15: ...MB Transcend Panasonic V1 0 V1 1 miniSD 512 MB Transcend Panasonic V1 0 V1 1 miniSD 1 GB Transcend Panasonic V2 0 SDHC CLASS 4 miniSD 4 GB Transcend V2 0 SDHC CLASS 6 miniSD 4 GB The DOS FAT file sys...

Страница 16: ...11 WPL 406 User Manual 2 3 Operator Controls 2 3 1 Front Panel Keys Standard LED indicators Feed key Pause key Keys Function Feed key Advance one label Pause key Pause Resume the printing process...

Страница 17: ...Front panel keys Keys Function 1 Enter the menu 2 Exit from a menu or cancel a setting and return to the previous menu Pause Resume the printing process Advance one label Scroll up the menu list Scro...

Страница 18: ...Clearing data Blinking No paper Paper jam or No ribbon 2 4 Setting up the Printer 1 Place the printer on a flat secure surface 2 Make sure the power switch is off 3 Connect the printer to the compute...

Страница 19: ...Ribbon 1 Open the printer right side cover 2 Install the ribbon and paper core onto the ribbon supply spindle and ribbon rewind spindle Push the paper core and ribbon roll to the end of the spindle 3...

Страница 20: ...bbon leader onto the ribbon rewind spindle Ribbon Leader Ribbon Sensor Ribbon Guide Bar 5 Stick the ribbon leader onto the paper core Keep the ribbon flat and without wrinkle 6 Rotate the ribbon rewin...

Страница 21: ...16 WPL 406 User Manual Loading path for ribbon Ribbon sensor Ribbon guide bar Ribbon Ribbon supply spindle Ribbon rewind spindle...

Страница 22: ...17 WPL 406 User Manual 2 6 Installation of Media 2 6 1 Loading the Roll Label 1 Open the printer right side cover 2 Push the print head release lever to open the print head mechanism...

Страница 23: ...l of media on the label supply spindle Flip up the label roll guard Note When inserting the 3 core adaptor to the spindle please make sure the arror direction is as shown in the figure below When usin...

Страница 24: ...sensor type and calibrate the selected sensor Please refer to section 4 Note Please calibrate the gap black mark sensor when changing media The sensor location is marked by a triangle mark at the sen...

Страница 25: ...20 WPL 406 User Manual...

Страница 26: ...rs from the media supply spindle 5 Insert the fan fold media through the rear external label entrance chute 6 Pull fan fold label leading edge forward through the media guide bar media sensor and plac...

Страница 27: ...e selected sensor Please refer to chapter 4 4 Pull the label through the front of the printer and take some labels off only leave the liner 5 Feed the liner into peel off cover slot 6 Close the peel o...

Страница 28: ...the cutter paper opening 3 Adjust the label guide to fit the width of the label 4 Close the print head mechanism making sure the latches are engaged properly 5 Use the DiagTool to set the printer set...

Страница 29: ...4 inch wide the print head pressure will need to be adjusted to avoid ribbon wrinkle There are 5 levels of pressure for adjustment Level 1 is the minimum pressure and level 5 is the maximum pressure F...

Страница 30: ...Manager Diagnostics Language Service Exit Printer Setup File List Print Config English Initialization Sensor Avail Memory Dump Mode Chinese TC Mileage Info Serial Comm Del All Files Rotate Cutter Chi...

Страница 31: ...6 WPL 406 User Manual 3 1 Setup Menu Overview Setup Printer Setup WPL ZPL2 Sensor Serial Comm Ethernet Status Baud Rate Status Calibration Parity Configure Exit Exit Exit Data Bits Stop Bit s Exit Exi...

Страница 32: ...00 999 USA 001 5 1 1 Batch Mode BRI 002 6 2 Peeler Mode GER 003 7 3 Cutter Mode FRE 031 8 4 Cutter DAN 032 9 5 Exit ITA 033 10 6 SPA 034 11 7 SWE 036 12 8 SWI 038 9 437 039 10 850 041 11 852 042 12 86...

Страница 33: ...Density Print Setup 2 12 Speed Density Direction Use this option to setup printing darkness The available setting is from 0 to 15 levels and the increment is 1 level Printer default density is 8 You...

Страница 34: ...4 Print Mode None Batch Mode Peeler Mode Cutter Mode Cutter Batch Print Setup 4 12 Density Direction Print Mode This option is used to set the print mode Printer default setting is Batch Mode When ent...

Страница 35: ...ey to cancel the setting and return to the previous menu The default value is 000 Note If printing from enclosed software driver the software driver will send out the OFFSET command which will overwri...

Страница 36: ...printer Press key to cancel the setting and return to the previous menu The default value is 000 Note If printing from enclosed software driver the software driver will send out the REFERENCE command...

Страница 37: ...6 Arabic 1257 Baltic 1258 Vietnam ISO Code Page ISO Code Page International Character Set code page number International Character Set code page name 8859 1 Latin 1 8859 7 Greek 8859 2 Latin 2 8859 9...

Страница 38: ...ry Code Country 001 USA 034 Spanish Spain 044 United Kingdom 055 Brazil 002 Canadian French 036 Hungarian 045 Danish 061 English International 003 Spanish Latin America 038 Yugoslavian 046 Swedish 351...

Страница 39: ...o n Length No Motion Exit Feed 000 000 Calibratio n Length No Motion Exit 3 1 1 2 Printer Setup Printer Setup ZPL2 Dark ness Print Speed Tear Off Print Mode Print Width List Fonts List Images List For...

Страница 40: ...d which will overwrite the setting set from the front panel 3 1 1 2 2 Print Speed Print Setup 2 17 Darkness Print Speed Tear Off Use this option to setup print speed The each increment decrement is 1...

Страница 41: ...ble the setting Press key to cancel the setting and return to the previous menu Printer Mode Description Tear Off Next label top of form is aligned to the print head burn line location Peel Off Enable...

Страница 42: ...Images Print Setup 7 17 List Images List Formats List Setup This feature is used to print current printer available images list to the label The images stored in the printer s DRAM Flash or optional...

Страница 43: ...right digit and press the button to set the value from 0 to 9 or A to F Press the button to set the value into printer Press key to cancel the setting and return to the previous menu 3 1 1 2 11 Format...

Страница 44: ...g is No Motion When enter this list the print mode in the right side of icon is the printer current setting Press and to select the different print mode and press button to enable the setting Press ke...

Страница 45: ...e cursor from left digit to right digit and press the button to set the value from to or 0 to 1 2 Press the button to set the value into printer Press key to cancel the setting and return to the previ...

Страница 46: ...2 Gap Size 24 Intensity 3 Ref Level 512 3 1 2 2 Calibration This option is used to set the media sensor type and calibrate the selected sensor We recommend to calibrate the sensor before printing when...

Страница 47: ...ou will see following message and printer will feed 2 to 3 gap labels to calibrate the sensor sensitivity automatically When calibration is completed the LCD screen will return to the previous menu Ga...

Страница 48: ...nto the printer 3 Open the print head mechanism put the label backing liner under the media sensor Press the button to set the value into the printer 4 Then Put the label with liner under the media se...

Страница 49: ...d press the button to set the value from 0 to 9 and the dot mm inch Press the button to set the paper length into the printer 2 Press the button to move the cursor from left digit to right digit and p...

Страница 50: ...will return to the previous menu Bline Mode Automatic B 2 Manual In case Automatic sensor calibration cannot apply to the media please use Manual function to calibrate the bline sensor manually Bline...

Страница 51: ...t the value into the printer Note Normally the value of Ref Level for mark should be larger than paper for over 128 If the media sensor fails to do so you have to manually change the Intensity by pres...

Страница 52: ...n to set the value from 0 to 9 and the dot mm inch Press the button to set the paper length into the printer 2 Press the button to move the cursor from left digit to right digit and press the button t...

Страница 53: ...and printer will calibrate the sensor sensitivity automatically When calibration process is completed the LCD screen will return to the previous menu Cont Mode Automatic C 2 Manual In case Automatic...

Страница 54: ...calibration is complete Press the button the LCD screen will return to the previous menu 3 1 3 Serial Comm Serial Comm Baud Rate Parity Data Bits Stop Bit s Exit 1200 bps None 7 1 2400 bps Odd 8 2 480...

Страница 55: ...2 5 Baud Rate Parity Data Bits This option is used to set the RS 232 parity The default setting is None Press and buttons to select the different parity and press button to set the value into printer...

Страница 56: ...used to set the RS 232 Stop Bits The default setting is 1 stop bit Press and buttons to select the different Stop Bits and press button to set the value into printer When you enter this list the opti...

Страница 57: ...hen Ethernet card is installed Press and buttons to select the different options and press button to enter the option Press key to cancel the setting and return to the previous menu Ethernet Status Co...

Страница 58: ...tton to return to the previous menu 3 1 4 2 Configure DHCP Static IP Use this menu to set the printer s DHCP and Static IP 3 1 4 2 1 DHCP Ethernet 2 4 Status Configure Reset Press and buttons to selec...

Страница 59: ...buttons to select the different options and press button to enter the option Press key to cancel the setting and return to the previous menu IP Address 000 000 000 000 Press button to move the cursor...

Страница 60: ...File List Avail Memory Del All Files DRAM DRAM FLASH FLASH CARD CARD Exit Exit Exit 3 2 1 File List Use this menu to show delete and run BAS the files saved in the printer DRAM Flash Card memory To sh...

Страница 61: ...t 1 4 DRAM FALSH CARD Del All Files SELECT YES MENU NO 3 2 2 Avail Memory Use this menu to show available memory space File Manager 2 4 File List Avail Memory Del All Files 3 2 3 Del All Files Use thi...

Страница 62: ...57 WPL 406 User Manual 3 3 Diagnostics Diagnostics Print Config Dump Mode Rotate Cutter Exit...

Страница 63: ...mode all characters will be printed in 2 columns as following The left side characters are received from your system and right side data are the corresponding hexadecimal value of the characters It al...

Страница 64: ...an French Russian Polish Spanish Exit This option is used to setup the language on LCD display Press and buttons to scroll the curser to desire language and press button to select this option Press ke...

Страница 65: ...leage information 3 5 1 Initialization Service 1 3 Initialization Mileage Info Exit The printer settings are restored to defaults once printer is initialized Please refer to section 4 2 for default se...

Страница 66: ...commands to a printer With the aid of this powerful tool you can review printer status and settings in an instant which makes it much easier to troubleshoot problems and other issues 4 1 Start the Di...

Страница 67: ...he printer and restore the settings to factory default Dump Text To activate the printer dump mode Ignore AUTO BAS Ignore the downloaded AUTO BAS program Configuration Page Print printer configuration...

Страница 68: ...st printout Printer model name Main board firmware version Printer serial number Printed mileage Main board firmware checksum Serial port setting Code page Country code Print speed Print darkness Labe...

Страница 69: ...leage meter Cutting counter Print speed inch sec Print darkness Label size inch Gap distance inch Gap black mark sensor intension Code page Country code ZPL setting information Print darkness Print sp...

Страница 70: ...65 WPL 406 User Manual Numbers of download files Total available memory space Print head check pattern...

Страница 71: ...0 46 2C TEST4 DA 22 54 45 53 54 34 2E 44 41 T 5 CLS 54 22 2C 35 2C 43 4C 53 0D DOWNLOAD 0A 44 4F 57 4E 4C 4F 41 44 TEST2 D 20 22 54 45 53 54 32 2E 44 AT 5 CLS 41 54 22 2C 35 2C 43 4C 53 DOWNLOA 0D 0A...

Страница 72: ...interface 1 Connect the USB cable between the computer and the printer 2 Turn on the printer power 3 Start the Diagnostic Utility by double clicking on the icon Note This utility works with printer f...

Страница 73: ...licks on the icon Note This utility works with printer firmware V6 00 and later versions 4 Select COM as interface then click on the Setup button to setup the serial port baud rate parity check data b...

Страница 74: ...nd later versions 4 Select Ethernet as the interface then click on the Setup button to setup the IP address subnet mask and gateway for the on board Ethernet 5 Click the Discover Device button to expl...

Страница 75: ...IP button printer will reset to take effect the settings 8 Click Exit button to exit the Ethernet interface setup and go back to Diagnostic Tool main screen Factory Default button This function will...

Страница 76: ...DiagTool shows Out of Paper The LCD shows No Paper Running out of label The label is installed incorrectly Gap black mark sensor is not calibrated Supply a new label roll Please refer to the steps on...

Страница 77: ...cable Ribbon and media are not compatible Verify the ribbon inked side Reload the ribbon again Clean the printhead The print density setting is incorrect Printhead s harness connector is not well con...

Страница 78: ...ndex higher pressure If the pressure adjustment knob has been adjust to index 5 and the poor print quality is still at the right side of the printout pressure adjustment knob to index 1 and use the Z...

Страница 79: ...r right side of label Wrong label size setup Set the correct label size RTC time is incorrect when reboot the printer The battery has run down Check if there is a battery on the main board Power and E...

Страница 80: ...Ribbon wrinkle is related to the media thickness print head pressure balance ribbon film characteristics print darkness setting etc In case the ribbon wrinkle happens please follow the instructions b...

Страница 81: ...ght side print head pressure adjustment knob setting 1 level per each adjustment then print the label again to check if wrinkle is gone 2 If the right side print head adjustment knob setting has been...

Страница 82: ...changing a new label roll Platen Roller 1 Turn the power off 2 Rotate the platen roller and wipe it thoroughly with 100 ethanol and a cotton swab or lint free cloth Clean the platen roller when chang...

Страница 83: ...78 WPL 406 User Manual...

Отзывы: