


t. Release the tension on the wire rope. The winch is not meant to hold the vehicle for
long periods of time.
u. Disconnect the wire rope from the anchor.
v. Rewind the wire rope. Make sure that any wire already on the drum has spooled
tightly and neatly. If not, draw out the wire and re-spool from the point where the rope
is tight.
w. Keep your hands clear of the winch drum and fairlead as the wire rope is being
drawn in.
x. Secure the hook and hook strap.
y. Disconnect the remote control and store in a clean, dry place.
z. Clean and inspect connections and mounting hardware for next winching operation.
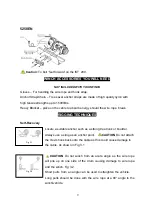
WINCH ASSEMBLY AND MOUNTING
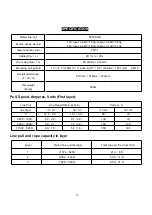
1. Your winch is designed with a bolt pattern that is standard in this class of winch.
Many winch mounting kits are available that utilize this bolt pattern for the
popular vehicles and mounting channels.
If you will utilize the mounting
channel you must ensure that it is mounted on a flat surface so that the three
major sections (motor, drum and gear housing) are properly aligned. Proper
alignment of the winch will allow even distribution of the full rated load.
If your winch choices the mounting channel. Start by connecting the roller
fairlead (Part# N1750900) to the mounting channel using 2 each of the cap
screw M12 X 30 (Part# N1750022), lock washer (Part# N1750021) and
securing (Make sure the screw is placed through the mounting channel and
roller fairlead from inside the channel. This will allow enough clearance for the
winch to be placed in the channel without obstruction.)
Assemble the winch to the mounting channel or vehicle bump base by first
pulling and releasing the clutch knob to the “CLUTCH OUT” position (free
spooling). Pull out a few inches of cable from the drum and feed the wire loop
through the opening in the front of the mounting channel and roller fairlead.
Now, using the remaining M12 x 35 cap screws (Part# N1750020) and lock
washer (Part# N1750021) secure the winch to the mounting channel.
Connect the winch motor leads as detailed below:
2.
3.
4.
7
Содержание 5250EN
Страница 1: ...ELECTRICAL WINCH 5250EN Assembly Operating Instructions...
Страница 15: ...WINCH ASSEMBLY DRAWING 5250EN 13...