background image

COMBO-401 i/501 i

OPERATOR’S MANUAL

14

Table 1:

Thicknes

s

(mm)

Length

(mm)

Wire

diameter

(mm)

Welding

current

(A)

Welding

voltage

(V)

Welding

speed

(cm/Min)

Stick

out

(mm)

Gas flow

(L/ Min)

T

ty

p

e

w

el

d

in

g

S

lo

w

sp

e

ed

1.0

2.5

3

0.8

70

80

17

18

50

60

10

10

15

1.2

3

3.5

1.0

85

90

18

19

50

60

10

10

15

1.6

3

3.5

1.0,1.2

100

110

18

19.5

50

60

10

10

15

2.0

3

3.5

1.0,1.2

115

125

19.5

20

50

60

10

10

15

2.3

3

3.5

1.0,1.2

130

140

19.5

21

50

60

10

10

15

3.2

3.5

4

1.0,1.2

150

170

21

22

45

50

15

15

20

4.5

4.5

5

1.0,1.2

180

200

23

24

40

45

15

15

20

6

5

5.5

1.2

230

260

25

27

40

45

20

15

20

8, 9

6

7

1.2,1.6

270

380

29

35

40

45

25

20

25

12

7

8

1.2,1.6

300

380

32

35

35

40

25

20

25

H

ig

h

sp

e

ed

1.0

2

2.5

0.8

140

19

20

150

10

15

1.2

3

0.8

140

19

20

110

10

15

1.6

3

1.0, 1.2

180

22

23

110

10

15

20

2.0

3.5

1.2

210

24

110

15

20

2.3

3.5

1.2

230

25

100

20

25

3.2

3.5

1.2

260

27

100

20

25

4.5

4.5

1.2

280

30

80

20

25

6

5.5

1.2

300

33

70

25

25

P

u

t

u

p

w

el

d

(t

h

in

p

la

te

)

S

lo

w

sp

ee

d

0.8

0.8

60

70

16

17

40

45

10

10

15

1.2

0.8

80

90

18

19

45

50

10

10

15

1.6

0.8

90

100

19

20

45

50

10

10

15

2.3

0.8

100

130

20

21

45

50

10

10

15

1.0,1.2

120

150

20

21

45

50

10

10

15

3.2

1.0,1.2

150

180

20

22

35

45

10

15

10

15

4.5

1.2

200

250

24

26

40

50

10

15

10

15

H

ig

h

sp

ee

d

2.3

3.2

1.2

220

24

150

15

25

300

26

250

15

25

C

o

rn

e

r

w

el

d

S

lo

w

sp

ee

d

1.6

0.8

65

75

16

17

40

45

10

10

15

2.3

0.8

80

100

19

20

40

45

10

10

15

3.2

1.0, 1.2

130

150

20

22

35

40

15

10

15

4.5

1.0, 1.2

150

180

21

23

30

35

15

10

15

Содержание COMBO-401 i

Страница 1: ...COMBO 401 i 501 i Inverter CO2 MIG MAG Gas Shield Welding Machines OPERATOR S MANUAL PLEASE READ CAREFELLY BEFORE OPERATION ...

Страница 2: ...allation DO NOT INSTALL OPERATE OR REPAIR THIS EQUIPMENT WITHOUT READING THIS MANUAL AND FOLLOWING THE SAFETY PRECAUTIONS CONTAINED THROUGHOUT Special Attention Very Important PLACE THE MACHINE ON A PROPER PLANE SO THAT THE MACHINE DOES NOT SLIP PLEASE KEEP THE MACHINE AWAY FROM RAIN UNDER PROPER ROOFING Purchase Date Serial Number Machine Type Purchase Place Cautions Arc and arc rays may harm hea...

Страница 3: ...pose themselves to the arc rays or to hot spatter or metal 3 Fumes and Gases can be dangerous Welding may produce fumes and gases hazardous to health Avoid breathing these fumes and gases While working in limited room use enough ventilation and or exhaust to keep fumes and gases away from the breathing zone or use the respirator Shielding gases used for arc welding can displace air and cause injur...

Страница 4: ...e to fans and do not move the brake handle while operating Please remove the connection between the engine and the welding equipment to avoid sudden starting during maintenance s When engine is hot it is forbidden to open the airtight cover of the radiator water tank to avoid hurt by the hot vapor 8 Electromagnetic Welding current going though any area can generate electromagnetic as well as the w...

Страница 5: ...juster 3 Directions of the manual welding mode 11 4 Directions of the Gas shielded Welding mode 11 Checking items methods and requests preparations before operation 4 1 1 Wears of safeguards 4 1 2 Checking after connections 4 1 3 Operation of switches adjustment of gas flux 4 1 4 Installation of the welding wire 4 2 Directions of the basic welding 4 2 1 Welding operation with crater function 4 2 2...

Страница 6: ... shock make sure the grounded bolt of the power source is grounded well use proper personal protection equipment To prevent injury of your eyes and skin from the ultraviolet radiation strong sparks and splash please make sure to use proper personal protection equipment like helmet hand gloves apron etc Protection against welding fume The gases and fumes produced by welding are hazardous to health ...

Страница 7: ...t will be cut automatically After the voltage is back to normal the machine will work again 7 Over heat indicator lamp If it runs beyond excess of its rated duty cycle or in a high temperature environment the thermal sensor s temperature achieves 75 5 the heat protection circuit will work and the heat indicator LED will glow the output current will be cut off Wait until the machine cool down and L...

Страница 8: ...ve ground line well 19 Adjustment knob of welding current To adjust the welding current 20 Adjustment knob of welding voltage To adjust the welding voltage 21 Manual wire feeding button Press the button the wire feeder begins to feed wire The speed of wire feeding can be adjusted by the welding current adjustment knob While using thinner wire the feeding speed should be slowed down to avoid distor...

Страница 9: ...COMBO 401 i 501 i OPERATOR S MANUAL 8 ...

Страница 10: ...ther side to workpiece with bolts Insert the aviation plug six cores of control cable into the control socket six cores of wire feeder then tighten the ring nut connect the other side of control cable to wire feeder 2 3 2 Connections of the power source wire feeder and welding torch please refer to figure 1 Methods and requirements Make sure the power switch is cut off before connecting Wire feede...

Страница 11: ...re s type and the welding diameter as per requirement by respective switch to meet the type and diameter of welding wire Fourth turn the Gas supply switch to check position Fifth turn on the gas valve of the cylinder and then adjust the knob of the flow meter slowly to meet the value needed Sixth turn the gas supply switch to welding position 4 1 4 Installation of the welding wire For the identifi...

Страница 12: ...into the self lock state Simultaneously you can adjust the welding voltage adjustment knob and welding current adjustment knob for the best welding performance c When welding is finishing press the welding torch switch again and it come into crater adjustment state Then set the crater voltage and current by adjusting the relative knobs on the welding power panel or adjust them to the needed values...

Страница 13: ...ltage drop b When lengthening the cable get the cable with higher cross section area c When lengthening cable place the cable straight don t make in coil form 6 Technique conditions 6 1 Technical parameters TYPE PARAMETER COMBO 401 i COMBO 501 i Shield rank IP21S Rated input voltage Three phase power 3 415VAC 50Hz Rated input capacity 16 5KVA 26 3KVA Gas shield welding Output current 60 400A 60 50...

Страница 14: ...ltage and current crater voltage and current at the end of the welding To guaranteed better arc striking every time the wire feeding is normally done at lower speed When the torch trigger is pressed irrespective of the current wire speed set wire will be fed slowly and it switches over to the set speed once the arc is struck What is burn back time After welding wire feeder is not stop even if the ...

Страница 15: ...2 1 6 300 380 32 35 35 40 25 20 25 High speed 1 0 2 2 5 0 8 140 19 20 150 10 15 1 2 3 0 8 140 19 20 110 10 15 1 6 3 1 0 1 2 180 22 23 110 10 15 20 2 0 3 5 1 2 210 24 110 15 20 2 3 3 5 1 2 230 25 100 20 25 3 2 3 5 1 2 260 27 100 20 25 4 5 4 5 1 2 280 30 80 20 25 6 5 5 1 2 300 33 70 25 25 Put up weld thin plate Slow speed 0 8 0 8 60 70 16 17 40 45 10 10 15 1 2 0 8 80 90 18 19 45 50 10 10 15 1 6 0 8 ...

Страница 16: ...tor plugs at the both ends of the control cable whether the welding cable is connected properly and the workpiece is connected tightly Whether the torch switch and the wire connected are damaged or open circuit whether the nozzle conduct tip conduct tip s seat and shunt are burned out and damaged Thick ness mm Wire diameter mm Root gap G mm Welding current A Welding voltage V Welding speed cm Min ...

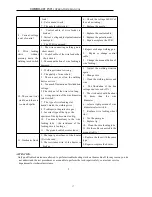
Страница 17: ...r some time 2 Check the fans power or change cooling fans 3 Replace temperature relay 5 Welding wire feeder works but there is no wire feeding or the feeding isn t stable 1 Wire press wheel is not pressed tightly 2 The type of wire feeding slot doesn t match the welding wire 3 The tip is jammed because of the spatters 4 The wire feeding roller is damaged 5 The wire feeding tube of the welding torc...

Страница 18: ... of the wire diameter select switch 7 The type of wire feeding slot doesn t match the welding wire 8 Problems in the protective gas 9 Incorrect type of the tip or the aperture of the tip becomes too big 10 Too much feculency in the wire feeding tube the resistance of the feeding wire is too large 11 The ground cable becomes loose 1 Adjust the welding criterion again 2 Change wire 3 Clean the weldi...

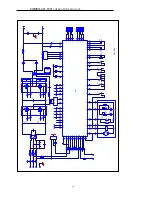
Страница 19: ...4 52 51 50 49 PV1 69 70 71 72 G2 E2 G1 E1 G4 E4 G3 E3 24 25 G1 G2 G3 G4 G1 G2 G3 G4 E1 E2 E3 E4 E1 E2 E3 E4 1 2 3 4 5 6 7 8 9 10 11 27 13 14 15 16 17 18 19 20 21 22 23 24 25 AP1 NB IGBT风 风 风 风 风 风 ZX7 AP4 79 68 67 45 27V 27V 8V 26V 47 46 风 风 风 风 风 RT1 RA 10K RB 390 2 SB1 SB2 DA 1N4007 DB 1N4007 RC 4 7K RP5 5K RP4 5K 风 风 风 风 风 风 风 风 A MG1 YV1 1 2 6 4 5 3 77 53 66 83 42 78 风 风 风 42 SA1 风 风 43 82 R4 ...

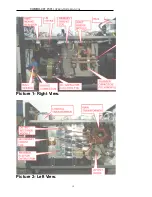
Страница 20: ...COMBO 401 i 501 i OPERATOR S MANUAL 19 Picture 1 Right View Picture 2 Left View ...

Страница 21: ...COMBO 401 i 501 i OPERATOR S MANUAL 20 Picture 3 Top View Picture 4 Front View ...

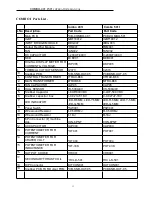
Страница 22: ...TRX B68 13 FAN CAPACITOR CAP05 CAP05 14 HALL SENSOR CS 500A 4V CS 500A 4V 15 Snubber Capacitor C 8UF 800VDC C 4UF 500 VDC 16 Snubber capacitor box C 0 027uF 1KV C 0 027uF 1KV 17 LED INDICATOR LED R 5MM LED Y 5MM LED G 5MM LED R 5MM LED Y 5MM LED G 5MM 18 Panel Switch PSW001 PSW001 19 Wire wound Resistor R 0 5OHMJ R 0 5OHMJ 20 Wire wound Resistor R 1KJ R 1KJ 21 6 Pin Connector F machine side CON 6P...

Страница 23: ...TAGE POT001 POT001 5 POTENTIOMETER FOR WELDING CURRENT POT001 POT001 6 INCHING SWTTCH INCSW001 INCSW001 7 SPOOL HOLDER SPOOL HOLDER 001 SPOOL HOLDER 001 Head Office Warpp Engineers Pvt Ltd Manufacturers of Welding And Related Plasma Products Unit no 5 6 Rajprabha Meenakshi Industrial Estate no 3 Near Mohan Bhagat School Naik Pada Waliv Phata Vasai E District Palghar Pin 401208 TEL 08551819944 8551...

Отзывы: