background image

©2021 Warn Industries, Inc. WARN® and the WARN logo are trademarks of Warn Industries Inc.

 4 

100243A1

I N S T A L L A T I O N   I N S T R U C T I O N S

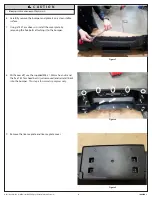
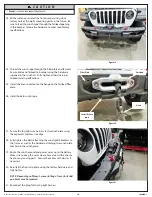
1.  Remove fascia plate, located behind the bumper, by using a 

small screwdriver to pry the two clips (one on each side) up 

and out of plate.  

NOTE:  You will not be reinstalling fascia 

plate.

2.  Using a 13mm socket, remove bolts securing skid plate to 

bumper and frame.  


Once all bolts (7 total) are removed, remove skid plate 

completely.  

NOTE:  Retain hardware for when the skid plate 

is reinstalled.


Figure 1

Figure 2

Figure 3

Содержание 101255

Страница 1: ...iringandelectricalterminals Alwaysinstallterminalbootsasdirectedininstallationinstructions Alwaysuseappropriateandadequatecareinliftingcomponentsintoplace Alwaysinsurecomponentswillremainsecureduringinstallationandoperation Alwaystightenallnutsandboltssecurely pertheinstallationinstructions Alwaysperformregularinspectionsandmaintenanceontheplowmechanism fasteners cableandrelatedhardware Alwaysrepl...

Страница 2: ...enance Care page 11 T O O L S R E Q U I R E D Standard wrenches Standard sockets Hacksaw Blade with Handle fine tooth N O T I C E EQUIPMENT DAMAGE Nevertowvehiclebyattachingatowbartotheeyeletsonthebumper Neverattachtowbarsdirectlytothebumper Damagetobumpermayoccur WARNbumpersarenotdesignedtobeusedforflattowing Consultwiththemanufacturerofyourtowbarsystemforthepropervehicletow barbrackets Read inst...

Страница 3: ...ART NO QTY Description A1 101251 1 WINCH PLATE A2 101304 1 LH WINCH PLATE BRACKET A3 101303 1 RH WINCH PLATE BRACKET A4 101305 2 WINCH PLATE SPACER A5 101256 1 FILLER PLATE B1 81707 4 M10 X 1 5 X 40 CARRIAGE BOLT B2 87166 4 M10 X 1 5 FLANGE ELASTIC NUT B3 79146 5 M8 X 1 25 HEX FLANGE NUT not shown A1 A2 A3 A4 A4 A5 B2 B1 ...

Страница 4: ...ehind the bumper by using a small screwdriver to pry the two clips one on each side up and out of plate NOTE You will not be reinstalling fascia plate 2 Using a 13mm socket remove bolts securing skid plate to bumper and frame Once all bolts 7 total are removed remove skid plate completely NOTE Retain hardware for when the skid plate is reinstalled Figure 1 Figure 2 Figure 3 ...

Страница 5: ...cket to remove the nuts 8 total from the OE bumper a From the outside of the bumper remove the two nuts both sides b From the inside of the frame remove the two nuts both sides 5 Remove the frame horn bolt holding the inner frame support gussets and remove the gusset NOTE The gussets and hardware will not be reused I N S T A L L A T I O N I N S T R U C T I O N S Figure 5 Figure 6 Figure 4 Inner gu...

Страница 6: ...install the cover plate by removing the five bolts attaching it to the bumper 8 With cover off use the supplied M8 x 1 25mm hex nuts and the five T45 Torx head bolts just removed and reinstall back into the bumper This step is for cosmetic purposes only 9 Remove the license plate and license plate cover C A U T I O N Alwaysuseassistancewhenmovingorliftingheavyparts Figure 9 Figure 7 Figure 8 ...

Страница 7: ...all flat head screwdriver to pry wire harness clips upward 12 Disconnect fog light harness Christmas tree clips from the bumper NOTE The wire will hang loosely but will later be secured to winch plate 13 Remove the four bolts two on each side that attach the two skid plate mounting brackets to the frame NOTE Retain hardware and brackets for winch plate bracket installation Figure 10 Figure 11 Skid...

Страница 8: ... Do not fully tighten the hardware at this time 15 Install the winch plate onto the winch plate brackets using the supplied M10x1 5 carriage bolts and hex nuts Do not fully tighten the fasteners at this time 16 Thread the supplied zip ties through the indicated holes on the wings of the winch plate and through the frame Start the zip tie but do not fully tighten it Figure 13 Figure 14 Figure 15 Sk...

Страница 9: ...sing the hardware supplied in your winch kit 19 Refer to the winch specific install torque specifications to fully tighten the hardware 20 Disengage the winch and spool out approximately 1 foot of winch rope 21 Check mounting hole alignment Once confirmed tighten zip ties in order to keep the holes aligned while mounting Trim off excess of zip tie 22 Place which plate spacers onto each of the oute...

Страница 10: ...26 Install hook to winch rope 27 Secure the fog light wire harness to the winch plate using the exposed christmas tree clips 28 Fully tighten the bolts attaching the winch plate brackets to the frame as well as the hardware attaching the winch plate brackets to the winch plate 29 Route the winch ground and power wires up to the battery Make sure to keep the wires clear of any areas with extreme he...

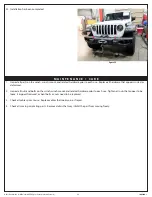
Страница 11: ...t appears rusted or deformed 2 Inspect all nuts and bolts on the winch winch mount and related hardware prior to each use Tighten all nuts that appear to be loose Stripped fractured or bent bolts or nuts need to be replaced 3 Check all cables prior to use Replace cables that look worn or frayed 4 Check all moving or rotating parts Remove debris that may inhibit the part from moving freely 32 Insta...

Отзывы: