Warmup Luxury 2 LUXY2D44 Скачать руководство пользователя страница 5

IF AFTER THE ABOVE SETTINGS HAVE BEEN COMPLETED

BUT..

THE SCREEN INDICATES AN ERROR MESSAGE

IF the floor sensor has not been connected
The thermostat needs to be programmed for monitoring the
Air (Room) temperature.

E2:  ERROR MESSAGE

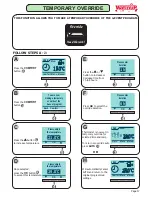
THESE SIMPLE STEPS NEED TO BE FOLLOWED:

FOLLOW STEPS A - H:

Press the Menu button

E2:

External floor sensor

error

Menu

4

4

5

OK

4-Event settings

Press the     button

5

5

Press the     button

5

User settings

OK

Press the       button

4

OK

4

Engineer settings

OK

5

Press the     button

5

Offset temp.

OK

5

Press the     button

5

Adaptive function

OK

Press the       button

4

OK

4

Application

OK

5

Press the     button

5

Application

OK

Room/limit

Regulator

Room

Press the       button

4

OK

4

Application

OK

Room

Room/limit

Floor

A

B

C

D

H

G

F

E

Important

Page 3

Содержание Luxury 2 LUXY2D44

Страница 1: ...LUXURY 2 USER MANUAL Copyright reserved 1985 Heatsolve SA PTY Ltd Warmup 1 5 2011 T A C ISO 9001 2000 QUALITY ENERGY EFFICIENT...

Страница 2: ...ry pre set events 13 Events can be changed to suit ones lifestyle 14 The room temperature can be temporarily changed 15 Safe and reliable international approvals 16 3 year warranty 17 Energy efficient...

Страница 3: ...vent Programmable Clock Thermostat ENERGY EFFICIENT 7 8 9 1 2 6 3 4 5 10 On Off slide switch Mode selection Temperature 2 pole Isolator switch Down right selection OK selection Current event Day Time...

Страница 4: ...0 using the or 17 3 confirm with button 5 5 OK confirm with button 5 OK 4 21 09 2010 Date OK confirm with button OK Choose the month 09 using the or 21 2010 3 4 confirm with button 5 OK Choose the yea...

Страница 5: ...OW STEPS A H Press the Menu button E2 External floor sensor error Menu 4 4 5 OK 4 Event settings Press the button 5 5 Press the button 5 User settings OK Press the button 4 OK 4 Engineer settings OK 5...

Страница 6: ...HE PRE PROGRAMMED TEMPERATURE SETTINGS 6 00 8 00 8 00 16 00 16 00 23 30 22 30 6 00 6 00 23 00 23 00 8 00 DAY 1 5 DAY 6 7 TIME WITH FLOOR SENSOR WITH ROOM SENSOR EVENT TIME WITH FLOOR SENSOR WITH ROOM...

Страница 7: ...F E Page 5 APPLICATION SETTINGS SETTING THE THERMOSTAT TO FUNCTION USING FLOOR OR AIR ROOM OR FLOOR AND AIR OR USED AS A REGULATOR Once a selection has been made for ether a FLOOR or ROOM or ROOM LIMI...

Страница 8: ...ettings Press the button 4 OK G 4 OK 4 Event schedule 4 5 Press the button to view next schedule 5 UP TYPICALLY USED IF ONE WORKS FROM MONDAY TO FRIDAY Schedule OK 5 2 Mon Fri 4 event Sat Sun 2 event...

Страница 9: ...OK 4 Event settings A 4 Press the button 4 OK Days OK Mon Fri Sat Sun Exit B CHOOSE THE DAYS YOU WANT TO CHANGE Press the button 4 OK 4 Time OK 06 00 00 00 23 45 Min Max D 3 5 SELECT THE TIME THE HEA...

Страница 10: ...ng 4 Time OK 8 30 6 00 Min 23 45 Max 2 3 3 5 SELECT THE TIME YOU WANT THE HEATING TO BE OFF Press the button Press the button to adjust time EARLIER to adjust time LATER 3 5 Press the button 4 OK OR T...

Страница 11: ...OU WANT THE HEATING TO BE OFF Press the button Press the button to adjust time EARLIER to adjust time LATER 3 5 Press the button 4 OK OR THEN Temp OK 20 0 C o 5 0 C o Min o 40 0 C Max SET THE TEMPERAT...

Страница 12: ...st time EARLIER to adjust time LATER 3 5 Press the button 4 OK OR THEN Temp OK 15 0 C o 5 0 C o Min o 40 0 C Max SET THE TEMPERATURE FOR EVENING EVENT 3 5 Press the button Press the button to adjust t...

Страница 13: ...ar Energy OK ZAR Euro Euro 4 Press the button 4 OK Q 5 Load OK 1 0kW Press the button 5 N 5 Cost unit OK 0 00 O 5 Press the button to set current kWh price of electricity Once selected press OK 5 Cost...

Страница 14: ...Event settings Press the button Press the button 5 5 User settings OK Press the button 4 OK 5 5 Press the button 5 Press the button 5 OK A B C D G F E OK Time and date OK Child lock 5 5 4 Press the bu...

Страница 15: ...e button 5 OK Page 13 OK Display settings OK 4 Event schedule 4 VIEW ENERGY CONSUMPTION THIS FUNCTION WILL ALLOWS YOU TO VIEW ENERGY CONSUMPTION FOR THE PAST 2 DAYS 30 DAYS OR 365 DAYS THESE SIMPLE ST...

Страница 16: ...n will display of kilowatt and Rand value used for the month Press the button to view next screen NEXT 5 J Energy Back Energy consumption for the last month 0 0 KWh 0 00 Zar Exit Next VIEW ENERGY CONS...

Страница 17: ...OK 4 Event settings Press the button Press the button 5 5 User settings OK 4 Press the button 4 OK 5 5 Press the button 5 Press the button 4 OK 4 Child lock Child lock OK OK Off On On Off A B C D G F...

Страница 18: ...OK Display settings 4 5 5 DISPLAY SETTINGS G H Follow the Steps 4 4 4 4 Press the button to view next schedule 5 UP Press the button to accept the Screen saver to show on the screen then select ON 4 O...

Страница 19: ...3 3 TEMPORARY OVERRIDE Need Warmth Override press the button to accept this temperature 4 OK Press the button COMFORT 4 5 5 4 4 C D E F Please adjust Please adjust Please enter Please enter the temper...

Страница 20: ...stat THESE SIMPLE STEPS NEED TO BE FOLLOWED FOLLOW STEPS A H Press the Menu button 4 4 5 OK 4 Event settings Press the button 5 5 Press the button 5 User settings OK Press the button 4 OK 4 Engineer s...

Отзывы: