background image

3

yr

Guarantee

Dual Sensor

3

1

4

2

5

8

7

The LUXURY 2

Quick Reference Guide:

4- Event Programmable Clock Thermostat

STOCK CODE:   LUXY2D44

STOCK CODE:   LUXY2D24

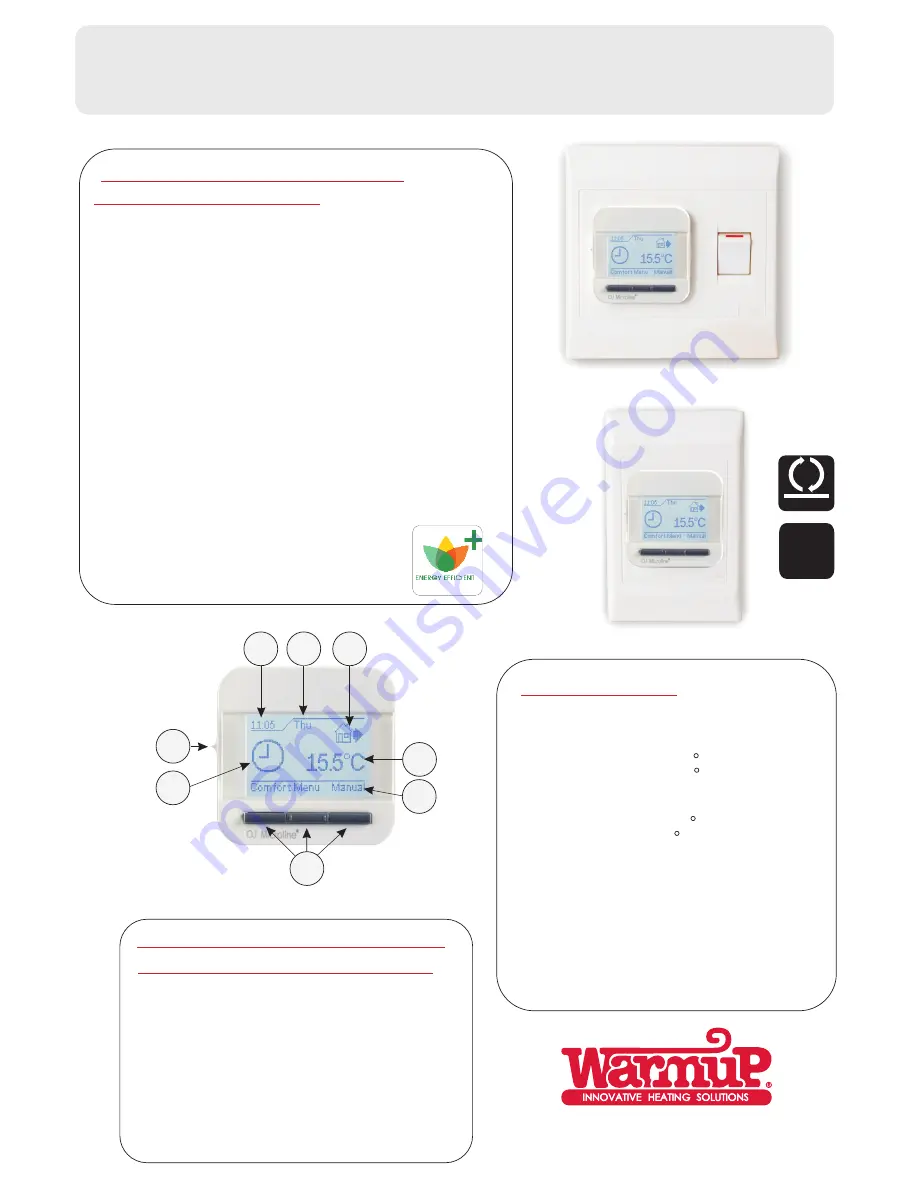
An intuitive menu guides you

through the setting process:

1.    On/Off
2.    Current time
3.    Day of the week
4.    4-Event schedule
5.    Current set temperature
6.    Menu guides
7.    Navigation buttons
8.    Auto or manual mode symbol

18 Important facts about the

Luxury 2 thermostat:

1.    Easy to install.
2. Simple to use.
3.    Intuitive menu guides you through the setting process.
4.    Comfortable floor temperature at required time.
5.    Modern and attractive.
6.    10 year battery backup.
7.    You never need to reset after power interruption.
8. Child lock.
9.    Built-in clock and calendar.
10.  Dual sensor (Air/Floor or use as regulator).
11.  Full compatibility with existing floor sensors.

12.  Factory pre-set events.
13.  Events can be changed to suit ones lifestyle.
14.  The room temperature can be temporarily changed.
15.  Safe and reliable, international approvals.
16.  3 year warranty.
17.  Energy eff.
18.  Saving money.

6

4 Richard Road, Industria North, Roodepoort, Gauteng, Tel: 011 673 5063, Fax: 011 673 4827, Toll Free: 0800 00 65 65

3 Thor Circle, Viking Place, Thornton, Cape Town, Tel: 021 531 1896, Fax: 021 532 0741

website: www.warmup.co.za, [email protected] / [email protected]

Technical data:

Supply Voltage:                    230 V AC +-10% 50/60 Hz
Output relay:                        16A
Interrupter:                           2 Pole isolator 16A (4x4 only)
Temperature range:            +5/+40  C
Floor limit range:                 +5/+40  C
Clock function:                     4-event program
Battery backup:                    10 Years
Ambient temperature:        0/+40  C during operation
On/Off differential:             0.4  C
Protective housing:             IP 21  (ingress protection)
Housing:                                Flush mount, total depth 40mm
Dimensions:                          4X4 (127mm x 127mm)

2x4 (80mm x 127mm)

Display:                                  Size 100 x 64 with backlight
Electronic:                             Programmable
Sensor:                                   Floor

or                                        Air
or                                        Dual (Air & Floor)
or                                        Regulator

Содержание Luxury 2 LUXY2D24

Страница 1: ...LUXURY 2 USER MANUAL Copyright reserved 1985 Heatsolve SA PTY Ltd Warmup 1 5 2011 T A C ISO 9001 2000 QUALITY ENERGY EFFICIENT ...

Страница 2: ...ory pre set events 13 Events can be changed to suit ones lifestyle 14 The room temperature can be temporarily changed 15 Safe and reliable international approvals 16 3 year warranty 17 Energy efficient 18 Saving money 6 4 Richard Road Industria North Roodepoort Gauteng Tel 011 673 5063 Fax 011 673 4827 Toll Free 0800 00 65 65 3 Thor Circle Viking Place Thornton Cape Town Tel 021 531 1896 Fax 021 5...

Страница 3: ...Event Programmable Clock Thermostat ENERGY EFFICIENT 7 8 9 1 2 6 3 4 5 10 On Off slide switch Mode selection Temperature 2 pole Isolator switch Down right selection OK selection Current event Day Time Auto mode Up left selection 11 7 8 9 1 2 6 3 4 5 10 11 Page 1 ...

Страница 4: ...20 using the or 17 3 confirm with button 5 5 OK confirm with button 5 OK 4 21 09 2010 Date OK confirm with button OK Choose the month 09 using the or 21 2010 3 4 confirm with button 5 OK Choose the year 2010 using the or 21 09 3 4 confirm with button 5 OK 4 5 Choose the actual date 21 using the or 09 2010 3 ACTUAL DATE MONTH AND YEAR MUST BE SET 2 THE LUXURY 2 THERMOSTAT MAY BE USED ETHER AS A FLO...

Страница 5: ...LOW STEPS A H Press the Menu button E2 External floor sensor error Menu 4 4 5 OK 4 Event settings Press the button 5 5 Press the button 5 User settings OK Press the button 4 OK 4 Engineer settings OK 5 Press the button 5 Offset temp OK 5 Press the button 5 Adaptive function OK Press the button 4 OK 4 Application OK 5 Press the button 5 Application OK Room limit Regulator Room Press the button 4 OK...

Страница 6: ...THE PRE PROGRAMMED TEMPERATURE SETTINGS 6 00 8 00 8 00 16 00 16 00 23 30 22 30 6 00 6 00 23 00 23 00 8 00 DAY 1 5 DAY 6 7 TIME WITH FLOOR SENSOR WITH ROOM SENSOR EVENT TIME WITH FLOOR SENSOR WITH ROOM SENSOR EVENT Day Day Home Night Out Out 25 C 25 C 25 C 20 C 20 C 20 C 20 C 21 C 21 C 15 C 15 C 15 C THE PRE PROGRAMMED 4 EVENT SCHEDULE THE 4 EVENTS FOR ECONOMIC CONTROL When you wake up in the morni...

Страница 7: ... F E Page 5 APPLICATION SETTINGS SETTING THE THERMOSTAT TO FUNCTION USING FLOOR OR AIR ROOM OR FLOOR AND AIR OR USED AS A REGULATOR Once a selection has been made for ether a FLOOR or ROOM or ROOM LIMIT AIR FLOOR REGULATOR or Press the button OK 4 IF the FLOOR or AIR FLOOR ROOM LIMIT selection has been made a floor sensor must be connected Important THESE SIMPLE STEPS NEED TO BE FOLLOWED FOLLOW ST...

Страница 8: ...settings Press the button 4 OK G 4 OK 4 Event schedule 4 5 Press the button to view next schedule 5 UP TYPICALLY USED IF ONE WORKS FROM MONDAY TO FRIDAY Schedule OK 5 2 Mon Fri 4 event Sat Sun 2 event 4 EVENT SCHEDULE H Follow the Steps Press the button to accept this schedule 4 OK 4 OR 5 Press the button to view next schedule 5 UP Schedule OK 6 1 Mon Sat 4 event Sun 2 event I Press the button to ...

Страница 9: ...E OK 4 Event settings A 4 Press the button 4 OK Days OK Mon Fri Sat Sun Exit B CHOOSE THE DAYS YOU WANT TO CHANGE Press the button 4 OK 4 Time OK 06 00 00 00 23 45 Min Max D 3 5 SELECT THE TIME THE HEATING SHOULD BE ON Press the button Press the button to adjust time EARLIER to adjust time LATER 3 5 Press the button 4 OK OR THEN Temp OK 20 0 C o 5 0 C o Min o 40 0 C Max E SET THE TEMPERATURE FOR T...

Страница 10: ...ing 4 Time OK 8 30 6 00 Min 23 45 Max 2 3 3 5 SELECT THE TIME YOU WANT THE HEATING TO BE OFF Press the button Press the button to adjust time EARLIER to adjust time LATER 3 5 Press the button 4 OK OR THEN Temp OK 15 0 C o 5 0 C o Min o 40 0 C Max SET THE TEMPERATURE FOR DAYTIME EVENT 3 5 Press the button Press the button to adjust tem DOWN to adjust temp UP 3 5 Press the button 4 OK OR THEN SECOND...

Страница 11: ...YOU WANT THE HEATING TO BE OFF Press the button Press the button to adjust time EARLIER to adjust time LATER 3 5 Press the button 4 OK OR THEN Temp OK 20 0 C o 5 0 C o Min o 40 0 C Max SET THE TEMPERATURE FOR EVENING EVENT 3 5 Press the button Press the button to adjust tem DOWN to adjust temp UP 3 5 Press the button 4 OK OR THEN 3 When you return home floor will be warm THIRD EVENT EVENING ON tim...

Страница 12: ...ust time EARLIER to adjust time LATER 3 5 Press the button 4 OK OR THEN Temp OK 15 0 C o 5 0 C o Min o 40 0 C Max SET THE TEMPERATURE FOR EVENING EVENT 3 5 Press the button Press the button to adjust tem DOWN to adjust temp UP 3 5 Press the button 4 OK OR THEN FOURTH EVENT NIGHT OFF time 4 4 When you go to bed at night floor in setback mode When you go to bed at night floor in setback mode Event O...

Страница 13: ...ear Energy OK ZAR Euro Euro 4 Press the button 4 OK Q 5 Load OK 1 0kW Press the button 5 N 5 Cost unit OK 0 00 O 5 Press the button to set current kWh price of electricity Once selected press OK 5 Cost unit OK 0 75 Press the button to select the kW size of the heater installed Then press OK 5 R 5 Page 12 Energy OK Back Press the button to select Exit Then press OK 5 P 4 Energy OK Load Press the bu...

Страница 14: ... Event settings Press the button Press the button 5 5 User settings OK Press the button 4 OK 5 5 Press the button 5 Press the button 5 OK A B C D G F E OK Time and date OK Child lock 5 5 4 Press the button 5 OK Page 11 OK Display settings OK Energy monitor OK 4 Event schedule 4 Press the button 4 OK 5 Press the button 5 UP Energy OK 2 days Month Exit ENERGY MONITOR SETTINGS H Follow the Steps ...

Страница 15: ...he button 5 OK Page 13 OK Display settings OK 4 Event schedule 4 VIEW ENERGY CONSUMPTION THIS FUNCTION WILL ALLOWS YOU TO VIEW ENERGY CONSUMPTION FOR THE PAST 2 DAYS 30 DAYS OR 365 DAYS THESE SIMPLE STEPS NEED TO BE FOLLOWED FOLLOW STEPS A R Press the Menu button Menu 4 4 Heating cost FOLLOW STEPS A G G 4 OK Energy monitor Press the button 4 OK 4 Press the button 4 OK Energy OK 2 days Month Exit H...

Страница 16: ...en will display of kilowatt and Rand value used for the month Press the button to view next screen NEXT 5 J Energy Back Energy consumption for the last month 0 0 KWh 0 00 Zar Exit Next VIEW ENERGY CONSUMPTION Heating cost FOLLOW FINAL STEPS I K 3 The selected screen will display of kilowatt and Rand value used for the month Press the button to return to the menu EXIT 3 K Energy Back Energy consump...

Страница 17: ... OK 4 Event settings Press the button Press the button 5 5 User settings OK 4 Press the button 4 OK 5 5 Press the button 5 Press the button 4 OK 4 Child lock Child lock OK OK Off On On Off A B C D G F E SETTING THE CHILD LOCK CHILD LOCK IS NOW SET OK Time and date OK Child lock 4 Press the button 4 OK Simultaneously press both the and buttons for 5 seconds 17 20 Mon 15 0 C 17 20 Mon 15 0 C 3 5 3 5...

Страница 18: ... OK Display settings 4 5 5 DISPLAY SETTINGS G H Follow the Steps 4 4 4 4 Press the button to view next schedule 5 UP Press the button to accept the Screen saver to show on the screen then select ON 4 OK OR Press the button to view next schedule 5 UP Press the button to accept the time day to show on the screen then select ON 4 OK OR I J Once the display is selected press the button Once the is sel...

Страница 19: ... 3 3 TEMPORARY OVERRIDE Need Warmth Override press the button to accept this temperature 4 OK Press the button COMFORT 4 5 5 4 4 C D E F Please adjust Please adjust Please enter Please enter the temperature the temperature duration duration 10 20 Mon Comfort Menu Manual 15 0 C 10 22 Mon Comfort Menu Manual 15 0 C OK OK OK OK 21 0 C o 29 0 C o 1h 6h Thermostat is now set in temporary override for s...

Страница 20: ...ostat THESE SIMPLE STEPS NEED TO BE FOLLOWED FOLLOW STEPS A H Press the Menu button 4 4 5 OK 4 Event settings Press the button 5 5 Press the button 5 User settings OK Press the button 4 OK 4 Engineer settings OK 5 Press the button 5 Offset temp OK 5 Press the button 5 Adaptive function OK 5 Press the button 5 Application OK OK OK Temp scale Backlight A B C D F F F E Page 18 10 20 Mon Comfort Menu ...

Отзывы: