Page2
WHT 1000
Thermostat
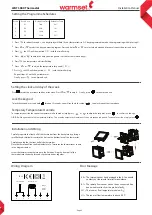
Setting the Programme Schedules
Installation Manual
Period
1
2
4
Period Icon
Default Start Time Default Set Temp
7:00
P1
P2
P3
P4
8:30
16:30
22:30
22
℃
16
℃
22
℃
16
℃
3
Press for about 5 seconds , the day display will flash. (if your thermostat is in 5+2 day programmable mode, the programming will skip to step 3).
Press , the LCD will show period 1( P1 ) with the time flashing.
Press or to adjust the time you wish period 1 to start for the selected day(s);
Press , the temperature will start flashing
Press or to adjust the temperature for period 1( P1 );
Finally , press to confirm and exit.
Finally , press to confirm and exit.
Press ,the LCD will show period 2 ( P2 ) with the time flashing.
Repeat Steps 4-7 until all 4 periods are set.
1.
2.
3.
4.
5.
6.
7.
Press or to select the day you want to program. Press and hold or to select whole week and to cancel, repeat the press and hold.
Setting the clock and day of the week
Lock the keypad
Temporary Temperature Override
Press to select hour, minute and day of the week. Press or to adjust.
To lock the keypad, press and hold for about 3 seconds, you will see the lock symbol , to unlock repeat the steps above.
To temporary override the current temperature in Auto mode, simply press or to adjust the set point,
press to confirm the change.
O/RIDE will appear above the temperature display. The override setpoint will remain until the next scheduled period. To cancel override, simply press .
Installation and Wiring
Wiring Diagram
Error Message
Carefully separate the front half of the thermostat from the back plate by placing a
small flat head terminal driver into the slots on the bottom face of the thermostat.
Carefully unplug the the front half of the thermostat.
Place the thermostat front half somewhere safe. Terminate the thermostat as shown
in the diagrams below.
Screw the thermostat back plate on to the flush box. Plug the front half of the
thermostat into the back plate and clip the two halves together.
E0 = The internal sensor has developed a fault. You should
contact your thermostat retailer for assistance.
E1 = The remote floor sensor has not been connected, has
been wired incorrectly or the probe is faulty.
LO = The room or floor temperature is below 0 °C
HI = The room or floor temperature is above 50 °C
1
2
3
4
5
6
AC230V
L~
N~
MAX LOAD
:
16A
50/60Hz
IP 21
L1
N1
FLOOR SENEOR
POWER


