background image

14

15

For manual cleaning, it is recommended that you use washing 

solutions based on non-sudsing detergents, and chlorine-based 

sanitizing solutions that have a minimum chlorine concentration  

of 100 PPM. The following washing, rinsing, and sanitizing 

solutions, or their equivalents, may be used:

 SOLUTION 

PRODUCT 

DILUTION IN WATER 

TEMPERATURE

 Washing  Ajax

®

 Sanitizer 

¼ oz. per  

Hot 115°F (46°C) 


Cleaner Powder* 

2½ gallons

  Rinsing 

Plain Water 


Warm 95°F (35°C)

 Sanitizing 

Clorox

®


1 tablespoon 

Cold 50°F (10°C)


Institutional** 

 per gallon

To clean and sanitize the motor base 

Clean and sanitize the motor base prior to initial use and after 

each use. Unplug the unit, then wipe down the exterior surfaces 

of the motor base with cloths or sponges dampened with a 

soluble detergent. Next, wipe down with rinse water. Prevent 

liquid from running into the motor base by wringing out all excess 

moisture from cloths or sponges before using them.

NEVER IMMERSE THE MOTOR BASE IN WATER OR 

ANY OTHER LIqUID. 

Allow the unit to air-dry before using again.
Never use harsh abrasive-type cleaners on any part of the  

Waring Commercial Batch Processor.
Any other servicing should be performed by an authorized  

service representative

*Ajax

®

 is a registered trademark owned by the Colgate-Palmolive Company

**Clorox

®

 is a registered trademark owned by the Clorox Company

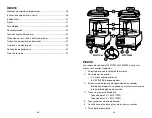
CLEANING AND MAINTENANCE

Clean the food processor and accessories prior to initial use and 

after each use. Do not use harsh abrasive-type cleaners on any 

part of the food processor.
Wash the motor shaft with a small brush.
Wash, rinse, sanitize and dry the bowl, covers and S-blade 

prior to initial use, and after use, unless they will be used again 

immediately. These items are all dishwasher safe, and may be 

cleaned and rinsed in the dishwasher instead of manually in the 

sink.
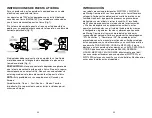
The bowl cover has a black seal around its outer rim that is easily 

removable for cleaning and should be cleaned periodically. There 

are three small holes on the outer lip of the top of the cover for 

pushing the seal out. Use a small, dull object like a toothpick or 

paper clip, to push the seal downward and out of the groove. DO 

NOT USE ANYTHING SHARP THAT CAN CUT THE SEAL. Hand 

wash with warm soapy water, rinse, and dry. To reassemble, 

insert the clean and dry seal back into the groove with your 

fingers, with the round edge at the top and the slotted edge at 

the bottom, facing in. Make sure the seal is fully inserted and in 

proper position. Note picture below.

Note:

 The flap of the cover seal must be downward and the 

opening must face to center of cover.

A stiff bristle brush will help to knock food particles out of the 

blades before washing. Handle very carefully as the blades are 

sharp.

Содержание WFP11S-SC

Страница 1: ...uction book carefully before using Afin que ce produit vous procure en toute sécurité beaucoup de satisfaction lisez toujours soigneusement les directives avant de l utiliser Para su seguridad y para disfrutar plenamente de este producto siempre lea las instrucciones cuidadosamente antes de usarlo ...

Страница 2: ...ect against risk of electrical shock do not put base in water or other liquids 8 Avoid contact with moving parts 9 Make sure motor has completely stopped before removing the lid 10 Do not operate any appliance with a damaged cord or plug or after appliance has been dropped or damaged in any manner Return appliance to the nearest authorized Waring service facility for examination repair or adjustme...

Страница 3: ...processors are the most versatile food processors in their class They both feature the LiquiLock Seal System unlike any other food processor in the industry This enables operation with large volumes of liquids without the need to remove the S blade while pouring These professional machines take advantage of Waring s forty years of commercial food service experience as well as thirty years of food ...

Страница 4: ... PARTS The Waring WFP11SW and WFP14SW batch processors both consist of the following standard parts and accessories 1 Solid motor base with vertical heavy duty shaft 2 Two control levers a ON b OFF PULSE 3 Safety interlock not shown Prevents machine from operating until cover is in place 4 Sealed clear work bowl Dry capacity of 2 5 quarts for WFP11SW Dry capacity of 3 5 quarts for WFP14SW 5 Sealed...

Страница 5: ...l the way down by turning it back and forth while lightly pushing it down If properly installed and fully seated the lower blade will be positioned just above the inside bottom of the bowl If processing food with the S blade now is the time to add the food or liquid to the work bowl Always process dry food first then add wet food Do not fill liquid over Max Liquid Fill line Place the cover on the ...

Страница 6: ...want from coarsely chopped to liquids Pulsing is also useful in processing hard foods Pulse the food a few times to break it up into smaller parts Then proceed with continuous use after the pieces are broken up and easier to process Always use the OFF PULSE lever for pulsing Never move the bowl or chute and cover assembly on or off to control pulses It is less efficient and could damage the machin...

Страница 7: ...am and your choice of sweetening or flavor and whip until cream is thick and fluffy Do not fill over the MAX FILL LINE as indicated on the batch bowl Note that the seal will prevent leaks and spills from the batch bowl cover however when the motor is running the liquid could get whipped out through the feed tube if it is filled above the MAX FILL LINE To turn your cream into butter keep whipping u...

Страница 8: ...e Palmolive Company Clorox is a registered trademark owned by the Clorox Company CLEANING and Maintenance Clean the food processor and accessories prior to initial use and after each use Do not use harsh abrasive type cleaners on any part of the food processor Wash the motor shaft with a small brush Wash rinse sanitize and dry the bowl covers and S blade prior to initial use and after use unless t...

Страница 9: ...ctly Pull the plug and try plugging into another outlet Turn On lever to On Make sure the bowl is properly positioned on the motor base that the bowl or cover is on properly and that the safety interlock tab on the cover has properly engaged the safety interlock switch Unit stops running during processing The unit may have overheated Refer to Resetting Thermal Protection section page 13 Turn unit ...

Страница 10: ...ed the product is delivered prepaid to the Waring Service Center 314 Ella T Grasso Ave Torrington CT 06790 or any Factory Approved Service Center This warranty does not a apply to any product that has become worn defective damaged or broken due to use or due to repairs or servicing by other than the Waring Service Center or a Factory Approved Service Center or due to abuse misuse overloading or ta...

Страница 11: ... LIRE TOUTES LES INSTRUCTIONS 2 Débrancher l appareil après usage et avant toute manipulation y compris vider le bol ou entretien Saisir le cordon d alimentation par la fiche Ne jamais tirer sur le cordon 3 Les lames sont très coupantes Manipuler avec précaution 4 Comme c est le cas avec tout appareil ménager il vous faudra être prudent lorsque vous utilisez le robot de cuisine Waring Bien que sim...

Страница 12: ...CORE directement dans le bol Les accessoires standards accompagnant le WFP11SW et le WFP14SW incluent un disque à fouetter et un couteau étanche De nombreux autres accessoires sont également disponibles INSTRUCTIONS DE MISE À LA TERRE Pour votre protection votre appareil est doté d un cordon avec mise à la terre Les appareils de 120V sont équipés d une fiche NEMA 5 15P La fiche doit être branchée ...

Страница 13: ...pacité de 2 5 L WFP11SW Capacité de 3 5 L WFP14SW 5 Couvercle étanche avec entonnoir 6 Couteau étanche pour couper hacher réduire en purée et mélanger 7 Disque à fouetter TABLE DES MATIÈRES Importantes consignes de sécurité 20 Instructions de mise à la terre 22 Introduction 23 Pièces 25 Assemblage du bol 26 Désassemblage du bol 27 Fonctionnement de l appareil 28 Utilisation du couteau et du disque...

Страница 14: ...çon à faire face aux boutons de commande Vérifier que l appareil est débranché et que le bouton de commande OFF est enclenché Ne pas brancher l appareil avant d avoir terminé l assemblage Tenir le bol entre les deux mains la poignée face à vous Aligner l arbre du moteur avec le cylindre qui se trouve au centre du bol La poignée devrait se trouver légèrement du côté gauche Enfoncer le bol sur le so...

Страница 15: ... ce faire presser puis relâcher le bouton OFF PULSE Continuer jusqu à obtention de la consistance désirée L utilisation du mode continu pour broyer ou hacher produira des résultats irréguliers les ingrédients au fond du bol seront broyés plus finement FONCTIONNEMENT DE L APPAREIL Brancher l appareil dans une prise électrique de 120V 60 Hz Les boutons de commande se trouvent face à vous Ils sont fa...

Страница 16: ...er plus de 450 g de viande avec le modèle WFP11SW ou 800 g avec le modèle WFP14SW Presser le bouton OFF PULSE 3 ou 4 fois de suite à un rythme d une seconde entre chaque pulsation Pour obtenir une texture plus fine utiliser le mode continu ON pendant quelques secondes Si l appareil a du mal à hacher retirer un peu de viande et continuer Réduire du fromage dur en poudre Couper le fromage froid en c...

Страница 17: ... ET ENTRETIEN Nettoyer l appareil et ses accessoires avant de l utiliser pour la première fois et après chaque utilisation Ne pas utiliser de nettoyants abrasifs Nettoyer l arbre du moteur avec une petite brosse Laver rincer et assainir le bol le couvercle et le couteau avant d utiliser l appareil pour la première fois et après chaque utilisation à moins que vous ne réutilisiez l appareil immédiat...

Страница 18: ... la charge de l importateur ou du distributeur local Les droits de garantie peuvent varier d un pays ou d une région à l autre Brancher cet appareil sur Courant Continu C C annulera la garantie RÉSOLUTION DE PROBLÈMES Vous trouverez dans cette section la solution aux problèmes les plus courants Si cette liste ne solutionne pas votre problème veuillez contacter un service après vente autorisé Consu...

Страница 19: ...cuales las siguientes 1 LEA TODAS LAS INSTRUCCIONES 2 Desconecte el aparato cuando no esté en uso antes de instalar o de remover piezas antes de vaciar el bol y antes de limpiarlo Para desconectar el aparato agarre el cable por la clavija Nunca jale el cable 3 Las cuchillas son muy filosas Manipúlela con sumo cuidado 4 Como todo electrodoméstico su robot de cocina Waring debe usarse con mucha prec...

Страница 20: ...ÁS directamente en el bol Los accesorios estándares que acompañan el WFP11SW y el WFP14SW incluyen una cuchilla y un disco batidor Muchos otros accesorios también están disponibles INSTRUCCIONES DE PUESTA A TIERRA Para su protección este aparato está equipado con un cable eléctrico con conductor de tierra Los aparatos de 120V están equipados con clavija tripolar de conexión con tierra NEMA5 15P la...

Страница 21: ...transparente hermético Capacidad de 2 5 L WFP11SW Capacidad de 3 5 L WFP14SW 5 Tapa sellada con boca de llenado 6 Cuchilla hermética para picar moler pisar y mezclar 7 Disco batidor hermético ÍNDICE Medidas de seguridad importantes 36 Instrucciones de puesta a tierra 38 Introducción 39 Piezas 41 Ensamblado 42 Desensamblado 43 Funcionamiento del aparato 44 Utilización de la cuchilla y del disco bat...

Страница 22: ...a de una toma de corriente Posiciónelo de manera que esté fácilmente accesible Asegúrese de que el aparato esté desconectado y apagado OFF No enchufe el aparato hasta haber terminado de ensamblar todas las piezas Sostenga el bol con ambas manos de manera que el asa apunte hacia su cuerpo Haga coincidir el árbol motor con el cilindro en el centro del bol e instale el bol sobre la base El asa se enc...

Страница 23: ...lo WFP11SW o 800 g con el modelo WFP14SW Oprima el botón OFF PULSE 3 ó 4 veces seguida esperando 1 segundo entre cada pulso Para obtener una textura más fina utilice el modo continuo ON durante varios segundos Si el aparato tiene dificultades para picar saque un poco de carne del bol FUNCIONAMIENTO DEL APARATO Enchufe el cable en una toma de corriente de 120V 60 Hz El aparato cuenta con dos botone...

Страница 24: ...sea moler el queso utilice la función de pulso para conseguir pedacitos del tamaño de guisantes luego utilice la función de encendido continuo hasta obtener un polvo fino Obtendrá mejores resultados con los quesos secos Los quesos más grasos suelen aglomerarse Picar cebolla apio col etc Corte las cebollas en cuartos y las demás verduras en pedazos de 2 5 cm Ponga los pedazos en el bol sin pasar la...

Страница 25: ...Ajax es una marca registrada de Colgate Palmolive Company Clorox es una marca registrada de Clorox Company LIMPIEZA Y MANTENIMIENTO Limpie el aparato y todos los accesorios antes del primer uso y después de cada uso No utilice detergentes abrasivos en ninguna parte del aparato Restriegue el árbol motor con un cepillo pequeño Lave enjuague y desinfecte el bol la tapa y la cuchilla antes del primer ...

Страница 26: ...idad del importador o distribuidor local Los derechos de garantía pueden variar según las regulaciones locales El utilizar este aparato con corriente directa C D invalidará la garantía RESOLUCIÓN DE PROBLEMAS Esta sección describe los problemas más comunes Si esta lista no soluciona su problema por favor comuníquese con su distribuidor local Consulte la lista de los centros de servicio autorizados...

Страница 27: ...appartiennent à leurs propriétaires respectifs Todas marcas registradas o marcas de comercio mencionadas en ésta pertenecen a sus titulares respectivos 2011 Conair Corporation Waring Products Division of Conair Corporation 314 Ella T Grasso Ave Torrington CT 06790 www waringproducts com Printed in China Imprimé en Chine Impreso en la China WFP11SW WFP14SW IB 11WC119758 IB 10561 ...

Отзывы: