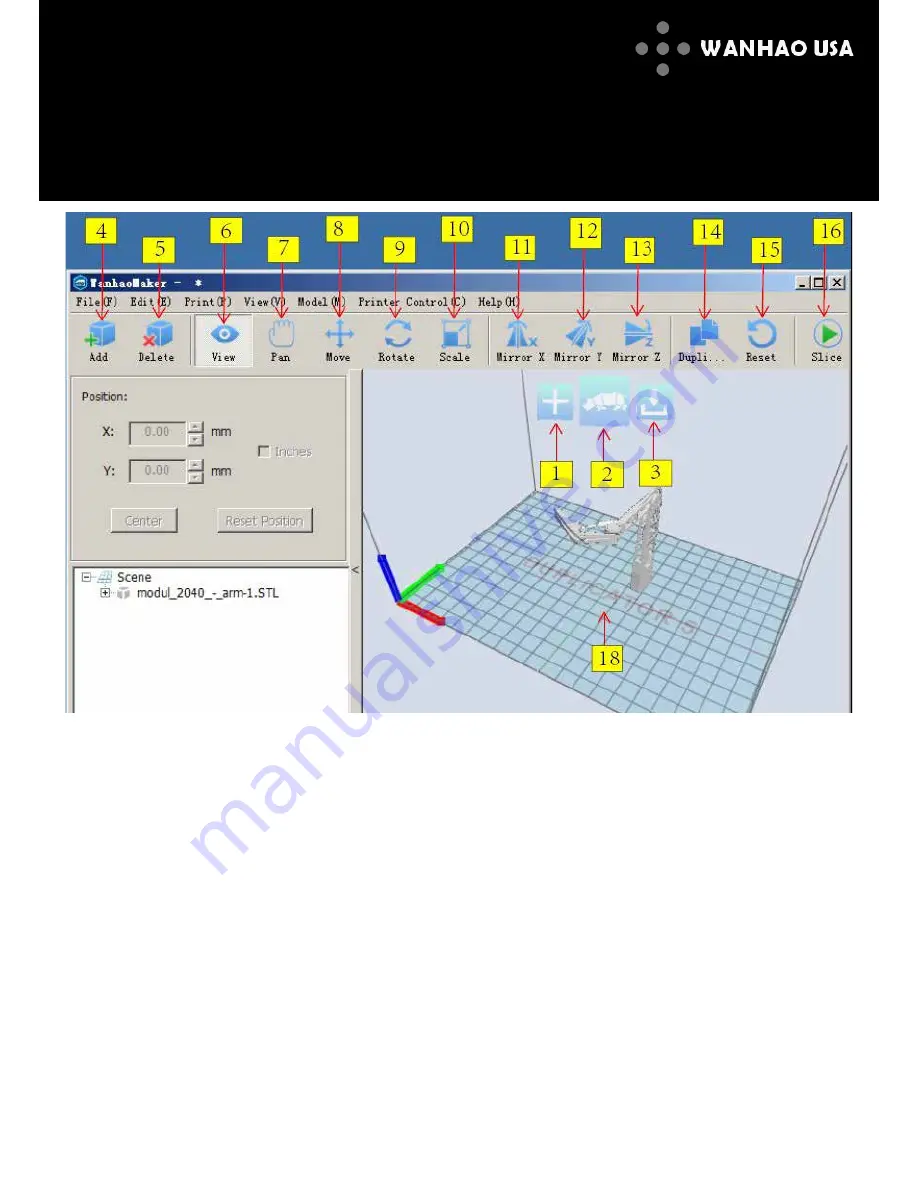
1.
Add
F
ile
(
Q
uick Button)
Click this
icon
to load an objec
t
to your
print area. You can add as many objects
as you can fit on the plate.
2. Start
Slicing (
Q
uick Button)
Click
this
icon
to start
s
licing.
Once you
click the icon, you will be given further
slicing options.
3. Save
I File (
Q
uick Button)
When you
click this icon
the
sliced
I file
will be saved
to your chosen
destination.
4.
Add
file
Click this
icon
to load an object to your
print area. You can add as many objects
as you can fit on the plate.
5. Delete
To delete an object, click on the object
and
then click this delete icon.
6. View
To view your object from different agles,
click this icon, and use your mouse
buttons to manipulate the 3D viewer.
7. Pan
Click this icon to get a different view with a
fixed rotation.
8. Move
Click on an object, then
on
this icon to
move
that
object around the plate.
9. Rotate
Click on an object, and then on this icon to
bring up three rotational rings. Click and
drag on these rings in whatever direction
you wish to rotate the object.
10. Scale
Click on an object, and then on this icon to
change the dimensions of that object. You can
click on an object and drag in any direction to
change size, or you can enter pre
c
i
s
e
measurements in the left slideout menu.
11. Mirror X
Click on an object, and then on this icon
to flip along the X-axis.
12. Mirror Y
Click on an object, and then on this icon
to flip along the Y-axis.
13. Mirror Z
Click on an object, and then on this
icon to flip along the
z
-axis.
14. Duplicate
Click on an object, and then on this icon
to duplicate that object on the build plate.
15. Reset
Click on an object, and then on this icon
to res
e
t that object's position on the plate
16. Start
Slicing
Click this icon to start slicing. Once you
click the icon, you will be given further
slicing options.
18. Build
P
late
This is your build plate.
Wanhao Maker Interface
12
Содержание Duplicator 5
Страница 2: ...2 ...


