WANDERS SOLEA MADERA Скачать руководство пользователя страница 21

GB

•  Any  bends  in  the  flue  tube  must  not  exceed  45 

degrees.

•  Ensure that the chimney tube can discharge the flue 

gases adequately, properly and safely. 

•  The values for calculating the chimney tube is given 

in the section on Technical Information, see above.

Fire Safety

For reasons of fire safety is it important to observe the 
instructions below before installing the stove. 

.  The free distance from the fire-proof rear wall is at 

least 0 cm in each rotated position.

.  Keep at least a distance of 80 cm between the stove 

and combustible objects such as curtains, wooden 
objects (cupboards and paintings) and glass objects. 
Keep the same distance from the flue tube.

.  Wooden  construction  parts  within  the  radiation 

range of the stove (80 cm from the exterior of the 
stove) must be covered with fireproof material. 

4.  If the flue tube goes through a ceiling and/or roof 

that consist of flammable materials, the ceiling and 
the roof must be covered with fireproof materials all 
around (about 80 cm). Pay also attention to joisted 
floor layers and any electric wiring.

5.  Keep a distance of at least 50 cm (in all directions) 

between  the  stove  and  supporting  steel  construc-
tion parts.

6.  Shield off all combustible materials within a radius 

of 80 cm from the stove openings with non-com-
bustible materials.

7.  The  wall  behind  the  stove  must  consist  of,  or  be 

insulated  with,  fire-proof  materials. The  insulation 
material  must  resist  a  temperature  of  700  °C  and 
have a density of 80 kg/m. Please see for insulation 
materials table on page 4).

8.  Avoid  heat  transmission  when  placing  the  stove. 

Heat transmission of a burning stove can penetrate 
the wall and even cause fire damage on the other 
side of the wall. Prevention is better than cure.


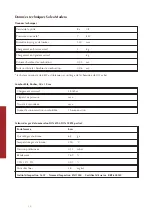
Height of chimney on the roof at a horizontal distance A measured from the ridge 


Horizontal distance A from the ridge, in metres 

Roof with 
slope X 

On the 
ridge 

 
0.5 m 

 
0.75 m 

 
1 m 

 
1.25 m 

 
1.5 m 

 
2 m 

 
3 m 

 
4 m 

25

o


0.5 

0.75 

0.85 

1.0 

1.1 

1.2 

1.6 

2.5 

3.3 

30

 o


0.5 

0.85 

1.2 

1.6 

2.0 

2.4 

3.2 

4.9 

6.5 

35

 o


0.5 

1.0 

1.8 

2.4 

3.0 

3.6 

4.8 

7.3 

10 

40

 o


0.5 

1.2 

2.4 

3.2 

4.0 

4.8 

6.4 

10 

13 

45

 o


0.5 

1.5 

3.0 

4.0 

5.0 

6.0 

8.0 

12 

16 


Installation

The Solea is tested in accordance with the international 
EN 40 standardization, and has an extra additional 
standardization  for  optimally  environment-friendly 
heating  devices  related  to  flue  gases  (Section  5a  B-
Vg. Des BmfWA). The stove can be connected to a flue 
tube to which several stoves are connected. The Solea 
should never been integrated into the construction of the 
room. 

The heating device must be placed and connected by an 
acknowledged installer and according to the installation 
instructions  given  below.  The  national  and  local  rules 
and  regulations  for  placing  and  using  wood-burning 
stoves are equally applicable. WANDERS does not give 
any  guarantee  if  the  Solea  is  connected  or  installed 
incompletely or incorrectly.

Supply of combustion air

The  stove  must  have  a  sufficient  fresh  supply  of 
combustion  air.  To  avoid  draft,  make  if  necessary  an 
extra air supply opening as close to the stove as possible. 
An extra air supply opening is definitely required if:
• 

the room has a heat recovery system.

• 

the room has a central exhaust system.

• 

the same space has a cooker hood.

The air supply opening must be sealable if it goes through 
a fire-resistant wall. If there are several heating devices 
in the same room there must be enough air openings to 
guarantee proper combustion.

Connecting the fireplace

Be sure that the floor is strong enough to hold the weight 
of the hearth without problem. 
Before  mounting  the  hearth,  follow  the  instructions 
given in the previous chapter. Protect the floor when you 
mount the stove, and mind your back.

.  To  be  rotatable,  the  Solea  must  be  placed  in  line 

with the inlet and outlet channels.

.  Connect the Solea Madera to an existing chimney.
.  The under-pressure in the flue tube must be 0 to  

Pa (0. to 0. millibars).

4.  If external air supply is advisable, drill the desired 

opening  straight  under  the  outlet  channel,  with  a 
diameter of at least 0 mm. Ensure that the stove is 

Содержание SOLEA MADERA

Страница 1: ...schriften Solea Madera 02 GB Users guide and installation manual for the Solea Madera 13 FR Mode d emploi et instructions d installation le Solea Madera 25 D Gebrauchsanweisung und Montage Vorschrifte...

Страница 2: ...eigen fabriek in Netterden en voor een belangrijk deel handgemaakt Voor de constructie zijn alleen de beste materialen gebruikt die voldoen aan de Europees geldende normen Zo garanderen wij u een lan...

Страница 3: ...en oogopslag 4 Installatie 4 Aansteken van de kachel 4 Eerste keer stoken 5 Brandstof hout 5 De optimale stookwijze 6 Schoorsteen en rookkanaal 6 Onderhoud 6 Veiligheid 7 Garantie 7 Installatievoorsc...

Страница 4: ...ken in de vroege herfst of late winter Wanneer de buiten en binnentemperatuur niet veel van elkaar verschillen is een goede schoorsteentrek een ware uitdaging In de vroege herfst of late winterdagen k...

Страница 5: ...s Na het stoken van de haard kunnen wanden plafonds en roosters verkleuren Dit komt doordat stofdeeltjes verbranden in de convectiemantel Dit is een natuurlijk proces waar WANDERS niet verantwoordelij...

Страница 6: ...uur af Tevens voorkomt u brandschade door mogelijk uitspattende vuurdeeltjes met name van naaldhout Leg niet meer dan 3 houtblokken ineens op het vuur Veel brandstof ineens werkt efficiente verbrandin...

Страница 7: ...eine kinderen of hulpbehoevenden in de buurt van een brandende kachel komen en laat ze zeker niet alleen als de haard brandt Ge bruik eventueel een haardscherm 3 Giet of leg geen brandbare vloeistoffe...

Страница 8: ...1 meter inclusief een bocht van 90 graden Is de aanvoerleiding langer dan moet de diameter na de eerste meter vergroot worden Het toestel mag alleen geplaatst en aangesloten worden door een erkend in...

Страница 9: ...per atuur van 700 graden Celcius te weerstaan en een dichtheid van 80 kg m3 te hebben Zie voor even tueel te gebruiken isolatiematerialen de tabel op pa gina 12 4 Indien de rookgasafvoer door een plaf...

Страница 10: ...het gewicht van de haard probleemloos kan dragen Volg voordat u de haard monteert eerst de aanwijzingen op uit het vorige hoofdstuk Voorbereiding Let op dat u uw rug en de vloer niet beschadigt tijde...

Страница 11: ...de voorzijde Verwijder de 6 schroeven zoals te zien op de detailopname Neem voorzichtig de klep er uit en vervang de thermostaat Technische gegevens Solea Madera Technische gegevens Deur sluiting Ba...

Страница 12: ...ing bij een onderbreking van meer dan 8 uur kan voor de te verwarmen inhoud 25 minder gerekend worden Tabel isolatiemateriaal NB alleen wat in grijs gebied staat is toegestaan Isolatie Verpakt Warmteg...

Страница 13: ...13 GB User s Guide and Installation Manual Solea Madera GB...

Страница 14: ...ur own factory in Netterden the Netherlands and is for the greater part handmade Only the best materials are used for the construction and comply with current international standards This will guarant...

Страница 15: ...ce 16 Installation 16 Lighting the stove 16 Lighting the stove for the first time 17 Fuel wood 17 The best way to burn your stove 18 Chimney and flue 18 Maintenance 18 Safety 19 Guarantee 19 Installat...

Страница 16: ...stallation It is common practice for the dealer where you purchased your stove to also take care of installing it If this is not the case please ensure that the installation is done by a certified ins...

Страница 17: ...6 hours when lighting the stove for the first 4 or 5 times Air the room well when the stove is burning Make sure that any cooking hood is not turned on when the stove is burning a cooking hood extract...

Страница 18: ...nd burdens the environment unnecessarily Ventilate the space well when you have the stove on A crackling fire has a minimum air consumption of 25 cubic metres an hour Never put on your cooking hood wh...

Страница 19: ...80 cm measured from the glass area of the hearth to the wall 8 Do not place any combustible materials such as curtains wooden objects cupboards paintings close to the fireplace or the flue tube A mini...

Страница 20: ...stove is connected or installed incompletely or incorrectly It is not allowed to place the stove in Arcades and corridors accessible to the public Stairwells except in buildings with no more than 2 dw...

Страница 21: ...5 0 75 0 85 1 0 1 1 1 2 1 6 2 5 3 3 30 o 0 5 0 85 1 2 1 6 2 0 2 4 3 2 4 9 6 5 35 o 0 5 1 0 1 8 2 4 3 0 3 6 4 8 7 3 10 40 o 0 5 1 2 2 4 3 2 4 0 4 8 6 4 10 13 45 o 0 5 1 5 3 0 4 0 5 0 6 0 8 0 12 16 Inst...

Страница 22: ...d between the mouthpiece and the ceiling 10 Connect if necessary the combustion air supply duct minimum diameter 100 mm If the connec tion is in the back you can use the cut in piece from the back pla...

Страница 23: ...nominal heat of 8 kW is obtained with a chimney draught of 0 10 mbar Fuel wood logs 30 x 10 cm Maximum supply 3 pieces Primary air valve max Secondary air outlet max Fuel burning period about 1 hour...

Страница 24: ...se products given in the grey shaded part Insulation Packed Thermal conduction Maximum Density appl temp no Article no Form no packed no C no Kg m3 10 Mineral wool 01 Bands 01 Stitched mats 10 100 02...

Страница 25: ...25 FR Mode d emploi et instructions d installation Solea Madera FR...

Страница 26: ...produit dans notre usine Netterden Pays Bas et fait la main pour une partie importante La construction est faite uniquement en les meilleurs mat riaux en conformit avec les normes europ ennes en vigue...

Страница 27: ...Allumage du po le 28 Premier chauffage 29 Combustible le bois 30 La fa on optimale de chauffer le po le 30 Chemin e et conduit de chemin e 31 Entretien 31 S curit 31 Garantie 32 Instructions d instal...

Страница 28: ...a aussi sur le conduit de chemin e auquel votre po le devra tre raccord Le raccordement des po les bois par une personne non agr e est fortement d conseill Dans ce cas nous ne garantissons pas le bon...

Страница 29: ...ration veuillez vous reporter aux consignes g n ralement donn es dans le commerce sur les po les d ambiance Votre installateur vous renseignera Pendant le premier chauffage du Solea Madera le po le a...

Страница 30: ...et forment de fa on simple des charbons de bois Les esp ces plus tendres telles que le sapin le pin et le peuplier produisent plus de flammes et moins de charbons de bois L entreposage du bois se fai...

Страница 31: ...gents et abrasifs agressifs pour l entretien de votre po le Mise hors service En t les portes et les tiroirs air doivent tous tre ferm s Il faudra mettre du sel absorbant dans le po le s il se trouve...

Страница 32: ...s avec l appareil d une installation effectu e par un installateur ou revendeur non agr par WANDERS d un d faut d entretien et en cas o le po le serait pass en d autres mains La garantie ne s applique...

Страница 33: ...rd tre nettoy et contr l par une entreprise de ramonage agr e Les ventuels clapets de fermeture doivent tre enlev s Le tuyau d vacuation des gaz de fum e du po le doit tre raccord sans d viations au c...

Страница 34: ...bois doit tre mont et raccord uniquement par un installateur agr et selon les instructions d installation suivantes De plus les l gislations et r glementations nationales et locales relatives au mont...

Страница 35: ...ations Remplacement de la vitre Attention le verre est tranchant Enlevez les 4 vis et les feuilles de ressort aux angles int rieurs de la porte Ecartez le verre et les clats ventuels avec pr caution 1...

Страница 36: ...obtenue par un tirage de la chemin e de 0 12 mbar Combustible b ches 30 x 10 cm Chargement maximal 3 b ches Clapet d air primaire max Trou d air secondaire max Dur e de consommation combustible 1 heu...

Страница 37: ...e grise est admis Isolation Emballage Conduction Thermique Temp e de serv Densit la plus lev e no article no forme no emballage no C no Kg m3 10 Laine min rale 01 Bandes 01 Matelats piqu s 10 100 02 2...

Страница 38: ...38 Gebrauchsanweisung und Installationsvor schriften Solea Madera DE...

Страница 39: ...en Fabrik in Netterden entwickelt hergestellt und gro enteils handgemacht Bei der Produktion wurden nur die besten Materiale die den europ ischen Normen entsprechen eingesetzt Damit gew hrleisten wir...

Страница 40: ...ntage 41 Den Ofen anmachen 41 Das erste mal Heizen 42 Heizmaterial Holz 42 Die optimale Art zu Heizen 43 Schornstein und Rauchkanal 43 Wartung 44 Brandschutz 44 Garantie 44 Montagevorschriften Solea M...

Страница 41: ...t wird Ein anerkannter Installateur kann Ihnen auch den korrekten Rat geben ber den Rauchabzugskanal an welchen der Ofen angeschlossen werden muss Der Anschluss der Holz fen durch Unbefugte ist verbot...

Страница 42: ...heizen wenn die Temperaturen auf mehr als 600 Celsius steigen Au erdem kann dieses Einbrennen einen unangenehmen Geruch mit sich bringen der aber unsch dlich ist Wir raten Ihnen den Ofen die ersten 4...

Страница 43: ...tersten Holzbl cke trocken Die optimale Art zu Heizen Die fen von WANDERS sind so entworfen dass sie die beste Nutzleistung erzeugen Ein gut beheizter Holzofen kann eine Nutzleistung von etwa 75 errei...

Страница 44: ...on der Schieber und oder Klappen kontrollieren Lassen sie j hrlich all Dichtungen von T ren und Glasscheiben auf Verschlei erscheinungen pr fen Brandschutz Mit einem WANDERS Holzofen haben Sie eine ko...

Страница 45: ...Kaufdatum eingereicht hat Reparaturen berechtigen nicht zu einer Verl ngerung der Garantie Alle Folgesch den sind ausgeschlossen Montagevorschriften Solea Madera Allgemeine Anweisungen 45 Vorbereitung...

Страница 46: ...A ab Giebel in Meter Dachneige X Im Giebel 0 5 m 0 75 m 1 m 1 25 m 1 5 m 2 m 3 m 4 m 25o 0 5 0 75 0 85 1 0 1 1 1 2 1 6 2 5 3 3 30 o 0 5 0 85 1 2 1 6 2 0 2 4 3 2 4 9 6 5 35 o 0 5 1 0 1 8 2 4 3 0 3 6 4...

Страница 47: ...f r die Zufuhr von frischer Luft hat einen Durchmesser von 150 mm Die Luftzufuhr kann sowohl mit einem Anschluss an der R ckseite als auch an der Unterseite des Ger tes angebracht werden Wenn die Luft...

Страница 48: ...cheibe und eventuellen Scherben weg Auswechseln des Thermostats Entfernen Sie zuerst die Seitenplatte Schieben diese nach oben holen sie in Ihre Richtung und schieben die Platte nach oben aus den Stif...

Страница 49: ...minale W rme von 8 KW wird mit einem Schornsteinzug von 0 10 mbar Heizmaterial Holzscheite 30 x 10 cm Max Einlegen 3 St ck Prim re Luftklappe max Sekund re L ftungs ffnung max Brennzeit Heizmaterial u...

Страница 50: ...Gebiet steht ist erlaubs Isolation Verpackt W rmeleitung H chste Gebr Dichte auchs Temp nr Artikel nr Form nr verpackt nr C nr Kg m3 10 Mineralwolle 01 Bahnen 01 Matten gen ht 10 100 02 20 11 Glaswoll...

Страница 51: ...Technische tekeningen Technical drawings Dessins techniques Technische Zeichnungen 51 Technische tekeningen Technical drawings Dessins techniques Technische Zeichnungen...

Страница 52: ...52...

Страница 53: ...Technische tekeningen Technical drawings Dessins techniques Technische Zeichnungen 53 Notitities Notes Notes Notizen...

Страница 54: ...54 Notitities Notes Notes Notizen...

Страница 55: ...Indirizzo Direc o Adres Postalcode Town Plz Ort Code postal Lieu Codice postale Localita C digo postal Cidade Postcode Plaats Name of installer Name des Installateurs Nom due l installateur Nome dell...

Отзывы: