CONTENTS OF THE PACKING CASE
1 x Machine body complete
2 x Handle bars
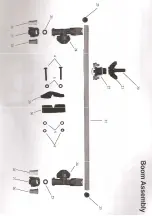
1 x Spray Boom assembly
1 x Plastic bag containing:
4 x Handle bolts, wingnuts and washers
2 x Cable Clamps
1 x Instruction manual and Warranty
ASSEMBLY INSTRUCTIONS
The RAMBLER sprayer has been factory
tested prior to packing and only requires
the handles and the spray boom assembly
to be fitted.
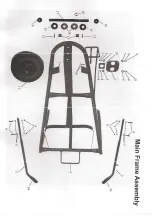
Fit the handlebars into position using the
nuts, bolts and washers from the fixing bag.
The boom assembly can be fitted to the
main frame in two positions. The upper
position should be suitable for most
purposes. Take the boom assembly and
attach it to the main frame by using the
clamps. The boom is marked showing its
centre position, and this should be carefully
aligned into the centre of the fixing clamp.
BEFORE tightening the clamp the machine
should be lifted into its normal working
position and the boom nozzles checked to
ensure they are parallel to the ground.
Adjust the boom position and rotation as
necessary, re-check, then tighten the clamp
fixings. Attach the inlet wing nut to the
boom inlet housing. The machine is now
ready for testing.
TESTING
A trial run should be carried out on a dry
concrete surface to check that the nozzles
are in alignment. This should be carried out
using clean water to ensure everything is in
working order.
Half fill the container with cold water,
replace the filler cap & filter and move off at
a steady working place similar to the speed
of mowing.
This will prime the pump mechanism and
water will spray from the nozzles, showing
that all air has been bled from the system.
If an airlock remains in the system, unscrew
the two diaphragm check valve caps and
push the machine until water flows through
the system. Tighten the two caps and then
push. The machine will then start to spray.
DO NOT over tighten the diaphragm caps.
They are fitted in order to clear the spray
system of air & other small blockages.
OPERATING INSTRUCTIONS
When filling the machine, add sufficient
liquid treatment to cover the area needing
treatment or a pro-rata amount if only part
filling. Pay careful attention to which colour
nozzle is fitted at the time of spraying to
avoid any over or under application of
chemical. Always follow the chemical
manufacturers instructions relating to the
specific area. In many instances dilution
rates of chemicals are not critical, but in
some cases where a greater volume of
water is needed, then two x half strength
applications are recommended, spraying
where possible in a chequer board fashion
in North to South and East to West
directions.
SPRAY WIDTH
The RAMBLER has a spray width of 40
inches (1016mm). In common with all
Walkover sprayers, the spray pattern tails
off on the extreme edge of the treated
swath which is compensated for when
treating the return track. You must therefore
always ensure your return track is 40”
(1016mm) from the datum point of your
previous pass to achieve correct coverage.
A set of red nozzles are provided with the
machine. Nozzles giving alternative
coverage areas for the 25 litre (5.5 gallons)
loading as follows:
(a) With standard nozzle fitted, Red
ANDT 2.0, one full tank covers 825
sq. metres (1000 sq. yards)
equivalent to 298.6 litres/hectare
(26.6 gallons/acre)
(b) Alternative nozzle, Grey
TF VP 3
delivers to one full tank 500 sq.
metres (670 sq. yards) equivalent
to 449 litres/ hectare (40
gallons/acre)
N.B
The coverage areas for each nozzle
may vary plus or minus 5% depending on
the speed of operation and variations of the
terrain.


