Walkera V1100 PRO Скачать руководство пользователя страница 18

Attentions:
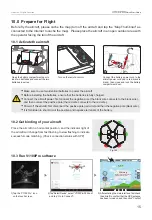
1)The first flight of the aircraft defaults to GPS Mode after each power on.
2) In GPS mode, altitude holding, location fixing and braking functions are available, and the flight speed is lower.
3) If the GPS signal is poor or there is no signal, it can only set the altitude, but not the location.
4) After switching to manual mode, location fixing is invalid.
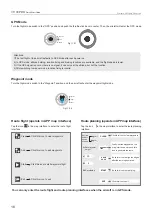
GPS Mode

Turn the flight mode switch to the “GPS” position and push the throttle stick back to center. Then, the aircraft will enter the GPS mode.

Waypoint

GPS

Manual

Turn the flight mode switch to the "Waypoint" position, and the aircraft will enter the waypoint flight mode.

Waypoint mode

Waypoint

GPS

Manual

18

Walkera All Rights Reserved

V1100 PRO

  Quick Start Guide

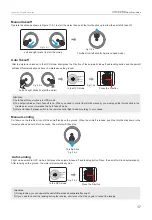
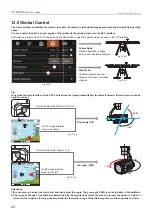
Y ou can only enter the route flight and route planning interfaces when the aircraft is in GPS mode.

Click this icon to add waypoints

Add

Clear

Click this icon to clear waypoints

Start

Click this icon to start waypoints flight

Exit

Click this icon to exit

Route flight (operate in APP map interface)

Route planning (operate in APP map interface)

Tap the icon       in the map interface to enter the route flight 
interface.

Tap the icon       in the map interface to enter the route planning 
interface.

Tap the icon       in the map interface to enter the route planning 

30

4

 H

Angle:

Angle:

 W

GENERATE 

LINE

Firstly, set the waypoint on the 
map interface and touch this 
icon to generate the route.

Set fore-

and-aft 

course 

overlap

H:

 Set waypoint 

     height

W: 

Set sidelap

Click this icon to clear waypoints

CLEAR

Touch this icon to align the edges 
after the route is generated.

ALIGN

EDGE

Touch this icon to start flying.

START

Click this icon to exit

EX IT

Fig.11.0-7

Fig.11.0-8

Содержание V1100 PRO

Страница 1: ...www walkera com January 20th 2021 QUICK START GUIDE V1 2...

Страница 2: ......

Страница 3: ...4 8 9 20 21 21 21 22 23 23 15 15 16 16 15 7 8 6 7 10 10 11 12 13 10 1 Activate the aircraft 10 2 Get binding of your aircraft 10 3 Run V1100Pro software 10 4 Description of GPS signal indications 10 5...

Страница 4: ...please replace them before flying Make sure the camera and fire extinguisher launcher are firmly installed and all screws are locked Make sure the propeller is firmly installed without damage and the...

Страница 5: ...revise or discontinue these terms and conditions at any time without prior notice In order to avoid violations possible injuries and damages the following must be observed 1 Do not fly the drone in th...

Страница 6: ...immediately after the aircraft hits the water or it will cause permanent damage to the aircraft Do not use liquids containing alcohol or other volatile components to clean the camera lens Don t store...

Страница 7: ...e Android System Port 24 Touch Screen Power on press and hold the power switch to turn on the remote control Power off restart Press and hold the power switch and the Power Off and Restart operation i...

Страница 8: ...remote control is an American Hand Mode left hand throttle The left stick controls the aircraft s flight altitude and direction while the right stick controls the forward backward and left right flig...

Страница 9: ...trollable rotation range Max control speed Pixels Focus time Sensor ISO range Gimbal Camera Camera 9 Walkera All Rights Reserved V1100 PRO Quick Start Guide Max communication distance 7 4V 9000mAh LiP...

Страница 10: ...onnect to the charging port of the remote control for charging Note The input power of the DC15V 4A power adapter is 100 240V 50 60HZ AC Fig 6 1 1 Charging port 6 0 Charge 1 To charge with the GA008 c...

Страница 11: ...C power supply 100 240V 50 60Hz turn on the power switch the charger beeps and the fan self test turns Battery Power Wire Conversion Wire Balance charging wire extension wire Battery Balanced Charging...

Страница 12: ...play positioning accuracy of the aircraft 7 HD image transmission signal strength Display the strength of the video signal transmitted between the aircraft and the remote control 8 Remote signal stren...

Страница 13: ...eserved V1100 PRO Quick Start Guide 8 0 Prepare the Remote Control 21 Flight status parameters D Distance horizontal distance between the aircraft and the point of return H Height vertical distance be...

Страница 14: ...dles GPS antennas Unfold the arm upwards as indicated by the red arrows in turn and tighten the arm locking nut as indicated by the blue arrows in a clockwise direction Rotate the paddles outward as i...

Страница 15: ...ful code matching Check connection status with APP 10 1 Activate the aircraft 10 2 Get binding of your aircraft 10 3 Run V1100Pro software Turn on the remote control Open the battery compartment door...

Страница 16: ...p interface is pointing in the same direction as the actual drone s nose Fig 10 5 1 Fig 10 4 1 When the aircraft is landed push the throttle stick to the lowest position and hold it for 5 seconds then...

Страница 17: ...en the aircraft is landed push the throttle stick down to the lowest position and hold it for 5 seconds The motors will then stop Flight mode switch In GPS mode short press the automatic take off and...

Страница 18: ...nly enter the route flight and route planning interfaces when the aircraft is in GPS mode Click this icon to add waypoints Add Clear Click this icon to clear waypoints Start Click this icon to start w...

Страница 19: ...e RTH button 2 When the aircraft loses the signal of the remote control it will automatically enter the Uncontrolled RETURN TO HOME mode 3 If the GPS signal is abnormal or the GPS does not work Return...

Страница 20: ...e Y AW is not adj ustable in Follow Mode 2 The speed of change of the Gimbal is determined by the amplitude by which the wheel is turned the speed is 0 when it returns to the midpoint the larger the a...

Страница 21: ...aircraft flat then rotate it 720 degrees in the horizontal direction the aircraft indicator will light up and then place the aircraft in a horizontal position 1 First open the calibration compass in t...

Страница 22: ...and hold the button again for 3 5 seconds When the four indicators are steady on confirm and exit stick calibration Spray Spray 15 2 Remote control stick mode switch and stick calibration Stick mode s...

Страница 23: ...y may damage the battery or objects it touches 8 Do not hit the battery Do not place heavy objects on the battery or charger 9 Do not disassemble or modify the battery or use it for other purposes 10...

Страница 24: ...o Ltd Add No 48 Wantai Rd Taishi Industrial Park Dongchong Town Nansha Dist Guangzhou China 511453 Hotline 86 20 84915115 This manual is subject to update without prior written notice Please refer to...

Отзывы: