background image

English

   - 10 -

Connecting to a DVD Player 

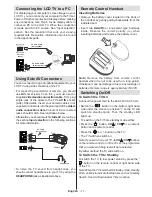
via Component Sockets 

(YPbPr) or Scart Cable

Some  DVD  players  are  connected  through 

• 

COMPONENT  SOCKETS  (YPbPr)

.  In  this  case, 

you  must  use  the  supplied  Component  video 

connection  cable  for  enabling  connection.  First, 

plug  single  jack  of  the  cable  to  the  TV’s  YPbPr 

socket  (side). Afterwards,  insert  your  component 

cable’s  (not  supplied)  connectors  into  the  plural 

part of the Component video connection cable (see 

illustration below). Colours of the connected jacks 

should match. 
To enable audio connection, use the 

• 

VGA/Component 

Audio cable

. First, plug single jack of the cable to the 

TV. Afterwards, insert your DVD player’s audio cable’s 

connectors into the plural part of the 

VGA/Component 

audio  connection  cable 

(

see  illustration  below

). 

Colours of the connected jacks should match. 

Side  AV  Input

Audio  Cable

(Not  supplied)

Side  Video/Audio 

Connection  Cable

(Supplied)

S

ID

E

 A

V

YPbPr

Side  view

DVD  Player

Connection  Cable

(supplied)

YPbPr  Video  Cable

(Not  supplied)

When  the  connection  is  made,  switch  to 

• 

YPbPr

  source.  See, 

Input  selection

  section. 

Note: 

To connect YPb Pr device, you should use supplied 

component (YPbPr) connection cable

You may also connect through the 

• 

SCART

 input.  

HDMI 

1

DM

H

2

SPDIF

Coax.OUT

Scart

 Cable

(not


supplied)

External device

Note

• 

: These three methods of connection perform the 

same function but in different levels of quality. It is not 
necessary to connect by all three methods.

Multipartiton    support    is  available.  Maximum  2 

• 

different partitions are  supported. If disk have more 

then 2 partition, crash may occur.  First partition of 

usb disk is used for PVR ready features. And also 

it must be formatted as primary partition to be used 

for PVR ready features.
Multipartition  HDDs  are  supported  until  two 

• 

partitions.
Some stream packets may not be recorded  because 

• 

of signal problems, so sometimes video may freezes 

during playback. 
Record,  Play,  Pause,  Display  (for  PlayListDialog) 

• 

keys could not be used when teletext is ON. If a 

recording  starts  from  timer  when  teletext  is  ON, 

teletext  is  automatically  turned  off. Also  teletext 

usage is disabled when there is ongoing recording 

or playback. 
Radio record is not supported.

• 

The TV can record programmes up to ten hours.

• 

Connecting to a DVD Player via HDMI

Please refer to your DVD player’s instruction book 

for additional information. Power off both the TV and 

the device before making any connections.
Note

:  Not  all  cables  shown  in  the  illustration  are 

supplied.

If your DVD player has an 

• 

HDMI

 socket, you can 

connect via 

HDMI 

for better video and audio quality.

HDMI 

1

DM

H

2

SPDIF

Coax.OUT

External device

(not


supplied)

HDMI Cable

When you connect to DVD player as illustrated above, 

• 

switch to the connected 

HDMI 

source. See, 

Input 

Selection

 section for more information on changing 

sources.

Содержание SaorView WP3882S

Страница 1: ...COLOUR TELEVISION WITH REMOTE CONTROL OPERATING INSTRUCTIONS WP3882S BE WALKER WISE logon to www walker ie APPROVED...

Страница 2: ...e Channel List 16 Moving a Channel 16 Deleting a Channel 16 Renaming a Channel 16 Locking a Channel 16 Managing Stations Favourites 17 Button Functions 17 Managing Stations Sorting Channel List 17 On...

Страница 3: ...Teletext fastext TOP text Headphone connection Automatic programming system Forward or backward manual tuning Sleep timer Child lock Automatic sound mute when no transmission NTSC playback AVL Automa...

Страница 4: ...likely to be stepped on A damaged power cord can cause fire or give you an electric shock When it is damaged and needs to be replaced it should be done by qualified personnel Moisture and Water Do no...

Страница 5: ...nection to a Television Distribution System Cable TV etc from Tuner Device connected to the protective earthing of the building installation through the mains connection or through other apparatus wit...

Страница 6: ...the TV is in Power Save Mode When the TV is not in use please switch off or disconnect the TV from the mains plug This will also reduce energy consumption Disconnect the TV from the mains socket when...

Страница 7: ...ode 17 Play in Media Browser mode 18 Red button 19 Green button List Schedule in EPG Tag 20 Untag All in favourite list Play Slideshow in Media Browser Loop Shuffle in Media Browser Picture mode selec...

Страница 8: ...ded for an HDMI to HDMI connection RF Input 3 connects to an aerial antenna system Note that if you use a decoder or a media recorder you should connect the aerial cable through the device to the tele...

Страница 9: ...ice with an audio cable to the AUDIO INPUTS of the TV to enable audio Component Video Input YPbPr 5 is used for connecting component video You can connect the component video and audio sockets with a...

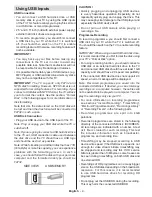
Страница 10: ...ces is a very hazardous operation Especially do not repeatedly quickly plug and unplug the drive This may cause physical damage to the USB player and especially the USB device itself Do not pull out U...

Страница 11: ...s of connection perform the same function but in different levels of quality It is not necessary to connect by all three methods Multipartiton support is available Maximum 2 different partitions are s...

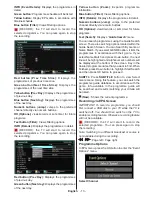
Страница 12: ...nes you should connect headphones to your TV by using the HEADPHONE jack as illustrated above Remote Control Handset Inserting Batteries Remove the battery cover located on the back of the handset by...

Страница 13: ...ol of your TV is designed to control all the functions of the model you selected The functions will be described in accordance with the menu system of your TV Volume Setting Press V button to increase...

Страница 14: ...tions views records or sets timer for future programs Text Search Displays Guide Search menu You can search programmes using the Guide Search screen There are searching options located within the Guid...

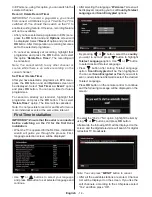
Страница 15: ...ents at the same time interval First Time Installation IMPORTANT Ensure that the aerial is connected before switching on the TV for the first time installation When the TV is operated for the first ti...

Страница 16: ...nual Tuning HINT This feature can be used for direct broadcast entry Select Manual Channel Scan from the Installation menu by using and OK buttons Manual Scan options screen will be displayed Select t...

Страница 17: ...ll be displayed Select Yes if you want to move the channel and press OK Press OK button to process Selected channel is now moved Deleting a Channel You can press GREEN button to tag untag all channels...

Страница 18: ...y on screen information Details of the station and current programme will be displayed on the information banner The information banner gives information on the channel selected and the programmes on...

Страница 19: ...subtitle Audio Jump GREEN button Jumps to time Use numeric buttons to type the desired time and press GREEN button again to proceed Yellow Opens subtitle time correction menu Press RETURN Exit button...

Страница 20: ...the random playback will continue 0 9 Numeric buttons The TV will jump to the file starting with the letter you input via the numeric buttons on your remote control Play This OK button Plays the sele...

Страница 21: ...When the timeshift is reached timeshifting mode will be quitted and you will switch back to watching normal broadcast Press STOP button to quit timeshifting mode Similtaneous timeshifting recording s...

Страница 22: ...be available You can use button to slow forward Pressing button consecutively will change slow forwarding speed Changing Image Size Picture Formats You can change the aspect ratio image size of the TV...

Страница 23: ...ure settings in detail Press MENU button and select the Picture icon by using or button Press OK button to view Picture Settings menu Operating Picture Settings Menu Items Press or button to highlight...

Страница 24: ...ical to the settings explained in main menu system PC Position Select this to display PC position menu items Autoposition Automatically optimizes the display Press OK to optimize H Position This item...

Страница 25: ...other setting options of the TV set Using a Conditional Access Module IMPORTANT Insert or remove the CI module only when the TV is SWITCHED OFF In order to watch certain digital channels a conditional...

Страница 26: ...Settings menu will function as described below Language Settings In the configuration menu highlight the Language Settings item by pressing or buttons Press OK and Language Settings submenu will be di...

Страница 27: ...Timer This setting is used for setting the TV to turn off after a certain time Highlight Sleep Timer by using or button Use or button to set The timer can be programmed between Off and 2 00 hours 120...

Страница 28: ...e Press OK button while the Format Disk option is highlighted A menu will appear on the screen requiring you to enter a pin number If you have not changed the pin number the factory default is 0000 Af...

Страница 29: ...on Blue Background Activates or deactivates blue background system when the signal is weak or absent Software Upgrade To ensure that your TV always has the most update information you can use this set...

Страница 30: ...n such as news sports and weather on your TV Note that is the signal degrades for example in poor adverse weather conditions some text errors may occur or the teletext mode may be aborted Teletext fun...

Страница 31: ...e plugs connected tightly to the aerial socket Is the aerial cable damaged Are suitable plugs used to connect the aerial If you are in doubt consult your dealer No Picture means that your TV is not re...

Страница 32: ...360x768 60 Hz Appendix B AV and HDMI Signal Compatibility Input Signal Types Source Supported Signals Available EXT SCART PAL 50 60 O NTSC 60 O RGB 50 O RGB 60 O Side AV PAL 50 60 O NTSC 60 O YPbPr 48...

Страница 33: ...e etc Movie mpg mpeg MPEG1 2 MPEG Layer 1 2 3 MAX 1920x1080 30P 20Mbit sec dat MPEG1 2 MPEG2 vob MPEG2 mkv H 264 MPEG1 2 4 EAC3 AC3 mp4 MPEG4 Xvid 1 00 Xvid 1 01 Xvid 1 02 Xvid 1 03 Xvid 1 10 beta1 2...

Страница 34: ...is found and downloaded successfully with next power up TV opens with new software version Note on reboot operation Reboot is the last step in software upgrade operation if download of new software is...

Страница 35: ...50 W max PANEL 16 9 display 32 Screen Size DIMENSIONS mm DxLxH With foot 187 x 776 x 567 Weight Kg 10 25 DxLxH Without foot 94 x 776 x 524 Weight Kg 9 50 Digital Reception MHEG 5 ENGINE compliant with...

Страница 36: ...green or green and yellow The wire which is coloured blue or black must be connected to the terminal which is marked with the letter N or coloured Black The wire which is coloured brown or red must b...

Страница 37: ...50211926...

Отзывы: