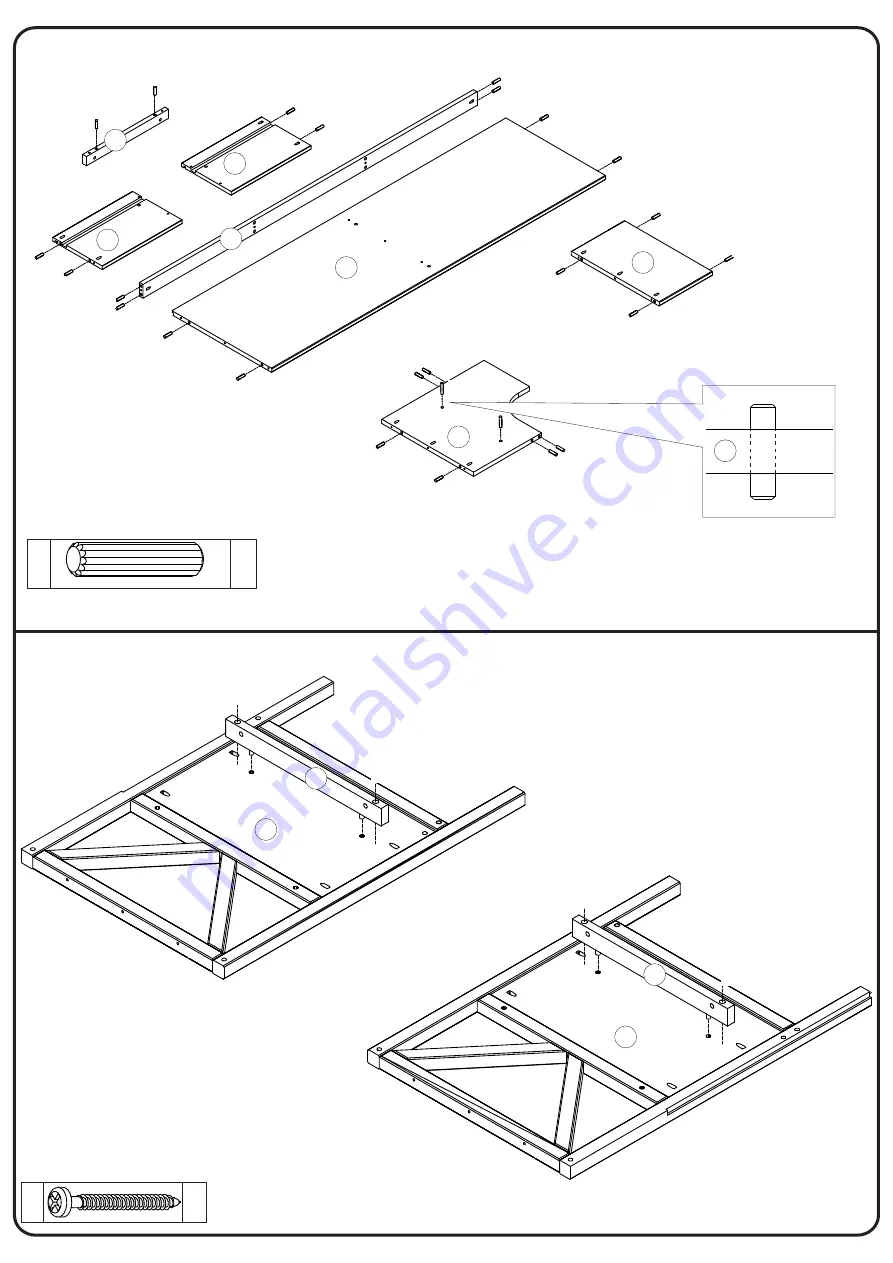
Walker Edison W60NAT3DR Скачать руководство пользователя страница 5

P.5

Step  1

Step  2

A

Ø8*30mm

44

Insert Wooden dowel (A) into part (2), (3), (4), (5), (6), (7), (8), (10) and (11). 

Secure part (6) to part (2) and (3) with screw (B). 

B

04

Ø4,0*30mm

B

2

6

6

3

B

B

B

2x

3x

3x

2x

A

A

A

A

A

A

A

A

A

A

A

A

A

A

A

A

8

7

10

11

6

4

A

A

2x

A

A

A

A

5

A

A

A

A

5

A

Содержание W60NAT3DR

Страница 1: ...lease visit our website for the most current instructions assembly tips to report damage or request parts www walkeredison com Copyright 2018 by Walker Edison Furniture Co LLC All rights reserved Revi...

Страница 2: ...P 2...

Страница 3: ...ight side of drawer 10 11 Back of drawer Drawer bottom 12 13 Lower Partition 01 pcs 01 pcs 01 pcs 02 pcs 02 pcs 02 pcs 03 pcs 03 pcs 03 pcs 03 pcs 1 Description Qty Part Description Qty Part Drawer Fr...

Страница 4: ...cs 4 0 30mm Screw Hammer recommended for assembly not included 4 0 40mm Screw 4 0 22mm F 03 pcs Handle D 04 pcs Screw 7 60mm G 01 pcs Hex key H Wall anchor Washer 6mm J 01 pcs K 02 pcs L 01 pcs Nail M...

Страница 5: ...0mm 44 Insert Wooden dowel A into part 2 3 4 5 6 7 8 10 and 11 Secure part 6 to part 2 and 3 with screw B B 04 4 0 30mm B 2 6 6 3 B B B 2x 3x 3x 2x A A A A A A A A A A A A A A A A 8 7 10 11 6 4 A A 2x...

Страница 6: ...P 6 Step 3 Step 4 Secure part 5 to part 8 with screw B B B B B B B B 5 5 8 B 06 4 0 30mm Secure part 15 to part 5 with screw B B 08 4 0 30mm 5 15 15 B B B B 2x...

Страница 7: ...P 7 Step 5 Step 6 C Secure part 4 to part 8 with screw C c c c 4 8 C 03 4 0 40mm C C C 04 4 0 40mm Secure part 7 to part 5 with screw C C C C 7 7 5 5...

Страница 8: ...P 8 Step 7 Step 8 B B B B B B Secure part 2 to part 7 and 8 with screw B 2 8 7 7 B 05 4 0 30mm B Secure part 3 to part 7 8 with screw B B B B B B 3 8 7 7 B 05 4 0 30mm...

Страница 9: ...10 B B B B B Secure part 1 to part 2 3 and 4 with screw B 1 2 3 4 B 09 4 0 30mm Secure part 1 to part 2 and 3 with screw D G D G D 04 7 0 60mm D G D G D G 2 3 1 G 01 M 04 Insert hardware M to part 2...

Страница 10: ...P 10 P 03 N 03 3 5 16mm Step 11 Step 12 P 10 P 10 H Secure back panel 14 with nails H H 10 10 22 H H H H H H H H H H H H H H H H H H H H H 14 H Fix stop P with screw N to part 8 90 8 N P N P N P P N...

Страница 11: ...P 11 Step 13 Step 14 P 11 P 11 12 Insert part 12 to part 10 and 11 10 11 3x Secure part 10 11 in drawer front part 9 with screw B B 10 11 9 B B 3x B B 12 4 0 30mm...

Страница 12: ...P 12 Step 15 Step 16 9 Insert Hardware F with screw E E 03 4 0 22mm F 03 F E 3x Secure part 13 to part 10 and 11 with screw B B B B B 3x 13 11 10 B 12 4 0 30mm...

Страница 13: ...l anchor and hardware are included with this product sure hardware is suitable for your walls before wall materials may require di erent types of anchors Please make installing as di erent Atach screw...

Страница 14: ...x from a standard candle can be used 2 Apply the wax by rubbing it on the wooden guide rails where there is wood on wood contact when opening and closing the drawer Wax should be room temperature do n...

Отзывы: