P.3
Copyright
©
2018, by Walker Edison Furniture Co., LLC. All rights reserved.
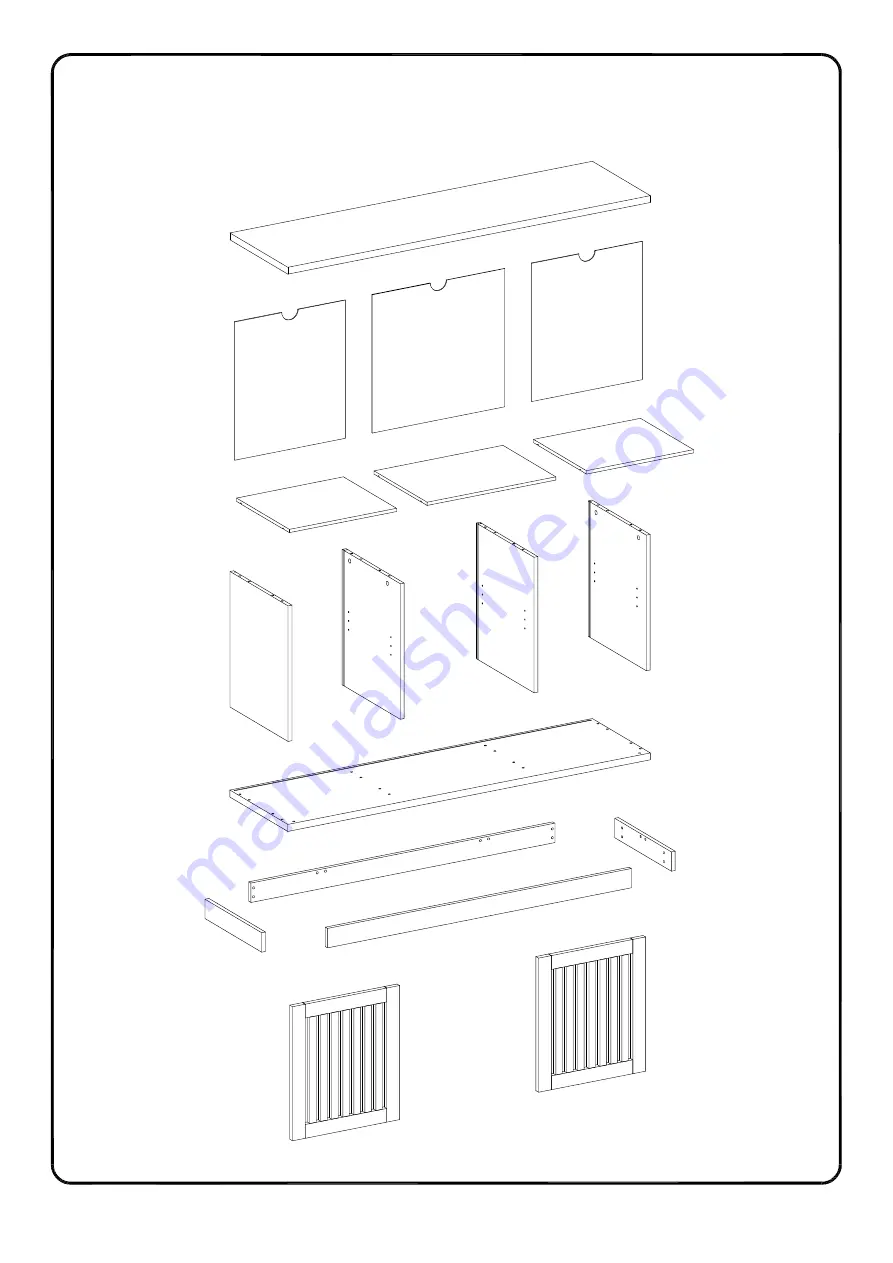
Parts List
1
11
12
9
10
3
4
5
6
2
7
8
13
14
Страница 1: ...y Instructions Revised 04 23 2018 Please visit our website for the most current instructions assembly tips report damage or request parts www walkeredison com Copyright 2018 by Walker Edison Furniture Co LLC All rights reserved ...
Страница 2: ...wood dowels in place When first inserting dowels locate the appropriate hole for the dowel place a small amount of glue in the hole and insert the dowel Wipe away excess glue immediately In future assembly steps when dowels are necessary to attach assembly parts together place a small amount of glue on the end of the dowel before attaching parts together Wipe away excess glue immediately VI A Phil...
Страница 3: ...P 3 Copyright 2018 by Walker Edison Furniture Co LLC All rights reserved Parts List 1 11 12 11 9 10 9 3 4 5 6 2 7 8 8 7 13 14 ...
Страница 4: ... L M N P Q pcs 16 pcs Wooden dowel Ø8x30mm pcs R S pcs T pcs pcs pcs Door Hinge 2 Door Hinge 2 Plastic pivot 4 Cam lock Ø15x11mm Ø6x35mm Cam bolt 8 8 Ø6x50mm 8 Bolt Screw Ø3x17mm 12 Ø8x5x16mm 12 Shelf support pin 4 Screw Ø3x12mm 8 1 Glue tube Screw Ø3x15mm Plastic wedge 12 1 Ø30mm 8 Sticker pcs M 4 Hex Key Copyright 2018 by Walker Edison Furniture Co LLC All rights reserved pcs pcs pcs 2 Door stop...
Страница 5: ...P 5 Copyright 2018 by Walker Edison Furniture Co LLC All rights reserved 1 3 4 5 6 A A A A A A A A A A A A A A A A B B B B B B B B Attach cam bolt B to part 1 with screwdriver Insert wooden dowel A into part 3 4 5 6 ...
Страница 6: ... P 6 Copyright 2018 by Walker Edison Furniture Co LLC All rights reserved 2 2 3 4 5 6 3 4 5 6 11 11 12 F H Attach part 2 to part 3 4 5 6 using bolt F with hex key H Slide back panel 11 12 into grooves as per diagram ...
Страница 7: ...er Edison Furniture Co LLC All rights reserved 2 1 3 x 2 1 3 4 5 6 7 8 C C C C C C C C G H J Attach part 1 to part 3 4 5 6 then insert and secure cam lock C to part 3 4 5 6 to lock it Attach connector J to part 7 8 using bolt G with hex key H ...
Страница 8: ...P 8 Copyright 2018 by Walker Edison Furniture Co LLC All rights reserved 2 7 7 8 8 7 7 8 8 G G H H J J Attach connector J to part 7 using bolt G with hex key H Attach connector J to part 2 using bolt G with hex key H ...
Страница 9: ...tep 9 P 9 Copyright 2018 by Walker Edison Furniture Co LLC All rights reserved 11 11 12 D D D D S T T Attach plastic wedge T to part 11 12 using screw S with screwdriver Place sticker D over holes as per diagram ...
Страница 10: ...1 P 10 Copyright 2018 by Walker Edison Furniture Co LLC All rights reserved 1 3 4 5 6 E E E E E E E E E L M M Attach door stopper L to part 1 using bolt M with screwdriver Insert shelf support pin E into part 3 4 5 6 ...
Страница 11: ...by Walker Edison Furniture Co LLC All rights reserved 3 4 5 6 9 9 10 13 14 K K N P R R Place shelf 9 10 on top of support pin Attach door hinge N P to part 13 14 using screw R with screwdriver Attach bolt K to part 13 14 with screwdriver ...
Страница 12: ... 1 2 13 P P Q Q Q Q Q R Place plastic pivot Q over holes as per diagram Place door hinge P into plastic pivot Q on part 2 Insert top door hinge into plastic pivot Q on part 1 then slide the door 13 into the bottom hinge P Secure door by tightening door hinge P using screws R with equal pressure ...
Страница 13: ...ll rights reserved Final Assembly 1 2 14 N N Q R Place door hinge N into plastic pivot Q on part 2 Insert top door hinge into plastic pivot Q on part 1 then slide the door 14 into the bottom hinge N Secure door by tightening door hinge N using screws R with equal pressure ...