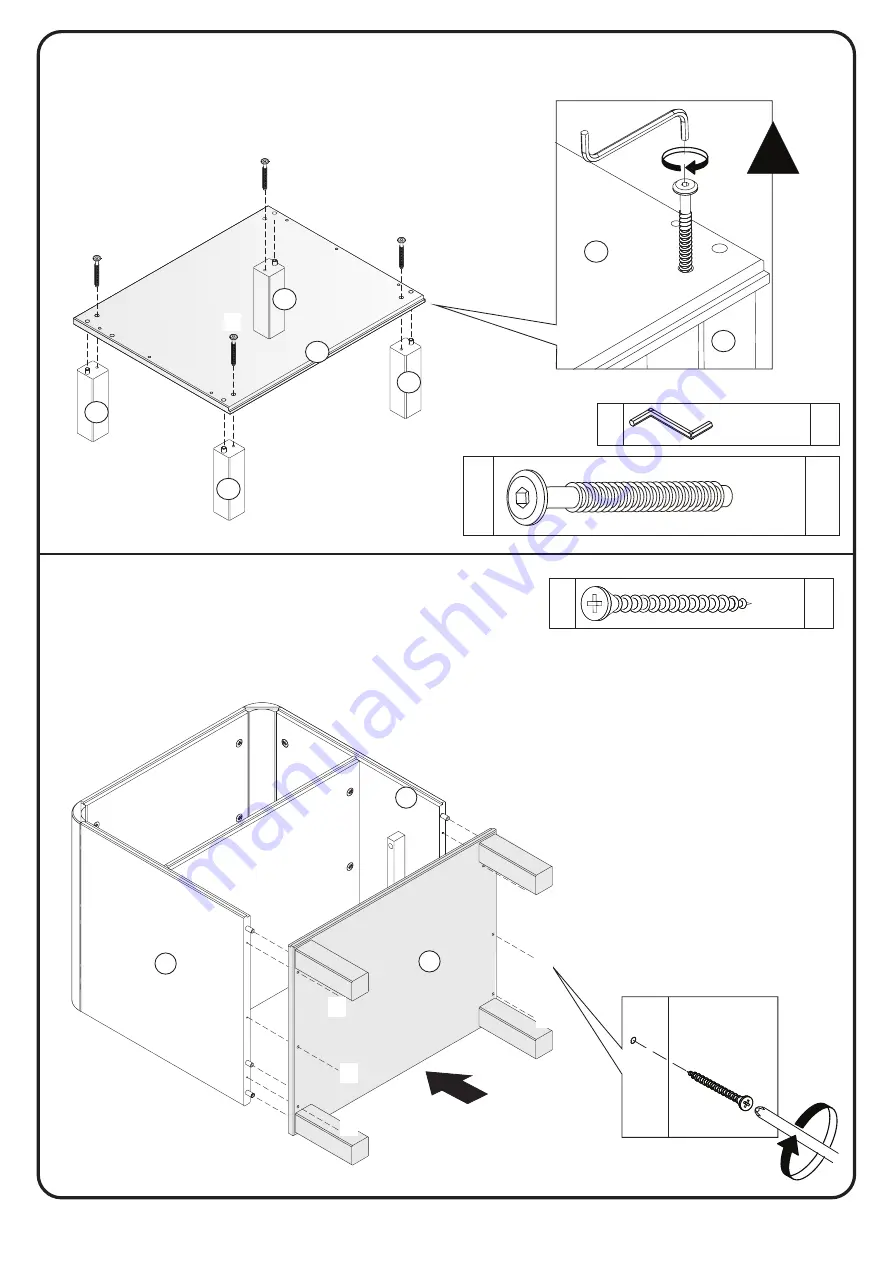
Walker Edison ELIB4C Скачать руководство пользователя страница 9

P.9


Step 9

Step 10

06

D

ø4,0*40mm

Secure part 04 to parts 02, 03 with screw (D)
and tighten with a Phillips head screwdriver.

D

Insert screw (K) into part 04 and 06, and tighten with hex key (L). 

04

06

06

06

06

K

K

K

K

K

L

ø7,0*50mm

01

L

04

K

06

04

!

D

D

D

D

D

D

03

02

04

Содержание ELIB4C

Страница 1: ...re Co LLC All rights reserved Copyright 2018 by Walker Edison Furniture Co LLC All rights reserved Revised 05 2023 V1 Please visit our website for the most current instructions assembly tips to report...

Страница 2: ...P 2 onto the wood that to keep the drawers sliding smoothly hen needed after VII Maintenance Guide A Phillips head screwdriver and hammer is required for the assembly of this product...

Страница 3: ...1 02 03 04 05 07 13 25 01 pcs 01 pcs 01 pcs 01 pcs 01 pcs 04 pcs 01 pcs 02 pcs 02 pcs 01 pcs 01 pcs 01 pcs 01 pcs 01 pcs Side rail Bottom panel 06 08 09 10 11 12 Shelf 09 08 11 01 02 03 05 07 25 25 04...

Страница 4: ...ist 8 40mm 02 pcs 26 pcs 04 pcs Screw 06 pcs Screw 04 pcs Screw 02 pcs Nail 16 pcs Handle 01 pc 22 pcs Screw 06 pcs A B C D E F G H I M 8 30mm 10 20mm 4 0 40mm 3 5 30mm 3 5 16m 8 8mm Cam Bolt 5 0 24mm...

Страница 5: ...n dowel B into parts 01 02 03 05 06 Step 1 22 B 8 30mm Insert wood dowel C into parts 25 c 04 C 10 20mm Attention to the dowel lenght 10 20mm C Step 2 2x B C C 05 25 B B B B B B B B B B B B B B B B B...

Страница 6: ...m Insert Cam Bolts I with a Phillips head screwdriver into parts 02 03 13 Secure parts 25 to parts 02 and 03 with screw M and phillips head screwdriver M M M M 06 M 4 25mm 02 03 25 25 25 2x I I I I I...

Страница 7: ...ocks J into part 5 and tighten with a Phillips head screwdriver 1st 2nd 3nd J 03 15 12mm J Secure part 05 to part 03 Insert cam locks J into part 5 and tighten with a Phillips head screwdriver 03 15 1...

Страница 8: ...o part 01 Insert cam locks J and tighten with a Phillips head screwdriver 1st 2nd 3nd 1st 2nd 3nd 06 15 12mm J Secure parts 13 to parts 02 03 Insert cam locks J and tighten with a Phillips head screwd...

Страница 9: ...0mm Secure part 04 to parts 02 03 with screw D and tighten with a Phillips head screwdriver D Insert screw K into part 04 and 06 and tighten with hex key L 04 06 06 06 06 K K K K K L 7 0 50mm 01 L 04...

Страница 10: ...il G and hammer Insert wooden dowel B into parts 09 10 Insert Cam Bolts I with a Phillips head screwdriver into part 08 02 B 8 30mm 04 I 5 0 24mm 07 05 07 04 G G G G G G G G G G G G G G G G 09 10 B B...

Страница 11: ...n with a Phillips head screwdriver Insert part 11 between parts 09 and 10 1st 2nd 3nd J Insert part 12 between parts 09 and 10 Secure part 12 to parts 09 and 10 with screw E and phillips head screwdri...

Страница 12: ...30mm A 02 A 8 40mm Insert wood dowel A on the inside of all drawers with the drawer inside the unit after having passed the wood dowel that is in the drawer slide Insert wood dowel B into part 25 with...

Страница 13: ...P 13 Step 18 06 N 17mm N N N N Insert cam lock cover N into cam lock J in the parts 02 03 02 03 02 N N N 29 lbs 41 lbs 44 lbs...

Отзывы: