P.6
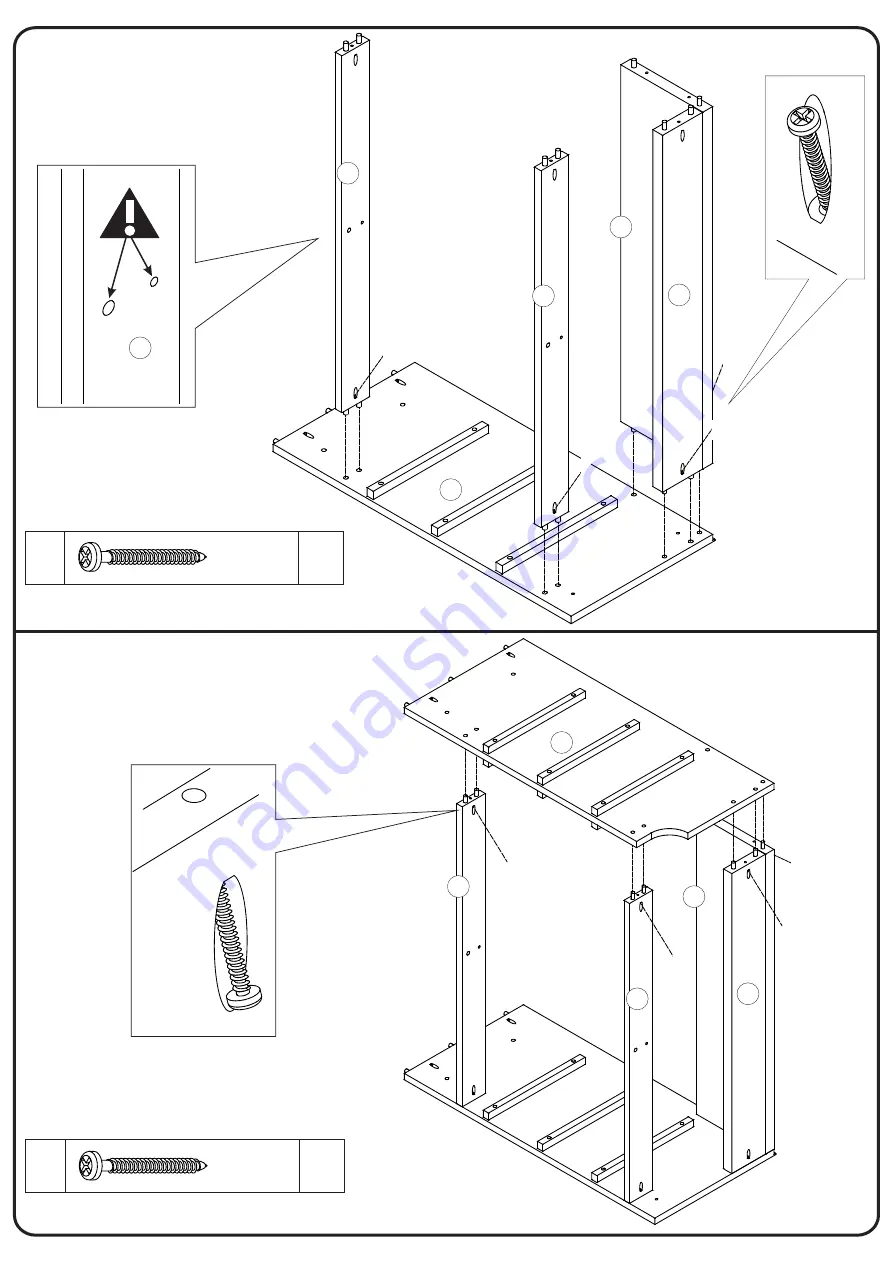
Step 3
Step 4
Secure part (2) to part (6), (9) and (10) with screw (B).
B
6
9
10
2
12
Secure part (12) to part (6), (9) and (10) with screw (B).
05
Ø3,5*30mm
Страница 1: ...ons Please visit our website for the most current instructions assembly tips to report damage or request parts www walkeredson com Copyright 2018 by Walker Edson Furniture Co LLC All rights reserved Revised 01 2021 BR9DBENDR ...
Страница 2: ...P 2 ...
Страница 3: ...cription Qty Part Description Qty Part 8 01 pcs Drawer bottom 15 09 pcs 2 3 4 6 7 9 18 8 15 14 16 Drawer back 16 06 pcs 17 06 pcs 11 17 Long back crossbeam 9 01 pcs Small back Panel 5 13 19 6x 10 5 5 5 5 5 5 5 5 5 5 5 5 5 5 5 6 4 11 3x 20 21 22 23 18 15 14 12 18 19 02 pcs 01 pcs 20 01 pcs 21 03 pcs 22 03 pcs 23 03 pcs Center panel Back Panel Long Front Drawer Side Foot Front Foot Central runner Su...
Страница 4: ... Screw 41 pcs Ø10 10 Nail 30 pcs Hammer recommended for assembly not included Screw Ø4 0 25mm 36 pc Ø8 20mm Wooden dowel G Corner 04 pcs K 08 pcs Ø3 5 14mm Screw J H 12 pcs Screw m4 22mm 12 pcs Handle M Wall anchor 01 pc L Washer 02 pcs Ø6mm 01 pc 01 pc N Profile H ...
Страница 5: ...D Insert Wooden dowel A into part 2 3 and 12 2 3 A Insert Wooden dowel E into part 5 D 5 D D 5 D D 5 D D 5 D D 5 D D 5 D D 5 D D 5 D D 5 D D D D D 5 5 5 2x 2x 18x 9x 9x E E A A A A A A A A A A A A A A A A A A A A A A A A A A A A A A A A A A 10 9 5 20 6 12 8 7 4 18 15 14 A A A A A A A A A A E 76 36 A D 09 24 Ø4 25mm Ø8 30mm Ø8 30mm Ø8 20mm ...
Страница 6: ...P 6 Step 3 Step 4 Secure part 2 to part 6 9 and 10 with screw B B B B B B B B B B B 6 6 9 10 10 9 6 6 6 2 12 Secure part 12 to part 6 9 and 10 with screw B B 05 Ø3 5 30mm B 05 Ø3 5 30mm ...
Страница 7: ...P 7 Step 5 Step 6 P 7 P 7 B B B B B B B B B B 12 4 4 4 4 7 7 8 8 3 Secure part 12 to part 4 7 and 8 with screw B Secure part 3 to part 4 7 and 8 with screw B B 05 Ø3 5 30mm B 05 Ø3 5 30mm ...
Страница 8: ... Step 7 Step 8 Secure part 20 to part 1 with screw B B B B B B B B B 1 1 20 20 2 12 3 Secure part 1 to part 2 3 and 12 with screw B Secure part 20 to part 6 with screw B 6 B B B 02 Ø3 5 30mm B 07 Ø3 5 30mm ...
Страница 9: ... Step 10 Secure part 18 to part 2 and 03 with screw D Secure part 19 18 18 3 2 19 18 18 D D D D C G C C C G C C G C C G C C G C C C C G G D D 04 Ø4 25mm C 08 Ø3 5 14mm G 04 to part 18 with hardware G and screw C ...
Страница 10: ... 12 Secure part 5 to part 2 3 2 and 12 with screw D D 5 D 5 D 5 D 5 D 5 D 5 A Insert Wooden dowel A into part 5 A A A A A A A A A A A A A A A A A A 5 5 5 5 5 5 5 5 5 5 5 5 5 5 5 5 5 5 20 12 3 2 D 12 Ø4 25mm A 18 Ø8 30mm ...
Страница 11: ...1 Secure back panel 11 and hardware N to body with nails F F 90 F F F F F F F F F F F F F F F F F F F F F F F F F F 11 11 11 11 D K L K D Attach hardware L part 1 with screw D K L N 01 F 30 Ø10 10mm K 01 D 01 Ø4 25mm L 01 N N ...
Страница 12: ... Insert part 22 between parts 14 and 15 Secure part 23 with screw B B B B B B B B 22 23 21 15 14 6x B B B B B B B B B Secure part 14 and 15 to part 13 with screw B Insert part 16 between parts 14 and 15 Secure part 17 with screw B 17 13 14 15 16 B 24 Ø3 5 30mm B 48 Ø3 5 30mm ...
Страница 13: ...l A on the inside of all drawers while drawer is inside the unit Make sure dowel is flush with panel Step 18 A A A A A A 21 13 13 21 21 13 13 13 Secure hardware H part 13 and 21 with screw J 3x 21 J H J H 13 J H 6x H 12 J 12 ØM4 22mm A 18 Ø8 30mm ...
Страница 14: ...d hardware are included with this product Please make sure hardware is suitable for your walls before installing as different wall materials may require different types of anchors Top Wall M K B Step 19 B 01 Ø3 5 30mm K 01 M 01 ...
Страница 15: ...ed or Paraffin wax from a standard candle can be used 2 Apply the wax by rubbing it on the wooden guide rails where there is wood on wood contact when opening and closing the drawer Wax should be room temperature do not melt the wax onto the wood 3 Wax should be applied every few months for the first year and then only when needed after that to keep the drawers sliding smoothly Assembly Complete ...