Walimex Pro LED Strip Light Slim 300 Daylight Скачать руководство пользователя страница 12

22

23

7.  Power supply

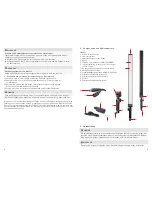
7.1 Connection of the power adapter

•  Switch the device off with the ON/OFF switch / dimmer wheel (5) by turning the knob to <OFF>.

•  Connect the round connection socket of the light (10) with the round plug of the power adap-

ter unit (11).

•  Connect the 3-pin power supply cable (13) to the power adapter unit (12).

•  Plug the power cable into the socket of the local electric power supply (AC 100-240V/50/60 Hz).

•  The LED light is now ready for use.

•  Do the same in reverse to remove the power supply


NOTE

Compare the local electric power supply with the connection values of the  

device. Should the connection values not match, please contact  

[email protected] or phone +49 8432-9489-0.

• 

Only connect the power supply unit to an earthed plug.


NOTE

After use, disconnect the device from the local power supply by simply pulling out the mains plug. 

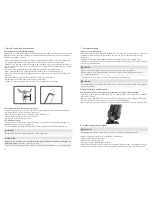
8. Operating the device

8.1 Switching the device on/off / light brightness adjustment (dimmer function)

•  Switch the device on with the ON/OFF switch/dimmer wheel (5) by turning the knob to <Pow

-

er on>

•  The LED bulbs start to light up

•  Turn the ON/OFF switch / dimmer wheel (5) to adjust the light brightness.

•  The luminous intensity can be selected from 0 to 100 %.

•  

After use switch the device off again with the ON/OFF switch / dimmer wheel (5)

9.  Transporting, storing the device

 WARNING

Danger of fire caused by hot parts of the equipment. Allow the device to cool down completely.

• Switch off the device (See „Switching the device on, off).
• Allow the device to cool down completely.
• Unplug the power supply cable from the device.
• If necessary clean the device (See „Cleaning the device“).
•  Lay the device and all disassembled elements into the original article packaging box and 

transport of store as specified in the technical specifications. See technical specifications.

10.  Troubleshooting

 Problem

Possible cause

Remedy

Device is switched on, but 

shows no function

Power cord is not plugged in 

or not properly inserted

Connect power cable and 

power supply correctly

Plug and socket of the device 

and the power supply is not 

connected

Connect the plug and socket 

of the device and the power 

supply

LED lamps does not

shine

Device ist switched off

Turn on the device

Power level to low

Increase the power of the 

dimmer control.

The device is defective.

Connect our service.

Содержание LED Strip Light Slim 300 Daylight

Страница 1: ...en China IT Fabbricato in Cina WALSER GmbH Co KG Senefelderstrasse 23 86368 Gersthofen Germany info walser de www walser de Gebrauchsanleitung Instruction Manual LED Strip Light Slim 300 Daylight LED...

Страница 2: ...12 12 Zubeh r 12 13 Entsorgung und Umweltschutz 13 14 Verweis auf die Konformit tserkl rung 13 15 Technische Daten 13 1 Understanding these user instruction correctly 16 1 1 Markings on the device 16...

Страница 3: ...schwere oder gar t dliche Verletzungen hin wenn ein bestimmtes Risiko nicht vermieden wird HINWEIS Weist auf m gliche Sach oder Ger tsch den oder sonstige wichtige Informationen in Zusammenhang mit d...

Страница 4: ...sich die Leitungsdr hte so stark erw rmen dass deren Isolierung schmilzt oder die Leitungsdr hte sogar durchschmelzen Dadurch kann es zu einem Brand kommen Verwenden Sie f r das Ger t nur die mitgeli...

Страница 5: ...9489 0 an Im Rahmen von Produktverbesserungen behalten wir uns das Recht auf technische und optische nderungen vor Abbildungen k nnen geringf gig voneinander abweichen Richtlinie 2010 30 EU zur Energ...

Страница 6: ...e das Ger t am EIN AUS Schalter 5 durch ein Drehen des Knopfes auf OFF aus Verbinden Sie die runde Anschlussbuchse der Leuchte 10 mit dem Rundstecker des Netzteils 11 Verbinden Sie das Kaltger tekabel...

Страница 7: ...de an den Leucht mitteln k nnen zum Bersten der Leuchtmittel f hren 12 Zubeh r Die LED Leuchte kann mit zus tzlichem Zubeh r versehen werden So finden Sie in unserem Webshop unter www foto walser de z...

Страница 8: ...Unser Garantieversprechen WALSER ist bekannt f r seine hochwertige Verarbeitung beste Funktionalit t und einen kun dennahen Service Um unserem au ergew hnlichen Serviceniveau zus tzlichen Ausdruck zu...

Страница 9: ...ations in photogra phy and videography It is very easy to use and offers latest and very powerful LED technology for your photo and video projects The Walimex pro LED strip light Slim 300 Daylight off...

Страница 10: ...G Fire danger through overheating The device can overheat if you operate it with covered ventilation slots The device itself or easily inflammable materials in close distance could catch fire Don t co...

Страница 11: ...le bracket fixing screw 9 so far that the bracket can be inserted into the mounting adapter of a suitable lamp stand Insert the light with the holder into the holder adapter of a suitable lamp stand U...

Страница 12: ...bulbs start to light up Turn the ON OFF switch dimmer wheel 5 to adjust the light brightness The luminous intensity can be selected from 0 to 100 After use switch the device off again with the ON OFF...

Страница 13: ...and environmental protection Dispose of the device at a legally specified collection point such as with the manufacturer electronics brands or at a local disposal depot This service is free of charge...

Страница 14: ...ermany Our warranty promise WALSER is known for its high quality workmanship optimal functionality and customer ori ented service To highlight our exceptional service level we offer a 2 year warranty...

Отзывы: