background image

63

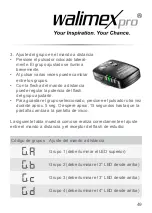
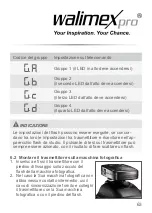
Codice del gruppo

Impostazione sul telecomando

Gruppo 1 (il LED in alto deve accendersi)

Gruppo 2  

(il secondo LED dall‘alto deve accendersi)
Gruppo 3  

(il terzo LED dall‘alto deve accendersi)
Gruppo 4  

(il quarto LED dall‘alto deve accendersi)


INDICAZIONE

Le impostazioni del flash possono essere eseguite, se concor

-

dano tra loro le impostazioni tra trasmettitore e ricevitore nell‘ap-

parecchio flash da studio. Il pulsante di test sul trasmettitore può 

sempre essere azionato, con il risultato di fare scattare un flash.

6.2  Montare il trasmettitore sulla macchina fotografica

1.  Inserisca e fissi il trasmettitore con il 

piedino di fissaggio sullo zoccolo del 

flash della macchina fotografica.

2.  Nel caso la Sua macchina fotografica non 

abbia nessun contatto intermedio, usi il 

cavo di sincronizzazione fornito e colleghi 

il trasmettitore con la Sua macchina 

fotografica o con il piedino del flash.

Содержание Excellence

Страница 1: ...Gebrauchsanleitung Instruction Manual Remote Control Excellence Fernbedienung...

Страница 2: ...standteile und Bedienelemente 11 5 Kurzanleitung 11 6 Ger t f r den Einsatz vorbereiten 12 6 1 Kanal einstellen 12 6 2 Sender an der Kamera anbringen 15 7 Ger te bedienen 15 8 Probleme beheben 16 9 Ge...

Страница 3: ...22 5 Quick reference guide 23 6 Preparing the devices for use 23 6 1 Setting the channel 23 6 2 Mounting the transmitter to the camera 26 7 Operating the devices 26 8 Troubleshooting 27 9 Maintaining...

Страница 4: ...des appareils 5 R sum des instructions 34 6 Pr paration des appareils avant utilisation 34 6 1 R gler le canal 34 6 2 Raccorder l metteur l appareil photo 37 7 Utilisation des appareils 38 8 R soudre...

Страница 5: ...l de los dispositivos 5 Manual breve 46 6 Preparaci n para el uso de los dispositivos 47 6 1 Ajuste del canal 47 6 2 Colocaci n del emisor en la c mara 50 7 Manejo de los dispositivos 50 8 Esoluci n d...

Страница 6: ...egli apparecchi 5 Brevi istruzioni per l uso 60 6 Preparazione all uso dell apparecchio 60 6 1 Impostazione del canale 60 6 2 Montare il trasmettitore sulla macchina fotografica 63 7 Come usare gli ap...

Страница 7: ...rsonen und Sachsch den vermeiden Beachten Sie alle Sicherheitshinweise in dieser Gebrauchsan leitung sorgf ltig Bewahren Sie diese Gebrauchsanleitung sorgf ltig auf Geben Sie diese Gebrauchsanleitung...

Страница 8: ...recht Das Symbol auf dem Produkt der Gebrauchsanleitung oder der Verpackung weist auf diese Bestimmungen hin Mit der Wiederverwertung der stofflichen Verwertung oder anderen Formen der Verwertung von...

Страница 9: ...r die Leitungsdr hte sogar durchschmelzen Dadurch kann es zu einem Brand kommen Betreiben Sie das Ger t nicht mit nassen H nden oder F ssen Betreiben Sie das Ger t nur in trockenen R umen Betreiben Si...

Страница 10: ...and wie diese Gebrauchsan leitung es vorschreibt 3 Ger t auspacken und pr fen 1 Packen Sie den Lieferumfang vorsichtig aus 2 Pr fen Sie ob der Lieferumfang vollst ndig vorhanden ist Fernbedienung Exce...

Страница 11: ...zanleitung HINWEIS Die detaillierte Anleitung zu den nachfolgenden T tigkeiten finden Sie in den jeweiligen Abschnitten dieser Gebrauchsanleitung Halten Sie bei der ersten Inbetriebnahme die Reihenfol...

Страница 12: ...rch verschieben der Pins den Abgleich zwischen Studioblitzger t und Sender vor 2 Kanal am Studioblitzger t einstellen Siehe Bedienungsanleitung Studioblitzger t Nachfolgende Tabelle zeigt wie der Code...

Страница 13: ...1 1 2 3 4 2 1 2 3 4 3 1 2 3 4 4 1 2 3 4 5 1 2 3 4 6 1 2 3 4 7 1 2 3 4 Einstellen des Kanals beim integrierten Funk Fernausl ser Kanal Code Einstellung 8 1 2 3 4 9 1 2 3 4 10 1 2 3 4 11 1 2 3 4 12 1 2...

Страница 14: ...ausgew hlte Gruppe zu speichern dr cken Sie den Taster ein weiteres Mal f r ca 5 Sec Oder warten Sie ca 15 Sekunden lang bis das Display am Studioblitzger t zur Startseite wechselt Nachfolgende Tabell...

Страница 15: ...an der Kamera anbringen 1 Stecken Sie den Sender mit dem Schuh auf Ihren Blitzsockel der Kamera 2 Sollte Ihre Kamera keinen Mittenkontakt haben benutzen Sie bitte das bei liegende Synchrokabel und ver...

Страница 16: ...Gruppe eingestellt An beiden Ger ten die gleiche Kanal Gruppen einstellung vornehmen siehe Kanal einstellen Batterie am Sender sind zu schwach Batterie austauschen siehe Batterie tauschen 9 Ger t inst...

Страница 17: ...ie lich Batterien die der vor geschriebenen Spezifikation entsprechen Siehe Technische Daten 1 Ziehen Sie den Batteriefachdeckel auf der Unterseite des Ger tes ab 2 Tauschen Sie die Batterie aus Achte...

Страница 18: ...Batterie CR 2032 3V Lagerbedingungen Trocken und staubfrei in Karton bei 20 C bis 50 C 13 Verweis auf die Konformit tserkl rung Hiermit erkl rt WALSER GmbH Co KG dass sich das Ger t in bereinstimmung...

Страница 19: ...ed to know in order to avoid damage to persons or property Strictly follow all notes on safety in these instructions for use Keep these instructions for use in a safe place If you sell your equip ment...

Страница 20: ...uct the instructions for use or the packaging refers to these provisions The recycling the material sensiti ve recycling or any other form of recycling of waste equipment batteries is an important con...

Страница 21: ...and cable wires are free of damage This could be caused e g by exposure to heat chemical or mechanical influences such as chafing buckling tearing rolling over or chewing pets Take care to prevent th...

Страница 22: ...free of damage NOTE If the scope of delivery is incomplete or damaged please contact info walimexpro de or call our service hotline under the number 49 8432 9489 0 Within the scope of product improvem...

Страница 23: ...ess test button 6 Preparing the devices for use 6 1 Setting the channel You can choose from 16 different channels 1 Adjust the channel on the back of the transmitter on certain models in the battery c...

Страница 24: ...integrated radio remote control Channel Code Setting 0 1 2 3 4 1 1 2 3 4 2 1 2 3 4 3 1 2 3 4 4 1 2 3 4 5 1 2 3 4 6 1 2 3 4 7 1 2 3 4 Channel Code Setting 8 1 2 3 4 9 1 2 3 4 10 1 2 3 4 11 1 2 3 4 12 1...

Страница 25: ...s several times to toggle bet ween the groups Use the arrow keys on the remote control to regulate the flash power for the set group Press the button once again for approx 5 sec to save the selected g...

Страница 26: ...l trigger a flash 6 2 Mounting the transmitter to the camera 1 Plug the transmitter with its shoe on the flash socket of your camera 2 Should your camera not have a hot shoes contact you should use th...

Страница 27: ...eceiver Make the same channel group settings on both devices see channel adjustment Battery on transmitter too weak Replace the battery see battery replacement 9 Maintaining the device 9 1 Continuous...

Страница 28: ...d batteries which comply with the prescribed specification See technical specifications 1 Pull off the battery compartment cover on the bottom side of the device 2 Replace the battery Ensure correct p...

Страница 29: ...ntact less than 0 01 mA Electric power supply CR 2032 3V Battery Storage conditions Dry and dust free in cardboard box at 20 C to 50 C 13 Reference to the Declaration of Conformity WALSER GmbH Co KG h...

Страница 30: ...voir afin d viter tout dommage corporel ou mat riel Veuillez respecter scrupuleusement toutes les consignes de s curit voqu es dans la pr sente notice d utilisation Conservez bien cette notice Remette...

Страница 31: ...duit la notice d utilisation ou l emballage informe des dispositions applicables Avec le recyclage des mat riaux ou des anciens appareils et batteries vous contribuez de mani re significative la prote...

Страница 32: ...uement dans des pi ces s ches N utilisez pas l appareil l air libre V rifiez l absence de dommages au niveau des c bles et des fils d alimentation Certains dommages pourraient se produire sous l effet...

Страница 33: ...e la livraison est incomplet ou endommag veuillez vous adresser info walimexpro de ou contacter notre hotline au 49 8432 9489 0 Afin d am liorer constamment nos produits nous nous r servons le droits...

Страница 34: ...bouton d essai 6 Pr paration des appareils avant utilisation 6 1 R gler le canal Au total vous pouvez choisir entre 16 canaux diff rents 1 R glez le canal l arri re de l metteur au niveau du comparti...

Страница 35: ...d clencheur radio int gr Canal Code R glage 0 1 2 3 4 1 1 2 3 4 2 1 2 3 4 3 1 2 3 4 4 1 2 3 4 5 1 2 3 4 6 1 2 3 4 7 1 2 3 4 Canal Code R glage 8 1 2 3 4 9 1 2 3 4 10 1 2 3 4 11 1 2 3 4 12 1 2 3 4 13 1...

Страница 36: ...t Appuyez plusieurs fois pour passer d un groupe l autre Les touches fl ch es de la t l commande permettent de r gler la puissance du flash pour le groupe s lectionn Pour enregistrer le groupe s lecti...

Страница 37: ...flash peuvent tre effectu s uniquement lorsque les r glages entre l metteur et le r cepteur concordent Le bou ton d essai de l metteur peut tre activ et d clenche un flash 6 2 Raccorder l metteur l ap...

Страница 38: ...Probl me Cause possible Solution Le d clencheur radio ne fonctionne pas Les c bles ne sont pas correctement ins r s Ins rer correctement tous les c bles Le flash studio est teint Allumer le flash Le c...

Страница 39: ...les et connecteurs X ATTENTION En cas de dommage Risque de d charge lectrique et d incendie en cas de court circuit Confiez la r paration uniquement un lectricien sp cialis 9 2 Nettoyage ATTENTION Ris...

Страница 40: ...mpartiment des piles l arri re de l appareil 2 Remplacez les piles Veillez respecter les polarit s 3 Refermez le couvercle du compartiment des piles 10 Accessoires et options Notre site web dispose de...

Страница 41: ...tral au dessous de 0 01 mA Alimentation CR 2032 3V Conditions de stockage Au sec et l abri de la poussi re dans l emballage d origine de 20 C 50 C 13 Rappel de la d claration de conformit WALSER GmbH...

Страница 42: ...ales o materiales Preste especial atenci n a las instrucciones de seguridad de este manual instrucciones Conserve correctamente este manual de instrucciones P sele este manual de instrucciones al nuev...

Страница 43: ...s de la jurisprudencia regional correspondiente Este s mbolo sobre el producto el manual de instruc ciones o sobre el embalaje le avisa de dichas disposi ciones Con el reciclaje la reutilizaci n de ma...

Страница 44: ...se funda incluso el propio hilo conductor De esta forma puede producirse un fuego No manipule el dispositivo con las manos o los pies mojados Use el dispositivo solo en espacios secos No utilice el d...

Страница 45: ...flash conectado con el bot n de prueba 3 Desempaquetado y comprobaci n de los dispositivos 1 Desempaquete el volumen de entrega con cuidado 2 Compruebe si el volumen de entrega est completo y contiene...

Страница 46: ...5 Tecla de ajuste de grupo 5 Manual breve NOTA Las instrucciones detalladas sobre las diferentes acciones a rea lizar las encontrar en los respectivos apartados de este manual de uso Para evitar da o...

Страница 47: ...rav s de las diferentes clavijas para la adaptaci n entre el flash de estudio y el emisor 2 Ajuste el canal al flash de estudio Consulte el manual de instruc ciones del flash de estudio La siguiente t...

Страница 48: ...rador a distancia integrado Canal C digo Ajuste 0 1 2 3 4 1 1 2 3 4 2 1 2 3 4 3 1 2 3 4 4 1 2 3 4 5 1 2 3 4 6 1 2 3 4 7 1 2 3 4 Canal C digo Ajuste 8 1 2 3 4 9 1 2 3 4 10 1 2 3 4 11 1 2 3 4 12 1 2 3 4...

Страница 49: ...rupo seleccionado presione el pulsador otra vez durante aprox 5 seg O espere aprox 15 segundos hasta que la pantalla cambia a la pantalla de inicio La siguiente tabla muestra como se realiza correctam...

Страница 50: ...c mara 1 Coloque el emisor con la base en el casquillo del flash de la c mara 2 Si su c mara no tiene contacto cen tral utilice el cable de sincronizaci n suministrado y conecte el emisor a su c mara...

Страница 51: ...estudio Entre el emisor y el receptor no est ajustado el mismo canal grupo En ambos dispositivos realice el ajuste del mismo grupo de canales consulte el ajuste del canal La bater a en el emisor es de...

Страница 52: ...l dispositivo entre en contacto con la humedad o en agua NOTA Eliminar la suciedad aparecida con un pa o de microfibras seco 9 3 Cambio de bater a NOTA Para este dispositivo use solo pilas que cumplan...

Страница 53: ...centro local de eliminaci n de residuos 12 Datos t cnicos Alcance en exteriores ca 30m Velocidad de sincronizaci n 1 200 Sek Peso total ca 25g Dimensiones L x An x Al ca 3 x 4 x 6cm Condiciones v lid...

Страница 54: ...Por la presente WALSER GmbH Co KG declara que el dispo sitivo cumple con los requisitos b sicos y las normas pertinentes en vigor de la Directriz 1999 5 CE La Declaraci n de Conformidad puede consulta...

Страница 55: ...e e alle cose Osservi con cura tutte le indicazioni per la sicurezza contenute in queste Istruzioni per l uso Conservi con cura queste Istruzioni per l uso Consegni queste Istruzioni per l uso al nuov...

Страница 56: ...ri di questa disposizione di legge sono regolati dalle singole normative regionali Il simbolo riportato sul prodotto sulle Istruzioni per l uso o sull imballaggio fornisce indicazioni riguardo a quest...

Страница 57: ...olgorazione e di incendio a causa di corto circui to o di funzionamento difettoso Un cortocircuito pu essere causato tra l altro da un cavo difet toso e dall umidit o dal bagnato In caso di cortocircu...

Страница 58: ...una volta di essere danneggiato o difettoso oppure Lei abbia sentito odore di bruciato Non metta in funzione l apparecchio con l involucro di prote zione danneggiato Non apra il ricevitore Non ripari...

Страница 59: ...i assistenza al numero 49 84 32 9489 0 Nel corso del miglioramento dei prodotti ci riserviamo di apportare variazioni tecniche e ottiche 4 Prospetto dei componenti e degli elementi operativi degli app...

Страница 60: ...ll uso dell apparecchio 6 1 Impostazione del canale Lei pu eseguire la selezione complessivamente da 16 canali diversi 1 Impostare il canale sulla parte posteriore del trasmettitore in alcuni modelli...

Страница 61: ...atto radio integrato Canale Codice Impostazione 0 1 2 3 4 1 1 2 3 4 2 1 2 3 4 3 1 2 3 4 4 1 2 3 4 5 1 2 3 4 6 1 2 3 4 7 1 2 3 4 Canale Codice Impostazione 8 1 2 3 4 9 1 2 3 4 10 1 2 3 4 11 1 2 3 4 12...

Страница 62: ...o successivamente pi volte Lei pu commutare tra i diversi gruppi Con il tasto freccia del telecomando Lei pu regolare la potenza del flash del gruppo impostato Per memorizzare il gruppo selezionato pr...

Страница 63: ...trasmettitore e ricevitore nell ap parecchio flash da studio Il pulsante di test sul trasmettitore pu sempre essere azionato con il risultato di fare scattare un flash 6 2 Montare il trasmettitore sul...

Страница 64: ...diofre quenza non d segni di funziona mento I cavi non sono inse riti bene e non fanno un buon contatto Inserire bene tutti i cavi in modo che facciano un buon contatto L apparecchio flash da studio d...

Страница 65: ...i X AVVERTIMENTO In caso di presenza di danni Pericolo di folgorazione e di incendio a causa di corto circuito o di funzionamento difettoso Faccia riparare l apparecchio esclusivamente da un elettrici...

Страница 66: ...ella batteria che si trova nella parte inferiore dell apparecchio 2 Sostituisca la batteria Faccia attenzione a non invertire le polarit 3 Richiuda lo scomparto della batteria 10 Accessori e prodotti...

Страница 67: ...mA Batterie CR 2032 3V Condizioni di conservazione a magazzino Asciutto e senza polvere nell imballaggio di cartone a una temperatura compresa tra 20 C e 50 C 13 Citazione della Dichiarazione di confo...

Страница 68: ...11 2013 WALSER GmbH Co KG Gewerbering 26 86666 Burgheim Tel 49 8432 9489 0 Fax 49 8432 9489 8333 Germany www walimexpro de EN Made in China ES Fabricado en China IT Fabbricato in China...

Отзывы: