background image

14 

NOTE: 

 

If  the  range  usage  is  very  high,  we  recommend  that  the  weekly  cleaning  procedure  is  

carried out on a more frequent basis. 

 

Ensure that protective gloves are worn during the cleaning process. 

 

DO NOT use harsh abrasive detergents, strong solvents or caustic detergents as they will 

damage the Cooktop and elements. 

 

DO  NOT  use  water  on  the  griddle  plate  (optional  -  if  fitted) while  it  is  still  hot  as  warping 

may occur.  Allow these items castings to cool and remove for cleaning. 


Griddle - Steel Plate (Optional - if fitted) 


NOTE:  In  order  to  prevent  the  forming  of  rust  on  the  griddle  plate,  ensure  that  all  detergent  and 

cleaning  material  has  been  entirely  removed  after  each  cleaning  process.    The  appliance 

should be switched on briefly to ensure the griddle plate becomes dry.  Oil or grease should 

be spread over the griddle surface in order to form a thin protective greasy film. 


a.  Remove and clean the grease collection drawer frequently to prevent over spills. 

b.  Clean the griddle surface thoroughly with a scraper tool or a wire brush.  If necessary use a  

griddle stone or a scotch bright pad on the griddle surface for the removal of stubborn or  

accumulated carbon deposits.. 

c.  Occasionally bleach the griddle plate with vinegar when the plate is cold. 

d.  Clean with hot water, a mild detergent solution and a scrubbing brush.  Dry all components  

thoroughly with a dry cloth. 

e.  The griddle should be switched on briefly to ensure that the griddle plate becomes dry.  A thin 

smear of cooking oil should be spread over the griddle in order to form a protective film. 


Radiant Elements and Cooking Area 


a.  Clean the radiant elements and cooking area with a soft cloth and a mild detergent and hot water 

solution. 

b.  Baked on deposits or discolouration may require a good quality stainless steel cleaner or stainless 

steel wool.  Always apply cleaner when the appliance is cold. 

c. 

Remove the grease drawer and clean with a mild anti bacterial detergent and hot water solution 

using a soft bristled brush.  

Dry the grease drawer thoroughly with a dry cloth. 

d.  Clean beneath the elements and the element frame drip trays as shown in ‘Daily Cleaning’ on the 

previous page. 


Stainless Steel Surfaces 


a.  Clean the exterior surfaces of the Cooktop with hot water, a mild detergent solution and a soft 

scrubbing brush.  Note that the control knobs are a push fit onto the control spindles and can be 

removed to allow cleaning of the front control panel. 

b.  Baked on deposits or discolouration may require a good quality stainless steel cleaner or stainless 

steel wool.  Always apply cleaner when the appliance is cold and rub in the direction of the grain. 

c.  To remove any discolouration, use an approved stainless steel cleaner or stainless steel wool.  

Always rub in the direction of the grain. 

d.  Remove the grease tray and clean with a mild anti bacterial detergent and hot water solution  

using a soft bristled brush. 

e.  Dry the grease tray thoroughly with a dry cloth. 

f. 

Dry all components thoroughly with a dry cloth and polish with a soft dry cloth.


To achieve the best results cleaning must be regular and thorough and all controls and mechanical parts 

checked and adjusted periodically by a competent serviceman.  If any small faults occur, have them 

attended to promptly.  Don't wait until they cause a complete breakdown.  It is recommended that the  

appliance is serviced every 6 months. 


Содержание RNL8610E Series

Страница 1: ...I n s t a l l a t i o n a n d O p e r a t i o n M a n u a l Series RN8610E RNL8610E RNB8610E RNLB8610E RN8610EC RNL8610EC RNB8610EC RNLB8610EC Electric Range 230559 13...

Страница 2: ...pares tel 1800 337 963 Customer Service tel 1800 335 315 fax 1800 350 281 CANADA Serve Canada Web www servecanada com E Mail info servecanada com Sales tel 800 551 8795 Toll Free Service tel 800 263 1...

Страница 3: ...vection Oven RN L B 8616EC Electric Range Convection Oven RN L B 8619EC Electric Range Convection Oven Model Numbers Covered in this Specification General Electrical Supply Requirements Electrical Con...

Страница 4: ...the appliance refer to the supplier of this appliance to obtain the technical instructions for adapting the appliance to the conditions for use in that country IMPROPER INSTALLATION ADJUSTMENT ALTERA...

Страница 5: ...hat the user does not have to reach across the cooking surface Supply cord shall be oil resistant sheathed flexible cable and not lighter than ordinary polychloroprene or other equivalent synthetic el...

Страница 6: ...4 RN L 8610E RN L 8610E EC RN L 8613E RN L 8619E RN L 8616E...

Страница 7: ...00 Wiring Rules United Kingdom BS 7671 Requirements for Electrical Installations Installations must be carried out by authorised persons only Failure to install equipment to the relevant codes and man...

Страница 8: ...Plinth Kit For installation details refer to the instructions supplied with each kit 1 Raise the appliance from the floor by approx 75mm using suitable lifting equipment i e Palletiser Forklift to al...

Страница 9: ...the main electrical switchgear panel 5 Connect the mains supply to L1 L2 and L3 connections for 3 phases Refer to the Electrical Supply Requirements section for connection details 6 Connect neutral an...

Страница 10: ...the front of this manual b Ensure that the operator has been instructed in the areas of correct operation and shutdown procedure for the appliance 2 This manual must be kept by the owner for future r...

Страница 11: ...iance correctly please read the following sections carefully Radiant Elements Solid or Open Griddle Plate Oven Oven Thermostat Control Knob OFF Position 50 C to 300 C Temperature Graduations Hotplate...

Страница 12: ...flat bases Any part of the element which glows bright red is not making effective contact with the base of the utensil and this decreases the life and efficiency of the element Utensils which are sign...

Страница 13: ...gh setting proportionally more heat is produced at the top of the oven This can be used for browning etc during the cooking operation With the oven top heat control set on a low setting less heat is p...

Страница 14: ...terial has been completely removed after each cleaning The appliance should be switched on briefly to ensure the griddle plate becomes dry Oil or grease should be spread over the griddle surface in or...

Страница 15: ...ng with a cloth moistened in a solution of hot water and detergent to prevent accumulation of food deposits 6 To clean under the elements carry out the following procedure as shown opposite A Lift up...

Страница 16: ...Cooking Area a Clean the radiant elements and cooking area with a soft cloth and a mild detergent and hot water solution b Baked on deposits or discolouration may require a good quality stainless ste...

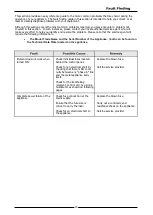
Страница 17: ...The Model Trade Name and the Serial Number of the Appliance both can be found on the Technical Data Plate located on the appliance Element does not work when turned ON Check individual fuses located...

Страница 18: ...16 Static Ovens RN8610E Series...

Страница 19: ...17 Convection Ovens RN8610EC Series...

Страница 20: ...18 Cooktop 6 Elements RN8610E EC Models Cooktop 4 Elements 300 mm Griddle RN8613E EC Models...

Страница 21: ...19 Cooktop 2 Elements 600 mm Griddle RN8616E EC Models Cooktop 900 mm Griddle RN8619E EC Models...

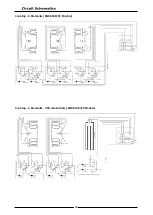
Страница 22: ...20 Wiring Layout for Static Oven Wiring Layout for Convection Oven Wiring Connection Between Oven and Hob...

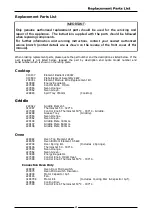
Страница 23: ...late 600mm 229108 Griddle Plate 900mm Oven 228082 Oven Top Element 2kW 228059 Oven Bottom Element 4 5kW 228704 Door Spring Kit Includes 2 Springs 229146 Thermostat 50 300 C 227963 Neon Orange 227962 N...

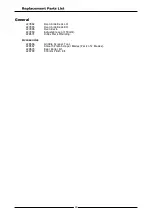
Страница 24: ...227893 Oven Side Rack RH 227896 Oven Rack 227850 Adjustable Leg 150mm 228571 Index Mark Moulding Accessories 228566 Griddle Scraper Tool 228567 Smooth Plate Scraper Blades Pack of 2 Blades 229674 Rear...

Страница 25: ......
Отзывы: