background image


500.0037-A


Technical alterations reserved


2.2.3.


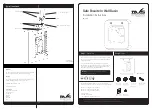
Anchoring hole dimensions 

In order to drive the supplied drop-in anchor into the building wall or building floor at the 
assembly location in advance, please consult the dimensions in the following figure for 
drilling pattern for the WALDIS Basic 480. 


2.2.4.


Procedure 

The safe is delivered with 2x cylinder screws with an M12x30 internal hex (DIN 912, 
strength grade 8.8), 2x M12 washers (DIN 125 A) and 2x M12x50 drop-in anchors. 


  If it is not possible to use the installation material specified or it is not possible to anchor 

the safe, please consult your property insurance provider to find an alternative anchoring 
solution. 
 
Follow this procedure to anchor the safe into the building wall or floor: 
1.


Draw the drilling pattern on the desired position and then drill the anchoring holes with 
Ø15 concrete drill and an impact drill. 


The Ø15 drill hole must be at least 54 mm (from the wall/floor) or at least 84 mm 

(from the safe’s 

interior wall) deep. 

2.


The EA2 M12x50 drop-in anchor can be hammered in once all anchoring holes have 
been drilled. 


Please consult the manufacturer’s information sheet for hammering in the Fischer 

EA2 M12x50 drop-in anchor (Fischer no.: 48406). 

3.


Align the safe with the installation holes in the building wall or the building floor. 

4.


If the safe is to be anchored to the building wall, it has to be evenly hammered into the 
wall evenly. 

5.


Level out the safe so that the door stands still in any position and does not start to 
swing in one direction (open or closed) on its own. 


To do this, place small hardboards (Pavatex) under the corners required. 

Front view (without door) 
for rear wall anchoring 

View from above (without door) 
for floor anchoring 

120 

200 

220 

240


18

1,

Содержание BASIC 480

Страница 1: ...www tresore ch INSTALLATION AND MAINTENANCE INSTRUCTIONS WALDIS BASIC 480 RESISTANCE LEVEL II AS PER EN1143 1...

Страница 2: ...an EN1143 1 certified safe A high quality Swiss product checked and approved by the VdS Please read these instructions carefully before setting up your safe For any questions please contact WALDIS Tr...

Страница 3: ...1 4 Operation elemnts 2 1 5 Set up 2 Installation 2 2 1 Positioning against the building wall 2 2 2 Anchoring the safe 3 2 2 1 Important prior clarification 3 2 2 2 Preparing the safe 3 2 2 3 Anchori...

Страница 4: ...e handle is in the open position and the bolt is retracted 1 2 Weight 1 3 Regulations and insurance For all safes with a net weight of less than 1000 kg professional anchoring either during constructi...

Страница 5: ...it must be noted that a minimum distance of 440 mm to the wall must be maintained at the front in order to be able to open the door more than 90 If you also want to be able to use the full light widt...

Страница 6: ...le for installing the safe and that there are no wires pipes or similar in the area to be drilled In case of doubt an expert report should be issued to guarantee that the intended assembly location in...

Страница 7: ...pattern on the desired position and then drill the anchoring holes with 15 concrete drill and an impact drill The 15 drill hole must be at least 54 mm from the wall floor or at least 84 mm from the s...

Страница 8: ...rer s instructions Maintenance and care instructions Your safe is essentially maintenance free However we still recommend carrying out a lubricating and servicing interval as follows depending on freq...

Страница 9: ...an alarm system In these cases the alarm system has to have been functional and activated at the time the theft took place and the alarm has to have been triggered and relayed Otherwise the theft gua...

Отзывы: