9
3.0 OPERATION
3.1
Priming
Install the pump as described above. With the pump turned on, set frequency at 100%. If the
pump is equipped with an air vent valve, open the knob 1/2 turn. Liquid should move through
the suction tubing and into the pump head. When liquid starts running through the vent side
tubing, close the air vent knob and continue with output adjustment described below. If the
pump has no air vent valve, disconnect the discharge tubing from the injection valve. When
liquid enters the discharge tubing at the pump head, stop the pump. Then reconnect the
discharge tubing to the injection valve.
If the pump does not self prime, remove the check valve housing on discharge & suction sides to
make sure valve cartridges and gaskets are in correct positions (see section 4.2 for correct
orientation).
Note:
It is recommended that pumps with FC liquid ends use flooded suction when priming, due
to the hard valve seat material.
3.2
Adjustment and Control
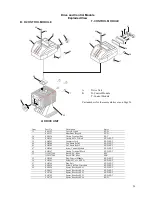
A. EZ Pumps using the ‘D’ Control Module
If less than full output is required, set the frequency to the appropriate percentage of
maximum desired.
Example: Model EZB21D1-VE has maximum output of 1.5 GPH.
Desired output is 1.2 GPH. 1.2 ÷ 1.5 = 0.8 or 80%
Set the frequency of the pump to 0.8 x 360 = 288 spm by pushing the UP or
DOWN arrow keys.


