background image

Connecting


to


power


1.


Connect the cord of the power adapter to the DC IN jack of the radio. 

2.


Connect the plug of the power adapter to a wall socket.  
The radio is powered and in standby mode when you see the display is 
switched on.


Backup


system


•   The radio is equipped with a backup system. Open the battery door on the 

rear of the unit by press the tab and then lifting it. Insert two (2) AAA size 
batteries (not included) according to the polarity diagram inside the battery 
compartment. (Alkaline batteries are recommended.) 
 

•   If a power cut occurs, the radio automatically switches to the battery power 
supply and keeps the clock and timer settings. 

  
•   When replacing the battery, do not disconnect the power adapter. Otherwise, 

all clock and alarm settings will be lost. 

Setting


the


clock


1.


In standby mode, press and hold the CLOCK button to enter the clock setting 

mode. 

2.


Press the CLOCK button repeatedly to cycle through the setting options: 

 
Year > Month/Day > Time


Setting


year

: Press the BACKWARD or FORWARD button. 


Setting


month/day

: Press the BACKWARD button to set the month and 

FORWARD button to set the day. 


Setting


the


time

: Press the BACKWARD button to set the hour time and 

FORWARD button to set the minute time. 


Press the SET button to confirm each setting option. 

Using


the


antenna


Unroll and extend the antenna to improve FM signal reception. 

Listening


to


radio


1.


Press the POWER button to switch the radio on. 

2.


Press the BACKWARD or FORWARD button to adjust frequency.  

3.


Press and hold the BACKWARD or FORWARD button to automatically tune to 
the next available FM station.  

4.


Press the POWER button to switch the radio off. 

Setting


preset


stations


You can store up to 10 preset stations. 
1.


Tune to a station. 

2.


Press and hold the MEM/M+ button until “P01” (or the next available preset 

slot) shows on the display. 

3.


Press the BACKWARD or FORWARD button to select a preset number (P01‐

P10). 

4.


Press the SET button to confirm. The preset station has been set up.  

Содержание Qi-1110A

Страница 1: ...radio User manual Qi 1110A QiCR 50 Manufacturer Wai Hang Electronic Co Ltd Address Room 1807 1808 18 F New Trade Plaza Block B 6 On Ping Street Siu Lek Yuen Shatin NT Hong Kong Importer xxxxxx Address xxxxxx ...

Страница 2: ...cluding amplifiers that produce heat 9 Do not defeat the safety purpose of the polarized or grounding type plug A polarized plug has two blades with one wider than the other A grounding type plug has two blades and a third grounding prong The wider or the third prong is provided for your safety If the provided plug does not fit into your outlet consult an electrician for replacement of the obsolet...

Страница 3: ...heat such as sunshine fire or the like 18 The marking information is located at the bottom of the apparatus 19 The Caution Marking is located at the bottom of the apparatus 20 CAUTION Danger of explosion if battery is incorrectly replaced Replace only with the same or equivalent type 21 Minimum distances 5 cm around the apparatus for sufficient ventilations 22 The ventilation should not be impeded...

Страница 4: ......

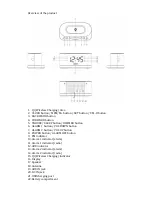
Страница 5: ... 6 ALARM 1 button VOL DOWN button 7 ALARM 2 button VOL UP button 8 POWER button ALARM OFF button 9 PM indicator 10 Alarm 1 indicator alarm 11 Alarm 1 indicator radio 12 AUX indicator 13 Alarm 2 indicator alarm 14 Alarm 2 indicator radio 15 Qi Wireless Charging Indicator 16 Display 17 Speaker 18 Antenna 19 AUX IN jack 20 DC IN jack 21 USB charging port 22 Battery compartment ...

Страница 6: ...CLOCK button repeatedly to cycle through the setting options Year Month Day Time Setting year Press the BACKWARD or FORWARD button Setting month day Press the BACKWARD button to set the month and FORWARD button to set the day Setting the time Press the BACKWARD button to set the hour time and FORWARD button to set the minute time Press the SET button to confirm each setting option Using the antenn...

Страница 7: ...d FORWARD button to set the minute time Setting alarm sound source Press the BACKWARD or FORWARD button to select the alarm or radio as the alarm sound source The corresponding alarm indicator will turn on according to your selection Setting alarm frequency Press the BACKWARD or FORWARD button to select an alarm frequency 1 5 Monday to Friday 1 7 Everyday 6 7 Weekend only Once the alarm setting is...

Страница 8: ...day d4 Thursday d5 Friday d6 Saturday and d7 Sunday In radio mode press the BACKWARD or FORWARD button once to briefly change the display from the clock time to the current radio frequency Display brightness In standby mode press the DIMMER button to change the brightness of the display low high or off Qi wireless charger 1 Place a supported mobile device on the center of the charging surface on t...

Страница 9: ... external device Connect an external device e g smartphone mp3 player via a USB cable not provided to the USB jack on the back of the radio for charging The radio cannot access the contents in the connected external device Specifications Tuner Range FM 87 5 108 MHz Number of preset radio stations 10 AC power adaptor Input AC100 240V 50 60Hz Output DC 5V 2 1A ...

Отзывы: