WAGNER ProjectPro 119 Скачать руководство пользователя страница 34


30 

WAGNER Project Pro 119 - 0418C
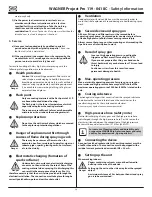
B) Startup

  1.  Remove the gun from the plastic bag.  Stir the water into the 

paint.

  2.  Turn the PRIME/SPRAY knob to PRIME.  

  3.  Plug sprayer in.  
  4.  Turn the switch to ON (I).

  5.  Turn the PRIME/SPRAY knob to SPRAY.   Test the sprayer on a 

practice piece and begin spraying.

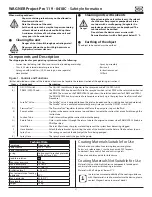
Figure 15 - Flushing the System


1.  Lock the gun and remove spray tip assembly.  Submerge 

suction set into a bucket with appropriate cleaning solution 

(a).

  2.  Place a waste container (b) next to the original material 

container (c).  The containers should be touching.  Aim the 

spray gun into the side of the original material container (c) 

and hold the trigger.

  3.  While pulling the gun trigger, turn the pump ON (l), and turn 

the PRIME/ SPRAY knob to SPRAY to purge material from the 

hose back into the original container.  Keep holding trigger 

through next steps.  

  4.  When cleaning solution flows from the spray gun, keep 

holding the trigger and aim the spray gun into the side of the 

waste container (ground gun with a metal container if flushing 

with flammable solvent).  

  5.  Trigger the gun until the fluid flowing out of the gun is clear.  

You may need to dispose and obtain new cleaning solution. 

  6.  Turn the PRIME/SPRAY knob to PRIME and trigger gun to 

relieve pressure.

Figure 16 - Cleaning the Spray Gun

  1. 

Make sure the pump is switched OFF (O).  Make sure 

the PRIME/SPRAY knob is turned to PRIME.  Unplug the 

sprayer.

  2.  Remove spray gun from the paint hose using adjustable 

wrenches.

  3.  Unclip the trigger guard (a) from the filter housing (b) by 

pulling outward from the filter housing.  Unscrew the filter 

housing.

  4.  Remove the filter (c) from the spray gun housing and clean 

with the appropriate cleaning solution (warm suds for water-

soluble materials, solvents with a flash point of over 21°C for 

solvent-based spray).

  5.  Remove spray tip (d) from spray guard assembly.  Clean spray 

tip with a soft-bristled brush and the appropriate cleaning 

solution.  Be sure to remove and clean the washer (e) and 

saddle seat (f) located in the rear of the spray tip assembly.

  6.  Replace the cleaned filter, tapered end first, into the gun 

housing.  The tapered end (g) of the filter must be loaded 

properly into the gun.  Improper assembly will result in a 

plugged tip or no flow from the gun.

  7.  Install spray tip (d), saddle seat (f) and washer (e), and replace 

spray guard assembly.

  8.  Thread the spray gun back onto the paint hose.  Tighten with 

a wrench.

Figure 17 - Cleaning the Suction Set

  1. 

Lock the gun and turn the pump OFF (O).  Turn the PRIME/

SPRAY knob to PRIME.

  2. 

Remove the suction hose from the inlet valve. Remove the 

return hose, by pushing the blue circlip ring up and pulling 

the hose down simultaneously. Coarsely clean the outside of 

both hoses with a suitable cleaning solution. 

  3.  Clean the thread of the inlet valve (a) with a cloth. 
  4.  Carefully remove the filter disc (b) from the suction filter using 

pliers, and clean both.

  5.  After cleaning the suction unit screw the suction hose back onto 

the inlet valve and replace the return hose in the return connection 

piece.

  6.  Submerge the suction hose and return tube into a bucket of 

new cleaning solution.

  7.  Turn the PRIME/SPRAY knob to PRIME. Turn the pump ON (l), 

and trigger the gun into a waste container to relieve pressure.

  8.  Let the pump circlulate cleaning solution through the suction 

set for 2-3 minutes.  Turn the pump OFF.

Figure 18 - Long-Term Storage

  1.  Fill a cup or another container with a little separating oil or 

a light, common household oil. Hold the cup under the inlet 

valve. The valve opening must be completely in the oil bath.  

  2.  Place a rag over the spray hose port, and turn the switch ON 

(l).  When the oil has been pumped from the cup, turn the 

pump OFF (O).

  3.  Fully insert the Sureflo™ valve.

  4.  Wipe the entire unit, hose and gun with a damp cloth to 

remove accumulated paint.  Replace the high pressure hose to 

the paint hose port.

Figure 19 - Cleaning the Inlet Valve
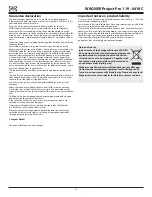
i

Cleaning or servicing the inlet valve may be required if 

the unit has priming problems.  Priming problems may 

be prevented by properly cleaning the sprayer and 

following the long-term storage steps.

  1.  Remove the suction hose and return tube. Loosen the fitting as 

shown (a) and remove the Sureflo™ valve solenoid. 


Make sure that the O-ring does not get lost.

  2.  Remove the inlet valve unit (b) from the basic unit with an 

adjustable wrench.  Visually inspect the inside and outside 

of the inlet valve assembly.  Clean any paint residue with the 

appropriate cleaning solution.  

  3.  Replace inlet valve assembly by screwing it into the sprayer.  
  4.  Replace Sureflo™ valve solenoid.  

Figure 20 - Folding the Cart

  1.  Turn the knobs on both sides of the carriage in the DOWN 

arrow direction as far as the stop. Hold the handle firmly while 

doing this, as otherwise it will drop down. 

  2.  Fold the handle down.  Be careful not to pinch the power cord 

with the cart.

Danger

Attention! When the feet are retracted the wheels 

can easily roll away, causing the unit to lose 

balance. Hold the basic unit firmly at the container 

holder during the next few steps, and block a wheel 

with your foot.

  3.  Pull the foot lock up and retract the feet. Secure the feet again 

with the foot lock. Place the basic unit carefully on the ground. 

Содержание ProjectPro 119

Страница 1: ...ProjectPro 119 Airless Sprayer 0418C 220 V 60 Hz Manual do Propriet rio Manual de usuario Owner s Manual GB 2 ES 13 P 24 BRA...

Страница 2: ...WAGNER Project Pro 119 0418C WAGNER Project Pro 119 0418C F E D G H C A B I K J 1 1 2 3 2 1 2 a 4 3 SPRAY PRIME 2 1 O 6 2 1 3 5 7...

Страница 3: ...WAGNER Project Pro 119 0418C WAGNER Project Pro 119 0418C 1 a b 2 SPRAY PRIME 3 4 5 l 8 SPRAY PRIME 1 2 SPRAY PRIME 3 l 9 a b 10 11 25 30 cm A B C 25 35 cm 25 30 cm 25 30 cm D...

Страница 4: ...WAGNER Project Pro 119 0418C WAGNER Project Pro 119 0418C A B 12 13 A 2 3 1 B 14 a c b 15 g a c b d f e 16 a b 17...

Страница 5: ...WAGNER Project Pro 119 0418C WAGNER Project Pro 119 0418C 1 2 18 7 8 5 9 11 6 3 4 1 2 10 23 a 1 2 b 19 1 2 3 20 3 2 4 1 21 22...

Страница 6: ...arranque 1 As unidades avariadas ou com defeito n o devem ser utilizadas 2 Segure na pistola de pulveriza o WAGNER utilizando o fecho de seguran a no gatilho 3 Certifique se de que a unidade tem liga...

Страница 7: ...oal b e culos de prote o A utiliza o dos equipamentos de seguran a tais como m scaras anti poeira cal ado de seguran a anti derrapante capacetes de prote o ou prote opara os ouvidos consoante o tipo d...

Страница 8: ...plos o bem como danos para a sa de durante os trabalhos de pulveriza o dever ser garantida uma boa ventila o natural ou artificial Proteger o aparelho e a pistola de pulveriza o Todos os tubos acess r...

Страница 9: ...a montagem passe as extremidades do suporte do tubo nos orif cios man pulo previstos para o efeito ver a figura J Pistola de Pulveriza o Para a aplica o do material de revestimento e regula o do d bi...

Страница 10: ...r em 0 10 2 Fa a um teste de pulveriza o p ex sobre um peda o de cart o i Todas as regula es estar o corretas no caso de um padr o de pulveriza o uniforme conforme apresentado na figura 12 A Se o padr...

Страница 11: ...de terminar a pulveriza o A pistola de pulveriza o deve mover se quando o gatilho for premido e solto Cubra cada pulveriza o em cerca de 30 Isto ir assegurar um revestimento uniforme i Quando termina...

Страница 12: ...lha e e a sede c ncava f localizada na parte traseira do conjunto da ponta de pulveriza o 6 Volte a colocar o filtro limpo introduzindo em primeiro lugar a parte c nica no alojamento da pistola A part...

Страница 13: ...eta 1 2 0418708 Ponta L 1 3 0418713 Filtro L XXL branco 2 4 0418720 Tubo de pulveriza o 15 m amarelo 1 Figura 22 Conjunto de Suc o Pe a Descri o Quantidade 2306605 Conjunto de suc o 1 Acess rios Pe a...

Страница 14: ...Certifique se de que n o arranha o alojamento onde est o localizados os vedantes 10 Limpe o local onde v o ser instalados os novos vedantes Montagem da bomba 1 Lubrifique o novo vedante superior 8 co...

Страница 15: ...pulverizador 2 Rode o bot o ON OFF para ON 3 Fa a deslizar o PressureTrac para a press o m xima ou alivie a press o rodando a v lvula PRIME SPRAY para PRIME 4 Teste a voltagem el trica 5 Substitua o...

Страница 16: ...ar o processo de garantia para uma empresa terceira contratada Repara es consideradas suficientes para as opera es lidadas nestas instru es de opera o encontram se reservadas para a nossa f brica No c...

Страница 17: ...pulverizadora Wagner con la palanca de seguridad en el disparador 3 Asegurar la puesta a tierra La conexi n se tiene que establecer a trav s de una toma de corriente de tipo Schuko con puesta a tierr...

Страница 18: ...durante la utilizaci n del equipo puede dar lugar a serias lesiones Use indumentaria protectora personal y siempre gafas b protectoras El uso de indumentaria protectora personal como mascarilla antip...

Страница 19: ...rar una buena ventilaci n natural o artificial Asegurar el aparato y la pistola pulverizadora Todas las mangueras conexiones y elementos filtrantes se tienen que asegurar antes de la puesta en servici...

Страница 20: ...iltro de entrada El filtro de entrada filtra el material de pulverizaci n para evitar que el sistema se atasque I Soporte de tubos Para el montaje inserte los extremos del soporte de tubos en los orif...

Страница 21: ...i n p ej en un trozo de cart n i Si se obtiene un esquema de proyecci n uniforme como en la Fig 12 A todos los ajustes son correctos Si el esquema de proyecci n muestra bandas marginales como en la Fi...

Страница 22: ...r movi ndose al pulsar y soltar el disparador Superponga un 30 cada pincelada De esta forma las capas ser n uniformes i Cuando haya terminado de pulverizar realice el Procedimiento de liberaci n de la...

Страница 23: ...s suaves y la soluci n de limpieza apropiada Procure quitar y limpiar la arandela e y la base f situadas en la parte posterior del montaje de la punta de pulverizaci n 6 Vuelva a colocar el filtro lim...

Страница 24: ...uera de pulverizaci n 15 m amarilla 1 Figura 22 Conjunto de aspiraci n N pieza Descripci n Cantidad 2306605 Montaje de conjunto de aspiraci n 1 Accesorios N pieza Descripci n 0418705 Punta XS Esmaltes...

Страница 25: ...ocure no ara ar la carcasa en la que se encuentran los sellos 10 Limpie la zona en la que se van a instalar los nuevos sellos Montaje de la bomba 1 Lubrique el nuevo sello superior 8 con aceite de sep...

Страница 26: ...6 P rdida de presi n Soluci n 1 Enchufe el pulverizador 2 Encienda el interruptor 3 Deslice el PressureTrac hasta la presi n m xima o libere presi n girando la v lvula PRIME Cebar SPRAY Pulverizar ha...

Страница 27: ...tratada satisfaga la garant a Las reparaciones que superen el mbito de estas instrucciones de funcionamiento se realizar n en nuestra f brica En caso de que necesite una reparaci n o realizar una recl...

Страница 28: ...2 Secure WAGNER spray gun using the safety catch on the trigger 3 Ensure that the unit is properly earthed The connection must take place through a correctly earthed two pole and earth socket outlet...

Страница 29: ...us injuries Wear personal safety equipment and always wear safety b goggles Wearing personal protective equipment such as dust mask non slip safety shoes safety helm or ear protection depending on the...

Страница 30: ...ry that the unit is always earthed through the electrical installation The connection must take place through a correctly earthed two pole and earth socket outlet U Ventilation Good natural or artific...

Страница 31: ...les of the handle as shown J Spray Gun The spray gun controls the delivery of the fluid being pumped K Spray Hose The spray hose connects the gun to the pump When working outdoors Danger Vapors contai...

Страница 32: ...te by 0 10 2 Do a test spray e g on to a piece of cardboard i If the paint sprays evenly as shown in fig 12 A all the setting must be correct If the paint looks stripy after spraying as shown in fig 1...

Страница 33: ...section of this manual Figure 12 Practice 1 Be sure that the paint hose is free of kinks and clear of objects with sharp cutting edges 2 Slide the PressureTrac to its to its lowest setting 3 Turn the...

Страница 34: ...nob to PRIME 2 Remove the suction hose from the inlet valve Remove the return hose by pushing the blue circlip ring up and pulling the hose down simultaneously Coarsely clean the outside of both hoses...

Страница 35: ...c resin based paints PVC paints 0418707 Spray tip M Enamel paints undercoats primers fillers indoor latex paints and indoor emulsions 0418708 Spray tip L Enamel paints undercoats primers fillers indoo...

Страница 36: ...de of the seal and popping it out Be sure not to scratch the housing where the seals are located 10 Clean the area where the new seals are to be installed Assembly of the Pump Section 1 Lubricate the...

Страница 37: ...t is too thick 6 Pressure loss Solution 1 Plug the sprayer in 2 Turn the ON OFF switch to ON 3 Slide the PressureTrac to maximum pressure or relieve pressure by turning the PRIME SPRAY valve to PRIME...

Страница 38: ...spersions glazes quartz undercoats abrasive materials etc reduce the durability of valves packings spray guns tips cylinders pistons filters hoses seals etc Any resulting signs of wear are not covered...

Страница 39: ...35 WAGNER Project Pro 119 0418C...

Страница 40: ...lidade por erros e altera es Errores y modificaciones reservados Not responsible for errors and changes Distribuidor no Brasil Cetec Equipamentos para Pintura LTDA CNPJ 72 679 665 0001 84 Av Jacobus B...

Отзывы: