background image

l

O

Start

Important Safety Warning

Be careful when handling the spray gun so 

you don’t accidently spray yourself.  The 

high pressure paint stream could pierce 

your skin causing serious injury.  If an 

accident happens see detail procedures in 

the Safety Information section on pages 4-5.  

See physician immediately and bring this 

instruction manual. 

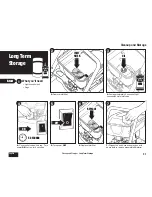
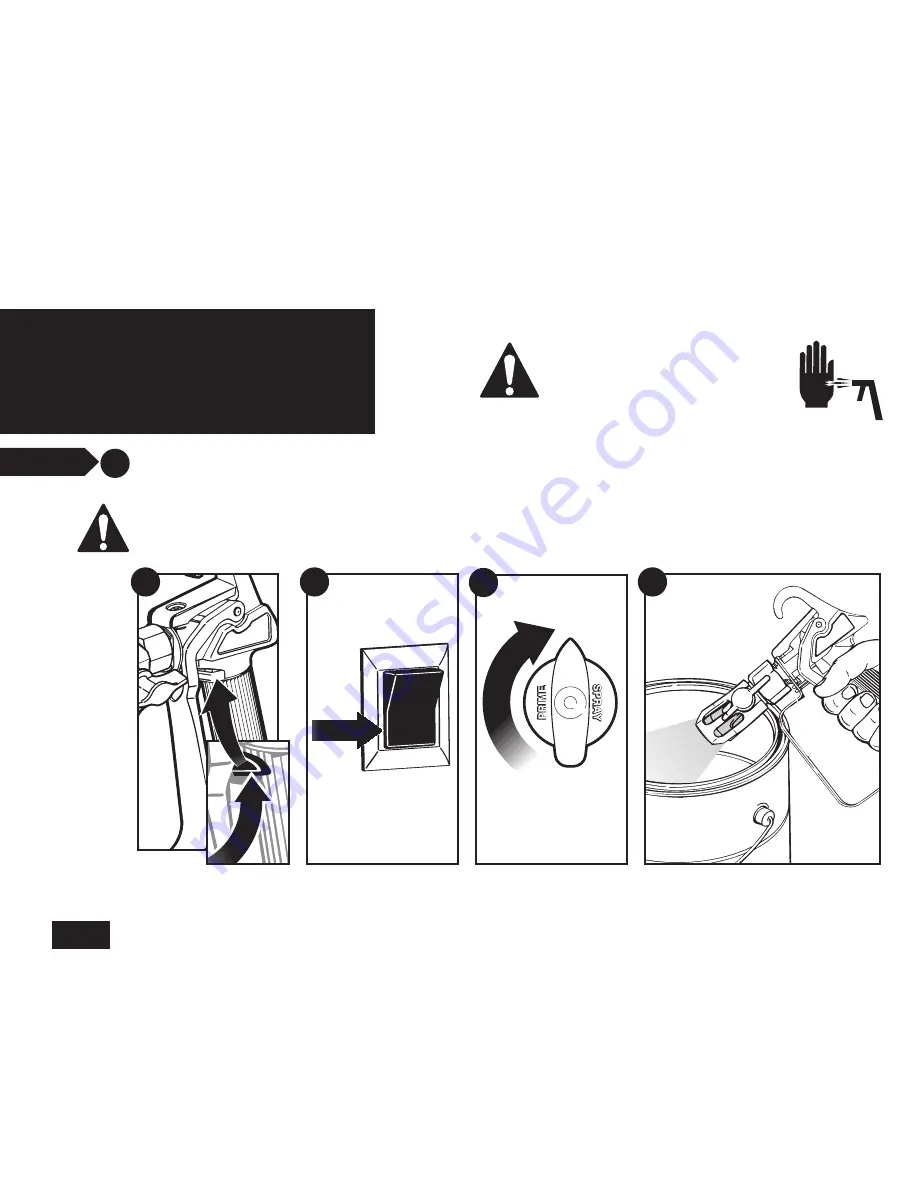
2.

 Lock spray gun

5.

 Unlock spray gun. Spray into a waste bucket 

until pressure is relieved.  Lock the spray gun

3.

 Turn power

 OFF

LO

CK

OFF

TU

RN

What you’ll need

• 

Waste bucket

Pressure Relief 

Procedure*

* Perform when instructed

Be sure to follow the Pressure Relief Procedure when shutting the 

unit off for any purpose.   This procedure is used to relieve pressure 

from the spray hose.  Failure to do so could result in serious injury.

Start

4.

 Turn knob to 

PRIME

3

5

4

2

1

Using the Wagner Paint Crew

Using the Wagner Paint Crew 

• Pressure Relief Procedure

English

7

Содержание Paint Crew 770

Страница 1: ...sues 12 Common Solutions to Spraying Issues 13 Clear the Spray Tip 14 Clean the Inlet Filter 15 Clean the Spray Gun Filter Cleanup and Storage 16 Shut Down and Short Term Storage 17 Startup From Short...

Страница 2: ...ray area Fire extinguisher must be present and in good working order Place paint pump in a well ventilated area away from the spray object Flammable vapors are often heavier than air Floor area must b...

Страница 3: ...not operate the unit when fatigued or under the influence of drugs or alcohol Important Electrical Information NOTICE Use only a 3 wire extension cord that has a 3 blade grounding plug and a 3 slot r...

Страница 4: ...RAY Knob Handle Handle Hardware Inlet Filter The Paint Crew Fill Line Questions Call Wagner Technical Service 1 800 328 8251 Register your product online at www wagnerspraytech com What s in the Box I...

Страница 5: ...rench 2 Note Do not plug in the power cord until assembly is complete 4 Thread one end of spray hose to outlet valve on sprayer 5 Tighten with wrench 6 Thread other end of spray hose to spray gun 7 Ho...

Страница 6: ...r Safety features Spray gun trigger lock and pressure diffuser built in tip safety guard PRIME SPRAY knob for safe pressure release Conforms to ULSTD 1450 Certified to CAN CSAC 22 2 NO 68 92 ON OFF Sw...

Страница 7: ...spray gun 5 Unlock spray gun Spray into a waste bucket until pressure is relieved Lock the spray gun 3 Turn power OFF L O C K OFF T U R N What you ll need Waste bucket Pressure Relief Procedure Perfor...

Страница 8: ...ouring into hopper to help prevent clogging when spraying 4 Plug in sprayer 5 Turn knob to PRIME T U R N PUSH FILL TO LINE 12 Place hopper lid on 10 Turn power OFF 11 Snap return tube back in place 8...

Страница 9: ...tting Material to Flow Prior to Spraying 3 Point spray gun at piece of scrap material cardboard Squeeze and hold trigger for steps 4 6 2 Unlock spray gun by turning trigger lock down U N L O C K 7 Rel...

Страница 10: ...scrap material cardboard Tip Trigger gun after starting the stroke Release the trigger before ending the stroke The spray gun should be mov ing when the trigger is pulled and released Overlap each str...

Страница 11: ...ase trigger Move steadily GOOD JOB BAD Spray Technique Spray Pattern GOOD SPRAY PATTERN BAD SPRAY PATTERN TAILING GOOD JOB Overlap Your Strokes See page 12 Using the Wagner Paint Crew Using the Wagner...

Страница 12: ...following Filter Spray Tip If using thicker material the tip may become clogged Follow Clear the Spray Tip Instructions on page 13 Inlet Filter The inlet filter located in the hopper is more likely to...

Страница 13: ...nclog or clean the tip with your finger High pressure fluid can cause injection injury 4 Rotate reversible spray tip 180 degrees to CLEAN position arrow pointing toward rear of spray gun OFF 5 Turn kn...

Страница 14: ...ou ll need Original material container Warm soapy water for latex material Mineral spirits for oil based materials 5 Clean inlet filter using appropriate cleaning solution warm soapy water for latex m...

Страница 15: ...proper sprayer operation 7 Inspect filter for damage and replace if rips are found important Never clean filter by poking with sharp object Perform Pressure Relief Procedure Page 7 6 Clean with approp...

Страница 16: ...ge on page 18 This procedure should be used when taking a short term break or when ending your project for the day If your break is longer than 16 hours follow instructions for Cleanup and Storage on...

Страница 17: ...ring shut down stir water into material 2 Remove spray gun from plastic bag or from bucket of water Startup from Short Term Storage What you ll need Stir stick Start 4 3 2 Page 9 1 OR English 17 Clean...

Страница 18: ...iner place it into an empty five gallon container then flush Area must be free from vapors Follow all cleanup instructions 4 Remove spray tip and guard and place in cleaning solution What you ll need...

Страница 19: ...eaning solution What you ll need Warm soapy water Mineral spirits if using oil based material Rags Start Clean the Hopper INLET FILTER T U R N 11 Properly dispose of cleaning solution in hopper Note I...

Страница 20: ...ur a few drops of light household oil inside gun housing 5 Clean spray tip and filter with soft bristled brush and appropriate cleaning solution 8 Install spray tip with arrow pointing towards front o...

Страница 21: ...seconds 5 Turn power OFF 7 Wipe entire unit hose and spray gun with damp cloth to remove accumulated material INLET FILTER Start What you ll need Light household oil Rags 6 Replace inlet filter REPLA...

Страница 22: ...fer to Clean the Inlet Filter see page 14 5 The inlet valve is stuck Inlet may be stuck from old material Push filter tab to release If still stuck refer to Clean the Inlet Filter see page 14 or Repla...

Страница 23: ...ear the Spray Tip see page 13 2 The inlet filter is clogged Refer to Clean the Inlet Filter see page 14 3 The spray gun filter is clogged Refer to Clean the Spray Gun Filter see page 15 Keep extra fil...

Страница 24: ...t valve from outlet valve housing using wrench 3 Remove any accumulated material inside outlet valve housing using appropriate solution for material being used 4 Replace with new outlet valve and tigh...

Страница 25: ...let valve tool Outil de soupape d entr e Herramienta de v lvula de entrada 1 9 0515221 Inlet valve kit Trousse de joint de soupape d entr e Juego de sellos para la v lvula de entrada 1 Parts and Acces...

Страница 26: ...INATION PARTICULI RE EST LIMIT E UN AN COMPTER DE LA DATE D ACHAT Si un produit est d fectueux en ce qui concerne les mat riaux ou l ex cution pendant la p riode de garantie applicable vous devez le r...

Отзывы: