37
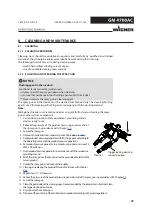
10.5 REPLACING THE NOZZLE SEAL
NOTICE
Defective nozzle seal!
Product sprays into the air cap next to the nozzle.
Do not clean the nozzle seal with sharp-edged objects.
Replace the nozzle seal if the sealing surface is damaged.
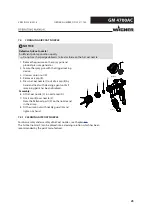
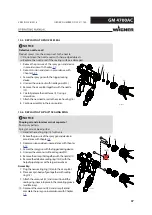
1. Relieve the pressure of the spray gun and device
in accordance with Chapter
16
17
14
13
36
33
B_02389
2. Decommission and clean in accordance with
Chapter
3. Secure the spray gun with the trigger locking
device.
4. Unscrew the union nut with nozzle guard (33).
5. Remove the air cap (36) together with the nozzle
(13).
6. Carefully release the nozzle seal (17) using a
screwdriver.
7. Attach the new nozzle seal to the valve housing (16).
8. Continue assembly in the reverse order.
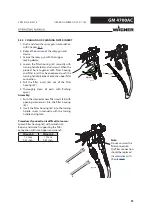
10.6 REPLACING THE "AIR" SEALING RING
NOTICE
Shaping air and atomizer air not separate!
Poor spray pattern.
Spray jet cannot be adjusted.
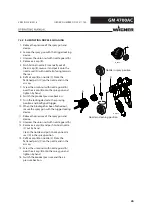
Handle the sealing ring (14) with care.
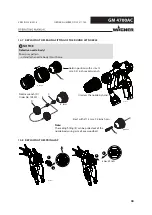
1. Relieve the pressure of the spray gun and device in
accordance with Chapter
.
4
1
3
2
14(F)
13
36
33
B_02390
2. Decommission and clean in accordance with Chapter
.
3. Secure the spray gun with the trigger locking device.
4. Unscrew the union nut with nozzle guard (33).
5. Remove the air cap (36) together with the nozzle (13).
6. Remove the defective sealing ring (14/F) with the
help of pipe tongs or with a large screwdriver.
Assembly:
7. Plug the new sealing ring (14) onto the air cap (36).
8. Place air cap in body of gun together with sealing
ring (14).
9. Attach the union nut (33) and screw it in until the
sealing ring snaps into place in the mounting groove
(audible snap).
10. Demount the union nut (33) and air cap (36) and
complete the spray gun in accordance with Chapter
VERSION 06/2018
ORDER NUMBER DOC2311730
Содержание GM 4700AC
Страница 1: ...AirCoat Manual Gun for Flat and Round Jet Nozzles Version 06 2018 B_02376...
Страница 2: ......
Страница 48: ...48...

