WAGNER FLEXiO 990 Скачать руководство пользователя страница 6

English

6


© Wagner Spray Tech. - All Rights Reserved

Setup

Before you begin

nEVER point the spray gun at any part 

of the body.

IMPORTanT:  Make sure the power cord is 

unplugged.

Setup

note:  Make sure the system is placed in a level, clean 

surface.   Follow these instructions for both one-gallon 

and five-gallon containers.

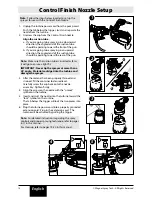
  1.  Lift up the suction tube holder as far as it will go.
  2.  Position the material container next to the pump 

assembly as shown.  The container handle (a) should 

be vertical and placed in between the two suction 

tube guides.

  Slide the suction tube holder (b) down until it 

touches the top of the material container.  The 

container is now secured to the pump and the entire 

unit can be carried by the container handle.   

IMPORTanT:  The container handle must be placed 

between the two suction tube guides, or the 

container will tip when carried due to the added 

weight of the pump assembly. 

  3.  Place the suction tube back into position in the 

suction tube guide.  Make sure the tube reaches the 

bottom of the material container. 

note:  If working on a ladder, use the belt clip.  This 

accessory provides 1) a place to hook the sprayer to 

free your hands and 2) a place to attach the spray hose  

to reduce the pull on your arm.  

  4.  Guide the cord (c) behind the tab (d) on the clip 

(the paint hose does not need to be secured, as it is 

attached to the cord).  The cord should be attached 

near the turbine plug (e).  

  5.  Attach the belt clip to yourself (it is recommended 

that it be secured to waistband of your pants).

  6.  If necessary, hook the spray gun into the belt clip 

with the attachment (f).

Watch Setup:

www.flexio990/setup

e d c

f

b

a

2

1

3

4

5

6

Содержание FLEXiO 990

Страница 1: ...mation 4 Controls and Functions 5 Overview 6 Setup 7 Preparing to Spray 8 Power and Material Controls 9 Spray Pattern Adjustment 10 Proper Spraying Technique 12 Cleanup 16 Maintenance 17 Troubleshooti...

Страница 2: ...uct is for use on a nominal 120 volt circuit and has a grounding plug that looks like the plug illustrated below Make sure that the product is connected to an outlet having the same configuration as t...

Страница 3: ...o support the cord Failure to observe may result in an electrical shock 6 The electrical cord has been specially designed to safely carry the electrical load of this system Do not use other non FLEXIO...

Страница 4: ...ump delivers material from the material container to the spray nozzle via the spray hose ON OFF Switch The ON OFF switch on the fluid pump turns power to the system on and off X Boost Turbine The X Bo...

Страница 5: ...Nozzle Selection Note Your unit includes two spray nozzles See below to determine the correct nozzle for your spraying project Direct Feed iSpray Nozzle used for broad surface coating Designed for spr...

Страница 6: ...ner handle important The container handle must be placed between the two suction tube guides or the container will tip when carried due to the added weight of the pump assembly 3 Place the suction tub...

Страница 7: ...he side of the waste container to minimize overspray 2 Turn the ON OFF switch to ON Material will begin to flow from the container into the paint hose Air will blow from the spray nozzle 3 Continue to...

Страница 8: ...spray gun Set the material flow by turning the knob on the body of the spray nozzle iSpray or the knob on the back of the trigger Control Finish iSpray Control Finish For thicker materials it is recom...

Страница 9: ...lly on the Control Finish nozzle only To achieve a round pattern with the iSpray nozzle see the Adjust Spray Width section Adjust Spray Width iSpray only The spray width lever on the iSpray nozzle det...

Страница 10: ...y Properly STOP It is important to keep your arm moving whenever the gun is being triggered If you pause or linger in one spot too long too much material will be sprayed to the surface STOP Partially...

Страница 11: ...e The Control Finish Nozzle provides an even narrower pattern for smaller surface projects and fine finishing Moving closer to the spray surface narrows the fan and moving farther away widens it If yo...

Страница 12: ...e turbine Wipe the exterior of the nozzle until clean Open the velcro strap at the paint hose and separate the power cord from the hose at about a length of 3 feet from the turbine Do not submerge or...

Страница 13: ...w be pointed directly into the container of cleaning solution Turn the pump ON and allow cleaning solution to circulate for approximately 5 minutes 3 After 5 minutes while pump is running remove sucti...

Страница 14: ...e nozzle and remove the cover b 2 Pull out the red catch and remove the pressure reducer c 3 Remove the valve d and clean thoroughly 4 Clean the openings in the pressure reducer using a brush and wate...

Страница 15: ...from the front end assembly 5 Insert the nozzle 2 Make sure to align the groove g and notch h and align the nozzle opening with the needle 6 Put the air screen i in the air cap j Put both 3 on the noz...

Страница 16: ...entered the air tube proceed as follows 1 Pull the air tube a at the top from the nozzle Screw off the valve cover b Remove the valve seal c Clean all the parts carefully Make sure to remove any mater...

Страница 17: ...l 4 Nozzle clogged 5 Air filter clogged 6 Spray material too thick 1 Decrease material flow setting 2 Increase air power setting 3 Adjust material flow or increase movement of spray gun 4 Clean 5 Chan...

Страница 18: ...s inserted as far as it will go to ensure a tight fit IMPORTANT Never tip the sprayer at more than a 45 angle Material could get into the turbine and damage the sprayer 3 After the material has been p...

Страница 19: ...in the system Pull the trigger so that the material inside the spray nozzle drains back into the container 2 Unscrew the container and remove Empty any remaining material back into the material conta...

Страница 20: ...e air vent c on the suction tube with a soft bristled cleaning brush 5 Clean the rear of the nozzle d with the appropriate cleaning solution Use a thin layer of petroleum jelly to lubricate the O ring...

Страница 21: ...vercle du filtre droite Cubierta del filtro derecha 1 4 2332973 Filter cover left Couvercle du filtre gauche Cubierta del filtro izquierda 1 5 2354701 Suction tube Tube d aspiration Tubo de succi n 1...

Страница 22: ...de chorro de pulverizaci n 1 5 2350214 Regulator seal Joint de r gulateur Sello de regulador 1 6 2353700 Regulator assembly includes item 5 Ensemble de r gulateur inclut l article 5 Conjunto del regu...

Страница 23: ...articulos 1 8 1 2 0417706 Nozzle seal Joint d tanch it de buse Sello de boquilla 1 3 2305131 Nozzle Buse Boquilla 1 4 2305129 Air cap Chapeau d air Tapa de aire 1 5 0417319 Connecting nut crou d asse...

Страница 24: ...ption Fran ais Description Espa ol Descripci n 0529014 iSpray nozzle assembly Ensemble de buse de iSpray Ensamblaje del boquilla de iSpray 0529013 Detail Finish Nozzle assembly Ensemble de buse de Det...

Страница 25: ...self Store indoors with the cord wrapped around the pump and secured with the straps Cet appareil n a aucune pi ce lectrique utilisable Ne tentez pas d effectuer vous m me l entretien Rangez l int rie...

Страница 26: ...BLE QUE POUR 30 JOURS COMPTER DE LA DATE D ACHAT DE L ARTICLE EST UTILIS DES FINS COMMERCIALES OU DE LOCATION Tout article comportant des d fauts de fabrication ou de mat riaux au cours de la p riode...

Страница 27: ...GAR NICAMENTE SI SE UTILIZA PARA PROP SITOS COMERCIALES O DE ALQUILER EST GARANT A ES V LIDA NICAMENTE DURANTE 30 D AS A PARTIR DE LA FECHA DE COMPRA Si cualquier producto est defectuoso con respecto...

Страница 28: ...FOR HOME USAGE ONLY IF USED FOR COMMERCIAL OR RENTAL PURPOSES THIS WARRANTY APPLIES ONLY FOR 30 DAYS FROM DATE OF PURCHASE If any product is defective in material and or workmanship during the applica...

Отзывы: