background image

eN

9

SPRAY PATTeRN ADjUSTMeNT 

ADjUST SPRAY ShAPe

Adjust the spray pattern by turning the air cap ears. the air 

cap position will determine the movement direction of the 

spray gun.
the  positions  of  the  air  cap  and  the  corresponding  spray 

pattern shapes are illustrated below.
test each pattern and use whichever pattern is suitable for 

your application.

NeVer  trigger  the  gun  while  turning  the 

adjustment ring.  NeVer point the spray gun 

at any part of the body.

Attention

when changing the spray pattern, make sure 

the black retaining ring is not loosened.

i

*the  air  cap  can  be  set  diagonally  on  the 

detail Finish nozzle only. to achieve a round 

pattern  with  the  iSpray  nozzle,  see  the 

“Adjust Spray width” section.

ADjUST SPRAY wiDTh (iSPRAY oNlY)

the  spray  width  lever  on  the  iSpray  nozzle  determines  the 

width of the spray pattern.

TiPS:

1. 

Start  with  a  narrow  fan  pattern  for  painting  trim  work 

(1-5” width) and larger surfaces like doors and walls (>5” 

width).

2. 

Adjust  material  &  Air  Flow  settings  as  shown  in  chart 

based on coating, fan pattern width, and nozzle.

3. 

Fine tune the material and Air power settings to achieve 

the best results for your application.

4. 

pull trigger slightly to start the turbine before pulling all 

the way to spray material.

5. 

use narrow pattern for detailed work, touch up.

6. 

recommended settings for material and Air power may 

change if the coating is thinned.

AiR CAP

AiR CAP eARS

Horizontal pattern

=

=


use ‘up and down’ 

spraying motion

Vertical pattern

=

=

use ‘side to side’ 

spraying motion

round pattern*

=

use ‘up and down’ or 

‘side to side’ spraying 

motion

use lower air power / 

material flow

For coating smaller 

areas, corners and 

edges

wiDe

NARRow

wide pattern


For coating large 

surfaces

use higher air power

use higher material 

flow

narrow  pattern

For coating smaller 

areas, corners and 

edges

use lower air power

use lower material 

flow

Содержание Flexio 2000

Страница 1: ... manuel de l utilisateur MANUAL DE USARIO readthis manual for complete instructions lire ce manuel pour obtenir des directives complÈtes lEA ESTE MANUAL PARA OBTENER LAS INSTRUCCIONES COMPLETAS wagner group com EN ES F Français p 16 espaÑol P 30 2000 3000 ...

Страница 2: ... codes and ordinances warning Improper installation of the grounding plug can result in a risk of electric shock If repair or replacement of the cord or plug is necessary do not connect the green grounding wire to either flat blade terminal The wire with insulation having a green outer surface with or without yellow stripes is the grounding wire and must be connected to the grounding pin Checkwith...

Страница 3: ...t and working HAZARD electric shock This product can cause injury due to electric shock PREVENTION Power cord must be connected to a grounded circuit Never submerge electrical parts Never expose the equipment to rain Store indoors Keep electrical cord plug and spray gun trigger free from paint and other liquids Never hold the cord at plug connections to support the cord Failure to observe may resu...

Страница 4: ...p you finish projects fast and professionally They are easy to use right out of the box and with low overspray and less clogging you will enjoy the flexibility to tackle all the painting projects on your list We appreciate your feedback so please visit our website and write a review on the FLEXiO handheld sprayer so we can continue to learn and improve our products Just click on www wagnerflexio c...

Страница 5: ...flow can be adjusted incrementally from 1 minimum to 12 maximum by turning the adjustable material flow control Detail Finish Nozzle 3000 only Set the material flow by turning the red knob on the trigger of the spray gun Trigger Pulling the trigger will deliver spray material from the material container to the nozzle assembly where it is sprayed Wide narrow Spray Width Lever The spray width lever ...

Страница 6: ...iner finish Make sure you adjust the X Boost and Material flow settings for your specific material needs If thinning is necessary use the proper solvent as specified by the material manufacturer Never exceed the thinning advice given by the coating manufacturer Donotthinwithmaterialsthathaveaflashpoint below 100 F 38 C i Material to be sprayed may need to be strained to remove any impurities in th...

Страница 7: ... the rear of the nozzle i Make sure the pickup tube is inserted as far as it will go to ensure a tight fit Attention Never tip the sprayer at more than a 45 angle Material could get into the turbine and damage the sprayer 3 Carefully screw the cup back onto the nozzle assembly Tighten firmly 4 Align the nozzle and the turbine approximately as shown 5 Insert and twist the nozzle into the turbine to...

Страница 8: ...igger of the spray gun For thicker materials it is recommended that you start with the highest material flow setting and then gradually decrease the flow to suit your particular spraying needs For thinner materials it is recommended that you start with a low material flow setting and then gradually increase the flow to suit your particular spraying needs The higher the flow setting the quicker you...

Страница 9: ...attern Tips 1 Start with a narrow fan pattern for painting trim work 1 5 width and larger surfaces like doors and walls 5 width 2 Adjust Material Air Flow settings as shown in chart based on coating fan pattern width and nozzle 3 Fine tune the Material and Air Power settings to achieve the best results for your application 4 Pull trigger slightly to start the turbine before pulling all the way to ...

Страница 10: ...ng the trigger will start the turbine but no material will spray until the trigger is pulled fully It is recommended that the trigger first be pulled partially in order to start the turbine before a spray pass is made Position the spray gun perpendicular to and six 6 to eight 8 inches from the spray surface depending upon the spray pattern size desired With reduced material flow and air power you ...

Страница 11: ... when using the iSpray nozzle Notes If you feel the material is going on too thin increase the material flow If you feel the material is going on too thick decrease the material flow even further or move the spray gun further away from the surface Besides adjusting the controls other factors that should be considered when spraying Distance from the spray object if you are too far from the spraying...

Страница 12: ...iner 3 Pour a small amount of the appropriate cleaning solution into the cup Water 1 2 full Mineral spirits 1 4 full 4 Attach the cup to the nozzle and plug in the sprayer 5 Spray the cleaning solution into a safe area While spraying gently shake the spray gun This slight agitation will help break up smaller particles of spray material 6 Unplug the power cord Loosen the material container by 1 2 t...

Страница 13: ...he parts as shown Clean all parts with a cleaning brush and the appropriate cleaning solution Reassemble all parts when clean 4 Clean the air vent c on the suction tube with a soft bristled cleaning brush 5 Clean the rear of the nozzle d with the appropriate cleaning solution Use a thin layer of petroleum jelly to lubricate the O ring e 1 2 a b 3 4 c 5 d e The nozzle seal may become stuck inside t...

Страница 14: ...tube follow the steps below 1 Pull the air tube a at the top from the nozzle Screw off the valve cover b Remove the valve seal c Clean all the parts carefully Make sure to remove any material from valve seal housing area d Attention The air tube and valve seal c are only solvent resistant to a limited extent Do not immerse in solvent only wipe 2 Place the valve seal c in the valve cover b with the...

Страница 15: ...r setting 3 Adjust material flow or increase movement of spray gun 4 Clean 5 Change 6 Tighten container 7 Thin Problem D Spray jet pulsates 1 Material in container running out 2 Air filter clogged 3 Air valve tube disconnected 1 Refill 2 Change 3 Reconnect both ends of the air tube Problem E Too much overspray 1 Gun too far from spray object 2 Air power setting too high 1 Reduce distance 6 8 is id...

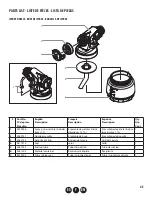
Страница 16: ...es pièces 2 à 4 Turbina de X Boost incluye los articulos 2 4 1 2 2367285 Filter Filtre Filtro 2 3 2332974 Filter cover right Couvercle du filtre à droite Cubierta del filtro derecha 1 4 2332973 Filter cover left Couvercle du filtre à gauche Cubierta del filtro izquierda 1 Accessories Accessoires Accesorios Part No Nº de piéce Pieza No English Description Français Description Español Descripción 05...

Страница 17: ...1 à 10 Ensamblaje de pistola incluye los articulos 1 10 1 2 2382751 Nozzle assembly Ensemble de buse Ensamblaje de boquilla 1 3 2382753 Adjustment ring Anneau de tarage Anillo de ajuste 1 4 0417474 Seal Joint Sello 1 5 2361505 Suction tube Tube d aspiration Tubo de succión 1 6 2361502 Material container Réservoir de liquide Recipiente 1 7 0529005 Tube Valve seal Tube Joint de clapet Tube Junta de ...

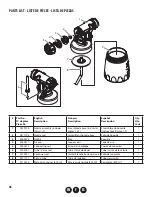
Страница 18: ...e seal Joint d étanchéité de buse Sello de boquilla 1 3 2362878 Nozzle Buse Boquilla 1 4 2362877 Air cap Chapeau d air Tapa de aire 1 5 2362873 Connecting nut Écrou d assemblage Tuerca de conexión 1 6 2304027 Tube Valve seal Tube Joint de clapet Tube Junta de la válvula 1 7 2370527 Container seal Joint d étanchéité de réservoir Sello de recipiente 1 8 2371151 Pickup tube Tube d aspiration Tubo de ...

Страница 19: ...CCESSOIRES CET ARTICLE A ÉTÉ CONÇU EXCLUSIVEMENT EN VUE D UN USAGE DOMESTIQUE LA GARANTIE NE SERA VALABLE QUE POUR 30 JOURS À COMPTER DE LA DATE D ACHAT DE L ARTICLE EST UTILISÉ À DES FINS COMMERCIALES OU DE LOCATION Tout article comportant des défauts de fabrication ou de matériaux au cours de la période de garantie applicable peut être retourné en port payé à un centre de service après vente agr...

Страница 20: ...flexio 2000 3000 wagner group com ...

Отзывы: