background image

66

Guia HDMI

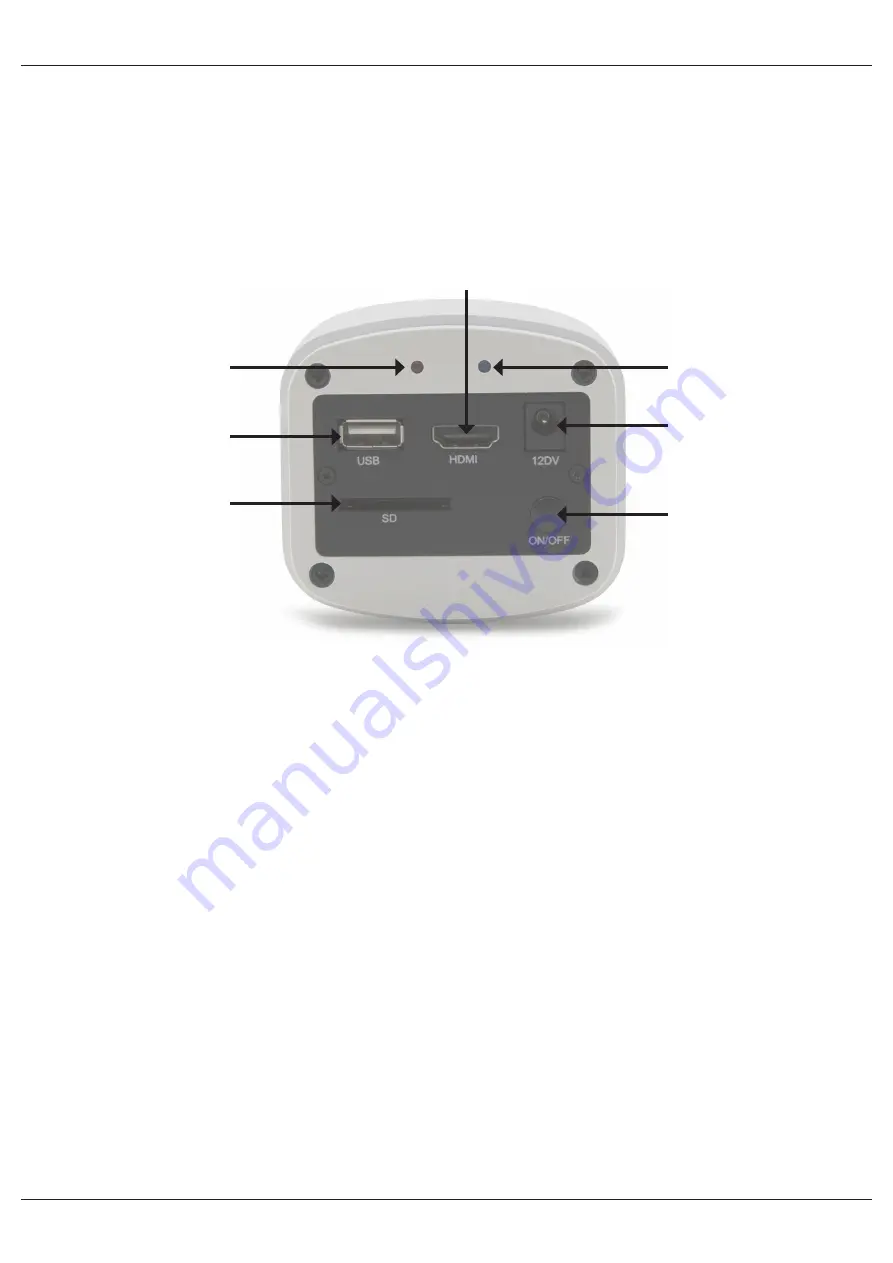
1. USB interface. 

A: Conecte o mouse a porta USB. Use o mouse para controlar a câmera diretamente. 

B: Conecte a porta USB ao PC para que a câmera funcione como Driver-Free.

2. HDMI interface.

Utilize o cabo HDMI para conectar a câmera ao monitor HDMI.

3. Power interface.

Utilize a fonte de alimentação fornecida 12V2A. Quando a alimentação é conectada à luz vermelha está ON. 

Quando o interruptor na luz azul câmera está ON.

4. ON/OFF TECLA

Pressione e segure a tecla ON / OFF até que a luz azul é ON , pressione a tecla ON / OFF novamente para 

desligar a câmera.

5. SD CARD

Para chegar mais rápido e transferência de dados mais estável, recomendamos o uso de Class10 cartão SD 

nós fornecemos aos 8 gigas cartão SD.

6. C MOUNT

Standard C-mount porta óptico.

POWER LIGHT

WORKING LIGHT

POWER

TURN ON/OFF

HDMI

USB

SD CARD

Содержание VisiCam HDMI13

Страница 1: ...Model European Catalogue Number HDMI13 630 2627 INSTRUCTION MANUAL Version 3 Issued 27 07 2015 VWR Pro HDMI...

Страница 2: ...ents Installation of camera drivers and software Some notes How to test your Camera Select the right driver Getting started with VisiCam a very easy measuring and documentation software Getting starte...

Страница 3: ...3 Package Contents DESCRIPTION QUANTITY HDMI Camera 1 12V 2000mA power supply 1 SD card 1 USB cable 1 HDMI cable 1 Calibration slide 1 CD 1 Mouse 1...

Страница 4: ...SB port Windows needs to recognize its Driver again even if it has already done this operation for the first USB port It may happen sometimes that Windows doesn t recognize a Camera using one of your...

Страница 5: ...and before capturing the image you can set the brightness saturation gamma ecc Then you can capture the image The image is now ready for being manipulated using VisiCam Getting started with optika is...

Страница 6: ...interface Please use the provided 12V2A power supply When power is plugged in the red light is on When switch on the camera blue light is on 4 ON OFF KEY Press and hold the ON OFF key until the blue l...

Страница 7: ...l blue light is on 2 Connect the mouse to the USB port Move the cursor to get the settings on the screen 3 Insert the SD card Step 2 Move the cursor to the left of the screen When move the cursor to t...

Страница 8: ...8 Step 3 Move the cursor to the right of the screen Step 4 Check the images and videos you have captured on the SD card 1 Check the album and delete the images...

Страница 9: ...e preview with the captured images Connect the camera to the PC 1 Use the special USB cable for connecting the camera to the PC 2 Plug in the 12V 2A Power Supply 3 Press and hold the on off key until...

Страница 10: ...y accident abuse misuse or misapplication or from ordinary wear and tear If the required maintenance and inspection services are not performed according to the manuals and any local regulations such w...

Страница 11: ...ur responsibility to decontami nate the equipment in case of biological chemical and or radiological contamination so as to protect from health hazards the persons involved in the disposal and recycli...

Страница 12: ...hwest Business Park Ballycoolin Dublin 15 Tel 01 88 22 222 Fax 01 88 22 333 E mail sales ie vwr com Italy VWR International PBI S r l Via San Giusto 85 20153 Milano MI Tel 02 3320311 02 487791 Fax 800...

Страница 13: ...Mod le European Catalogue Number HDMI13 630 2627 MANUEL D UTILISATION Version 3 du 27 07 2015 VWR Pro HDMI...

Страница 14: ...on des pilotes de la camera et du logiciel Quelques notes Comment tester votre cam ra Quel est votre pilote VisiCam un logiciel simple et complet de mesure et de documentation d images Pour commencer...

Страница 15: ...15 Contenu de l emballage DESCRIPTION QUANTIT Cam ra HDMI 1 Alimenation 12V 2000mA 1 Carte SD 1 C ble USB 1 C ble HDMI 1 Lame microm trique 1 CD 1 Mouse...

Страница 16: ...ows devra reconna tre nouveau son pilote m me si cette op ration d j t faite pour le premier port USB Il peut arriver que Windows ne reconnaisse pas une cam ra en utilisant l un des ports USB de votre...

Страница 17: ...ge vous pouvez r gler la luminosit la saturation puis vous pourrez capturer une image L image est maintenant pr te tre labor e en utilisant VisiCam Pour commencer avec optika IsView un logiciel comple...

Страница 18: ...12V2A fournie Quand l alimentation est branch e la lumi re rouge est allum e Quand la cam ra est allum e la lumi re bleue est allum e 4 BOUTON ON OFF Appuyer et maintenir le bouton ON OFF jusqu ce qu...

Страница 19: ...jusqu ce que la lumi re bleue s allume 2 Connecter la souris au port USB D placer le curseur pour param trer l cran 3 Ins rer la carte SD tape 2 D placer le curseur vers la gauche de l cran Quand on...

Страница 20: ...20 tape 3 D placez le curseur vers la droite de l cran tape 4 V rifier les images et les vid os sauvegard s sur la carte SD 1 V rifier l album et supprimer les images...

Страница 21: ...s images sauvegard es Connecter la cam ra l ordinateur 1 Utiliser le c ble USB pour connecter la cam ra l ordinateur 2 Brancher l alimentation 12V 2A 3 Appuyer et maintenir le bouton ON OFF jusqu ce q...

Страница 22: ...usive ou incor recte d une mauvaise application ou de l usure normale du produit Cette garantie deviendrait non valide dans le cas o les services de maintenance et de v rification requis ne seraient p...

Страница 23: ...icant et suivre la proc dure que celui ci a adopt pour permettre le ramassage s lectif de l appareil Le ramassage s lectif correct de l appareil pour son recyclage traitement et limination compatible...

Страница 24: ...ess Park Ballycoolin Dublin 15 Tel 01 88 22 222 Fax 01 88 22 333 E mail sales ie vwr com Italie VWR International PBI S r l Via San Giusto 85 20153 Milano MI Tel 02 3320311 02 487791 Fax 800 152999 02...

Страница 25: ...Model European Catalogue Number HDMI13 630 2627 BEDIENUNGSANLEITUNG Version 3 Datum 27 07 2015 VWR Pro HDMI...

Страница 26: ...oftware Anmerkungen berpr fung der kamera Was ist ihr driver VisiCam ein komplettes programm um messungen Durchzuf hren und ihre bilder zu dokumentie ren Erste schritte mit optika IsView eine vollst n...

Страница 27: ...27 Verpackung BESCHREIBUNG MENGE HDMI Kamera 1 12V 2000mA Netzteil 1 SD Karte 1 USB Kabel 1 HDMI Kabel 1 Kalibrierungsobjekttr ger 1 CD 1 Mouse 1...

Страница 28: ...mit einem anderen Port verbun den so muss Windows es erkennen und deshalb den Driver auch f r diesen Port installieren Normalerweise wenn ein anderer Port verwendet wird und dann die Kamera verbunden...

Страница 29: ...ild auf Vor der Aufnahme k nnen einige Parameter wie S ttigung Kontrast Spektrum u s w eingestellt werden Das Bild ist jetzt bereit um mit VisiCam bearbeitet zu werden Erste schritte mit optika IsView...

Страница 30: ...r Interface Verwenden Sie den mitgelieferten 12V2A Netzteil Wenn die Betriebsspannung eingesteckt ist ist die rote Licht an Wenn eingeschaltet ist die blaue Licht an 4 ON OFF TASTE Dr cken Sie den ON...

Страница 31: ...den Sie die Mouse an den USB Port Bewegen Sie den Cursor um die Konfiguration an dem Bildschirm zu haben 3 Setzen Sie die SD Karte ein Step 2 Bewegen Sie den Cursor an die linke Seite des Bildschirmes...

Страница 32: ...32 Step 3 Bewegen Sie den Cursor an die rechte Seite des Bildschirmes Step 4 Kontrollieren Sie die Bilder und Video in Ihrer SD Karte 1 Kontrollieren Sie Ihre Bildergalerie und l schen Sie die Bilder...

Страница 33: ...icherten Bildern Verbindung der Kamera an den PC 1 Verwenden Sie den Spezial USB Kabel um die Kamera an den PC zu verbinden 2 Stecken Sie den Anschlusstecker in den 2V 2A Netzteil ein 3 Dr cken Sie di...

Страница 34: ...n die erforderlichen Wartungsarbeiten und Inspektionen nicht entsprechend der Bedienungsan leitung und den lokalen Erfordernissen durchgef hrt werden erlischt die Gew hrleistung es sei denn dieses Unt...

Страница 35: ...durch die bergabe zu einer genehmigten An lage f r die getrennte Sammlung und das Recycling Es ist auch Ihre Verantwortung die Einrichtung im Falle von biologischen chemischen und oder radiologischen...

Страница 36: ...Postbus 8198 1005 AD Amsterdam Tel 020 4808 400 Fax 020 4808 480 E mail info nl vwr com Norwegen VWR International AS Haavard Martinsens vei 30 0978 Oslo Tel 0 2290 Fax 815 00 940 E mail info no vwr...

Страница 37: ...Modello European Catalogue Number HDMI13 630 2627 MANUALE D ISTRUZIONI Versione 3 Emesso il 27 07 2015 VWR Pro HDMI...

Страница 38: ...one Installazione dei drivers e del software Alcune note Come verificare la telecamera Selezionare il driver corretto VisiCam un programma completo per eseguire misurazioni e per documentare le vostre...

Страница 39: ...39 Contenuto della confezione DESCRIZIONE QUANTIT Camera HDMI 1 Alimentazione 12V 2000mA 1 SD card 1 Cavo USB 1 Cavo HDMI 1 Vetrino di calibrazione 1 CD 1 Mouse 1...

Страница 40: ...u una porta USB e la collegate poi in una seconda porta Windows avr bisogno di riconoscerla ed installare il Driver anche per questa porta possibile che Windows non riconosca la periferica su una port...

Страница 41: ...ne potete regolare alcuni importanti fattori quali sensibilit del CCD saturazione contrasto gamma ecc Quindi catturate l immagine L immagine ora pronta per essere elaborata con VisiCam Iniziare a util...

Страница 42: ...re l alimentatore 12V2A fornito in dotazione Quando l alimentazione attiva la luce rossa accesa Quando la telecamera in uso la luce blu accesa 4 ON OFF Tener premuto il pulsante ON OFF finch la luce b...

Страница 43: ...accenda la luce blu 2 Collegare il mouse all uscita USB Muovere il cursore per impostare la schermata 3 Inserire la SD card Step 2 Muovere il cursore sulla parte sinistra dello schermo Portando il cu...

Страница 44: ...44 Step 3 Spostare il cursore a destra dello schermo Step 4 Controllare immagini e video salvate su SD card 1 Controllare la galleria e cancellare le immagini...

Страница 45: ...5 Confrontare anteprima con immagini salvate Collegare la camera a PC 1 Usare il cavo USB per collegare la camera a PC 2 Collegarlo all alimentatore 12V 2A 3 Tener premuto il pulsante on off fino a c...

Страница 46: ...ali o causati da abuso uso o applicazione impropri o dal normale logorio dell apparecchio Qualora i servizi di ispezione e manutenzione necessari non vengano eseguiti secondi i manuali e le eventuali...

Страница 47: ...edere alla decontaminazione dello strumento da eventuali contaminazioni con materiale biologico chimico e o radioattivo al fine di proteggere le persone coinvolte nel processo di riciclo dello strumen...

Страница 48: ...artinsens vei 30 0978 Oslo Tel 0 2290 Fax 815 00 940 E mail info no vwr com Nuova Zelanda Global Science A VWR Company 241 Bush Road Albany 0632 Auckland Tel 0800 734 100 Fax 0800 999 002 E mail sales...

Страница 49: ...Modelo European Catalogue Number HDMI13 630 2627 MANUAL DE INSTRUCCIONES Versi n 3 Publicado 27 07 2015 VWR Pro HDMI...

Страница 50: ...laci n de los drivers y del software Notas C mo verificar la tele c mara Reconocimiento del tipo de driver VisiCam un programa completo para realizar mediciones y documentar im genes Con el software O...

Страница 51: ...51 Contenido del embalaje DESCRIPCI N CANTIDAD C mara HDMI 1 Alimentaci n12V 2000mA 1 Tarjeta SD 1 Cable USB 1 Cable HDMI 1 Muestra de calibraci n 1 CD 1 Mouse 1...

Страница 52: ...comunicaci n es superior Si se utiliza una perif rica en un puerto USB y despu s se conecta a un segundo puerto Windows necesitar reconocerla e instalar tambi n el Driver en la segunda Puede suceder q...

Страница 53: ...magen es posible re gular algunos factores importantes como por ejemplo sensibilidad del CCD saturaci n colores balance del blanco contraste gama etc Ahora ser posible capturar y elaborar la imagen ut...

Страница 54: ...a c mara recibe corriente desde el alimentador la luz roja aparecer encendida Cuando la c mara est en funcionamiento se enciende luz azul 4 Bot n de encendido ON OFF Mantenga presionado el bot n de en...

Страница 55: ...cienda 2 Conectar el rat n al puerto USB Mueva el cursor para ver el men de configuraci n en la pantalla 3 Insertar la targeta SD Paso 2 Mover el cursor a la izquierda de la pantalla Al mover el curso...

Страница 56: ...56 Paso 3 Mueva el cursor a la derecha de la pantalla Paso 4 Ver imagenes y v deos guardados en la targeta SD 1 Ver el album y eliminar imagenes...

Страница 57: ...HDMI a un ordenador PC 1 Utilice el cable especial USB para conectar la c mara al ordenador 2 Conecte el transformador de corriente 12V 2A a la c mara 3 Presione y mantenga presionada la tecla de ence...

Страница 58: ...ica si el producto ha sufrido da os a causa de un accidente abuso uso indebido o incorrecto o del desgaste por el uso normal Si los servicios de inspecci n y mantenimiento precisos no se efect an de a...

Страница 59: ...escontaminaci n del equipo en caso de haber usado productos biol gicos qu micos y o contaminaci n radiol gica a fin de protegerlos de peligros para la salud de las personas involucradas en la eliminac...

Страница 60: ...s Campus Northwest Business Park Ballycoolin Dublin 15 Tel 01 88 22 222 Fax 01 88 22 333 E mail sales ie vwr com Italia VWR International PBI S r l Via San Giusto 85 20153 Milano MI Tel 02 3320311 02...

Страница 61: ...VWR Model European Catalogue Number HDMI13 630 2627 MANUAL DE INSTRU ES Vers o 3 Emitido 27 07 2015 Pro HDMI...

Страница 62: ...ocumentar suas imagens Iniciar a utilizar Optika IsView um software completo para a medi o ajuste e captura de imagens e v deo Guia HDMI HDMI Operation Servi o T cnico Garantia Conformidade com leis e...

Страница 63: ...63 Conte do da embalagem DESCRI O QUANTIDADE C mara HDMI 1 Alimenta o 12V 2000mA 1 SD card 1 Cabo USB 1 Cabo HDMI 1 Vidro de calibragem 1 CD 1 Mouse 1...

Страница 64: ...numa porta USB e se este mesmo perif rico for conectado depois numa segunda porta Windows precisar reconhec lo e instalar o Drive tamb m para esta porta poss vel que Windows n o reconhe a o perif rico...

Страница 65: ...ss vel ajustar alguns fatores importantes como sensibilidade do CCD satura o contraste gama etc Capturem portanto a imagem A imagem est agora pronta para ser elaborada com VisiCam Iniciar a utilizar O...

Страница 66: ...enta o fornecida 12V2A Quando a alimenta o conectada luz vermelha est ON Quando o interruptor na luz azul c mera est ON 4 ON OFF TECLA Pressione e segure a tecla ON OFF at que a luz azul ON pressione...

Страница 67: ...OFF at que a luz azul est ON 2 Ligue o mouse porta USB Mova o cursor para obter as defini es do screen 3 Insert the SD card Step 2 Mova o cursor para a esquerda da screen Ao mover o cursor para a esq...

Страница 68: ...68 Step 3 Mova o cursor para a direita da tela Step 4 Confira as imagens e v deos que voc capturou no cart o SD 1 Verifique o lbum y exclu a as imagens...

Страница 69: ...isualiza o com as imagens capturadas Conecte a camera PC 1 Utilize o cabo USB especial para conectar a c mera ao PC 2 Conecte o 12V 2A Power Supply 3 Pressione e segure a tecla liga desliga at que a l...

Страница 70: ...se tiver sido aplicado incorrectamente ou se os danos resultarem do des gaste normal Se a manuten o necess ria e servi os de inspec o n o forem efectuados de acordo com os manuais e com as normas loca...

Страница 71: ...descontamina o do equipamento em caso de contami na o biol gica qu mica e o radiol gica assim como proteger de riscos de sa de as pessoas envolvidas na remo o e reciclagem do equipamento Para mais inf...

Страница 72: ...ness Park Ballycoolin Dublin 15 Tel 01 88 22 222 Fax 01 88 22 333 E mail sales ie vwr com It lia VWR International PBI S r l Via San Giusto 85 20153 Milano MI Tel 02 3320311 02 487791 Fax 800 152999 0...

Отзывы: