


8
|
6-Drawer Dresser
6-Drawer Dresser
| 9
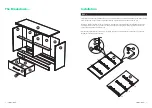
Installation
Installation
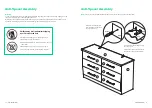
STEP 3
STEP 2
Screw Panels D, E, and F to Panels A and C using Screw (2) and the Allen Key. Make sure the edge banding
sides of Panels D and E are facing outwards.
Place the Drawer Slides (9) marked with CR at the predrilled holes on Panel B (Right Side Panel) as shown. Make
sure the end with the roller is aligned with the right side of panel B. Tighten the drawer slides (9) with Screw (10).
Insert Cam Nut (6B) into Panels B and C with the cross arrow mark facing upwards. You will be able to see the
opening of the Cam Nut (6B) thru the top edges of Panels B and C.
Turn over Panel C. Place the Drawer Slides (9) marked with CL at the predrilled holes on Panel C. Make sure the
end with the roller is aligned with the left side of Panel C. Tighten the Drawer Slides (9) with Screw (10).
9
10
1
6B
B
C
CL
CR
CR
CR
CL
CL
A
C
D
E
F
1
2