background image

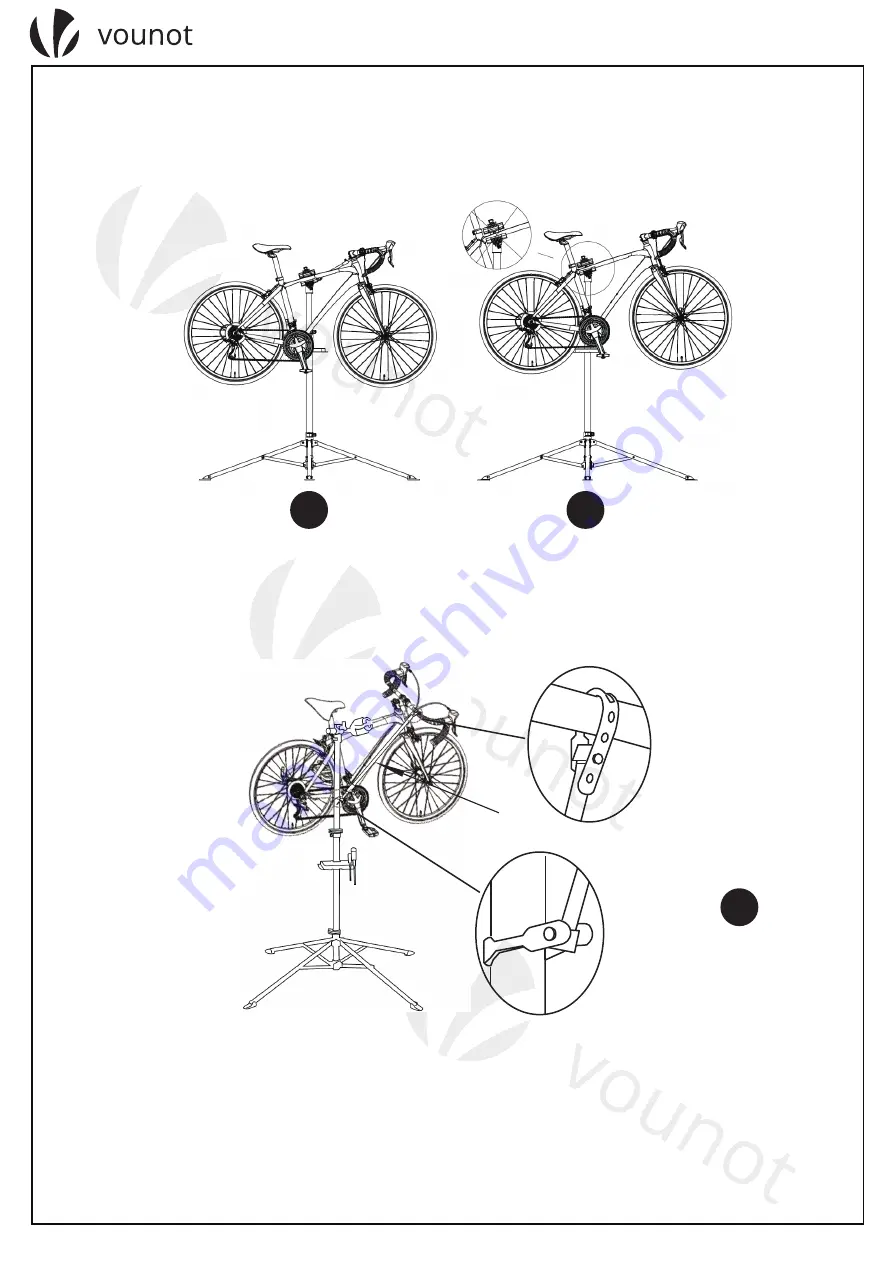
Fijación de la bicicleta

Ajuste los ángulos ANTES de cargar la bicicleta y asegúrese de que todos los tornillos de bloqueo 

y cierres rápidos estén apretados con anticipación. 

Elija su posición de sujeción en la bicicleta para lograr un equilibrio lo más parejo posible para 

evitar forzar la abrazadera y evitar que vuelque. (Ver comparación de Fig. 10 y Fig. 11)

Para estabilizar la rueda delantera, puede insertar el estabilizador delantero (E1/E2/E3) entre el 

manillar de la rueda delantera y la barra telescópica. (Fig.12)

Contenedor de herramientas

La bandeja de herramientas tiene un imán para asegurar piezas pequeñas y herramientas.

Mantenimiento, almacenamiento

Limpie el soporte con agua tibia y jabón PH neutro. ¡Por favor, limpie siempre la superficie limpia con 

un paño seco! ¡Evite el uso de productos químicos agresivos (p. ej., disolventes)! Guarde el artículo en 

un lugar seco y bien ventilado.

30

2022-05-23

Version:

12

E3

E2

E1

10

11

Instrucciones

Содержание 6726323601431

Страница 1: ...6726323601431 Bike repair stand BIKE REPAIR STAND SUPPORT DE RÉPARATION VÉLO FAHRRADMONTAGESTÄNDER SUPPORTO PER RIPARAZIONE BICI SOPORTE PARA REPARACIÓN BICICLETAS ...

Страница 2: ...rts must be replaced to avoid damage to the item Please ensure that the socket head screws connecting the upper bar are always tight Warning Please put the bicycle work stand only on a solid and stable surface to avoid tipping Warning Nobody should try to ride the bicycle when it is mounted on the stand Avoid damage To avoid damage to the bicycle please do not squeeze conduit or cable with the ret...

Страница 3: ...bike stand by pushing the articulated assembly 1 on the Upright 4 down until it stops Tighten quick to release 3 Open the brackets to the maximum angle to ensure the stability Assembly 2 1 Allen key A B F C D1 D2 E1 E2 E3 02 2022 05 23 Version ...

Страница 4: ...rs 2 down in a horizontal position and make sure the item is placed on a solid and stable surface 3 As shown in Fig4 and Fig5 insert telescopic bar B in 4 before mounting the bike support stand C on the telescopic bar 3 4 5 03 2022 05 23 Version ...

Страница 5: ...tment tube B There is a maximum extension mark on the tube Do not extend the horizontal clamp bar farther than warning line marked on the tube as shown in Fig7 maximum extension mark warning line The warning line shall not enter the sleeve 04 2022 05 23 Version 7 6 ...

Страница 6: ...wn in Fig8 attach the tool shelf D1 D2 on upright 4 and set to a convenient height The bracket of the work stand can be fixed to the floor to achieve better stability The fixed holes with the ground 9 D2 D1 8 05 2022 05 23 Version ...

Страница 7: ...l tray has a magnet for securing small pieces and tools As shown in Fig12 To stabilize the front wheel you can insert the front stabilizer E1 E2 E3 between the handlebars of the front wheel and the telescopic bar Attaching the bicycle Maintenance storage Clean the stand with warm water and neutral PH soap Please always wipe the clean surface with a dry cloth Avoid using harsh chemicals e g solvent...

Страница 8: ... endommager l article Vérifiez toutes les pièces du support Les vis desserrées doivent être serrées et toutes les pièces défectueuses doivent être remplacées pour éviter d endommager l article Veuillez vous assurer que les vis à tête creuse reliant la barre supérieure sont toujours bien serrées Avertissement Veuillez placer le support de vélo uniquement sur une surface solide et stable pour éviter...

Страница 9: ...o en poussant l ensemble articulé 1 sur le Montant 4 vers le bas jusqu à ce qu il s arrête Les pieds peuvent être moins écartés Ouvrez les supports à l angle maximum pour assurer la stabilité Assemblage 2 1 Clé Allen A B F C D1 D2 E1 E2 E3 08 2022 05 23 Version ...

Страница 10: ... position horizon tale et assurez vous que l article est placé sur une surface solide et stable 3 Comme montré sur la Fig4 et la Fig5 insérez la barre télescopique B dans le montant 4 avant de monter le support de vélo C sur la barre télescopique 3 4 5 09 2022 05 23 Version ...

Страница 11: ...l y a une marque d extension maximale sur le tube Ne pas étendre la barre de serrage horizontale plus loin que la ligne d avertissement indiquée sur la Fig7 la ligne d avertissement ne doit pas dépasser la manche 7 marque d extension maximale 6 10 2022 05 23 Version ligne d avertissement ...

Страница 12: ...ort de travail peuvent être fixés au sol pour obtenir une meilleure stabilité 4 Comme montré sur la Fig8 fixez la tablette à outils D1 D2 au montant 4 et réglez la à une hauteur appropriée Les trous fixes au sol 9 D2 D1 8 11 2022 05 23 Version ...

Страница 13: ...er la roue avant vous pouvez insérer le stabilisateur avant E1 E2 E3 entre le guidon de la roue avant et la barre télescopique Fig12 Attacher le vélo Conteneur d outil Le plateau à outils a un aimant pour fixer les petites pièces et les outils Entretien rangement Nettoyez le support avec de l eau tiède et du savon au PH neutre Veuillez toujours essuyer la surface propre avec un chiffon sec Évitez ...

Страница 14: ... Gefahr der Beschädigung des Gegenstandes Überprüfen Sie alle Teile des Ständers Lose Schrauben müssen nachgezogen und defekte Teile ausgetauscht werden um eine Beschädigung des Artikels zu vermeiden Achten Sie darauf dass die Innensechskantschrauben die die obere Stange verbinden immer fest angezogen sind Achtung Bitte stellen Sie den Fahrradständer nur auf einen festen und stabilen Untergrund um...

Страница 15: ...ie die Gelenkeinheit 1 am Ständer 4 bis zum Anschlag nach unten schieben Ziehen Sie den Schnellverschluss 3 fest Öffnen Sie die Halterungen bis zum maximalen Winkel um die Stabilität zu gewährleisten Zusammenbau 2 1 Inbusschlüssel A B F C D1 D2 E1 E2 E3 14 2022 05 23 Version ...

Страница 16: ...ale Position und stellen Sie sicher dass das Gerät auf einer festen und stabilen Oberfläche steht 3 Setzen Sie die Teleskopstange B wie in Abb4 und Abb5 gezeigt in den Ständer 4 ein bevor Sie den Fahrradständer C an der Teleskopstange befestigen 3 4 5 15 2022 05 23 Version ...

Страница 17: ... B Auf dem Rohr ist eine Markierung für die maximale Ausdehnung angebracht Verlängern Sie die horizontale Klemmleiste nicht über die in Abb7 gezeigte Warnlinie hinaus die Warnleine darf nicht in die Hülse hineinragen 7 maximale Verlängerungsmarke 6 16 2022 05 23 Version Warnlinie ...

Страница 18: ...nen am Boden befestigt werden um eine bessere Stabilität zu erreichen 4 Bringen Sie die Werkzeugablage D1 D2 wie in Abb8 gezeigt am Ständer 4 an und stellen Sie sie auf eine geeignete Höhe ein Die festen Löcher mit dem Boden 9 D2 D1 8 17 2022 05 23 Version ...

Страница 19: ...n können Sie den vorderen Stabilisator E1 E2 E3 zwischen dem Lenker des Vorderrads und der Teleskopstange einfügen Abb12 Anbringen des Fahrrads Werkzeugbehälter Der Werkzeugbehälter verfügt über einen Magneten zur Befestigung von Kleinteilen und Werkzeugen Wartung Lagerung Reinigen Sie den Ständer mit warmem Wasser und neutraler PH Seife Bitte wischen Sie die saubere Oberfläche immer mit einem tro...

Страница 20: ...lare tutte le parti del supporto Le viti allentate devono essere serrate ed eventuali parti difettose devono essere sostituite per evitare danni all articolo Assicurarsi che le viti a brugola che collegano la barra superiore siano sempre ben serrate Attenzione Si prega di posizionare il supporto da lavoro per bicicletta solo su una superficie solida e stabile per evitare il ribaltamento Attenzione...

Страница 21: ...alletto spingendo verso il basso il gruppo articolato 1 sul Montante 4 fino all arresto Serrare lo sgancio rapido 3 Aprire le staffe all angolo massimo per garantire la stabilità Montaggio 2 1 Chiave a brugola A B F C D1 D2 E1 E2 E3 20 2022 05 23 Version ...

Страница 22: ... orizzontale e assicurarsi che l articolo sia posizionato su una superficie solida e stabile 3 Come mostrato in Fig4 e Fig5 inserire la barra telescopica B nel montante 4 prima di montare il cavalletto portabici C sulla barra telescopica 3 4 5 21 2022 05 23 Version ...

Страница 23: ...za B Sul tubo è presente un segno di estensione massima Non estendere la barra di bloccaggio orizzontale oltre la linea di avvertenza mostrata in Fig7 la linea di avvertimento non deve entrare nella manica 7 segno di massima estensione 6 22 2022 05 23 Version linea di avvertimento ...

Страница 24: ...oro possono essere fissati al pavimento per ottenere una migliore stabilità 4 Come mostrato in Fig8 Fissare il ripiano portautensili D1 D2 al Montante 4 e regolarlo ad un altezza conveniente I fori fissi con il terreno 9 D2 D1 8 23 2022 05 23 Version ...

Страница 25: ... stabilizzare la ruota anteriore è possibile inserire lo stabilizzatore anteriore E1 E2 E3 tra il manubrio della ruota anteriore e la barra telescopica Fig 12 Contenitore per attrezzi Il vassoio degli attrezzi ha un magnete per fissare piccoli pezzi e strumenti Manutenzione conservazione Pulisci il supporto con acqua tiepida e sapone a PH neutro Si prega di pulire sempre la superficie pulita con u...

Страница 26: ... partes del soporte Los tornillos sueltos deben apretarse y cualquier pieza defectuosa debe reemplazarse para evitar daños al artículo Asegúrese de que los tornillos de cabeza hueca que conectan la barra superior estén siempre apretados Advertencia Coloque el soporte de trabajo para bicicletas solo sobre una superficie sólida y estable para evitar que se vuelque Advertencia Nadie debe intentar mon...

Страница 27: ...tas empujando el conjunto articulado 1 en el Montante Vertical 4 hacia abajo hasta que se detenga Apriete el cierre rápido 3 Por favor abra los soportes al ángulo máximo para garantizar la estabilidad Montaje 2 1 Llave Allen A B F C D1 D2 E1 E2 E3 26 2022 05 23 Version ...

Страница 28: ...osición horizontal y asegúrese de que el artículo esté colocado sobre una superficie sólida y estable 3 Como se muestra en la Fig4 y la Fig5 inserte la barra telescópica B en el montante 4 antes de montar el soporte para bicicletas C en la barra telescópica 3 4 5 27 2022 05 23 Version ...

Страница 29: ... B Hay una marca de extensión máxima en el tubo No extienda la barra de sujeción horizontal más allá de la línea de advertencia que se muestra en la Fig7 la línea de advertencia no entrará en la manga 7 marca de extensión máxima 6 28 2022 05 23 Version línea de advertencia ...

Страница 30: ...o se pueden fijar al suelo para lograr una mejor estabilidad 4 Como se muestra en la Fig8 fije el estante para herramientas D1 D2 al Montante Vertical 4 y colóquelo a una altura conveniente Los agujeros fijos con el suelo 9 D2 D1 8 29 2022 05 23 Version ...

Страница 31: ...lizar la rueda delantera puede insertar el estabilizador delantero E1 E2 E3 entre el manillar de la rueda delantera y la barra telescópica Fig 12 Contenedor de herramientas La bandeja de herramientas tiene un imán para asegurar piezas pequeñas y herramientas Mantenimiento almacenamiento Limpie el soporte con agua tibia y jabón PH neutro Por favor limpie siempre la superficie limpia con un paño sec...

Страница 32: ...n Europa 10 rue Pergolese 75016 Paris Frankreich ist als Bevoll mächtigter AR für CE gekennzeichnete Produkte benannt um die Einhaltung der einschlägigen Verpflichtungen in den europäischen Vorschriften sicherzustellen IT Francis Lim con sede in Europa 10 rue Pergolese 75016 Parigi Francia è designato come rappresentante autorizzato AR per i prodotti marcati CE per garantire il rispetto degli obbl...

Отзывы: