Volvo Trucks North America, Inc.
Date
Group
No.
Page
Service Bulletin
4.2004
392
08
47(47)
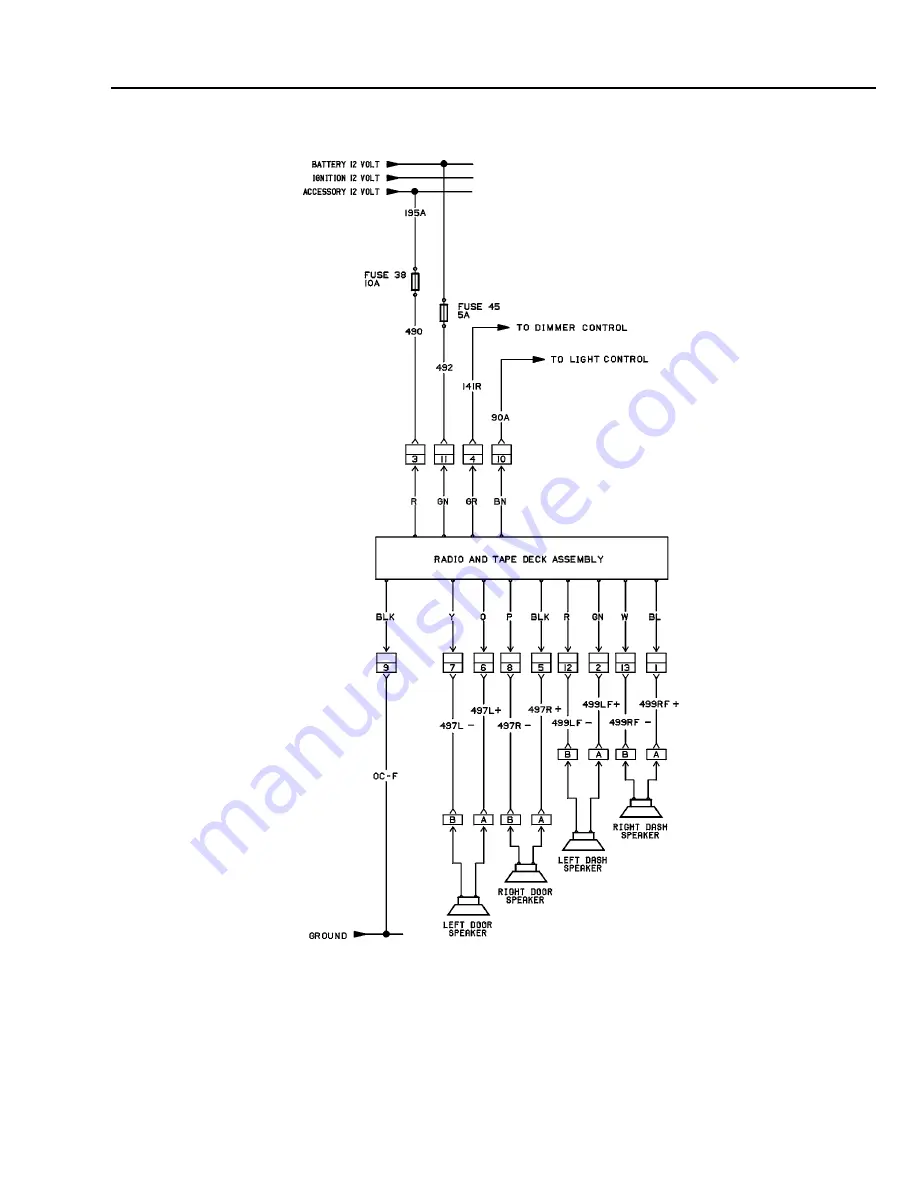
4 Speaker System Schematic
W3003396
Note:
For detailed, vehicle specific, electrical
schematics see: VN/VHD Series ElectricalSchematics – Group 37.
Страница 1: ...er to Group 3 Contents Volvo VN Sound System page 2 Radio Signals page 3 Noise page 9 Troubleshooting Consideration page 10 Stereo Receiver page 11 Weatherband Family page 11 High Performance Family page 14 CD Changer High Performance Family page 27 CD Changer Magazine page 29 Amplifier page 38 Speakers page 39 Antenna page 41 Schematics page 45 Note Information is subject to change without notice...
Страница 2: ...r production VNs beginning approximately June 1999 It is standard on the VHD vehicles The XTA series is available in a Basic system with or without a cassette player and an Uplevel system with a cassette or CD player All VN VHD models are also available with either basic or premium speaker packages The VN 770 premium speaker system includes an 8 channel amplifier and a subwoofer The VN 660 and VN ...
Страница 3: ...na and the grounding bases In North America commercial radio signals are legislated into two bands AM 530 1710 kHz in 10 kHz steps FM 87 9 107 9 MHz in 200 kHz steps Each frequency range uses a different modulation method Since a radio wave is really just electromagnetic energy it must be controlled in a certain way to carry information The process of adding the information to the radio signals is...
Страница 4: ...l and or concrete structures The AM frequencies have longer range due to the ground wave The ground wave follows the curvature of the earth and is effected by its conductivity The greater the conductivity the less the signal loss so transmission over water is better than over land The ground wave in this frequency band has a range of 80 320 kilometers 50 200 miles The sky wave will pass through th...
Страница 5: ...sorbed by the earth eliminating the ground wave Even when out of a direct line of sight the signal may be reflected into areas that would be in a shadow otherwise FM signals and light rays respond to atmosphere in a similar manner The atmosphere bends them both so they will follow the curvature of the earth to a certain extent This is called refraction and it is similar to a lens which can bend li...
Страница 6: ...rvice offices Taped weather messages are repeated every four to six minutes and are routinely revised ever one to three hours or more frequently if needed Most of the stations operate 24 hours a day The weather for your area can be found on one of seven stations The frequency associated with each channel is as follows 162 550 MHz 162 400 MHz 162 475 MHz 162 425 MHz 162 450 MHz 162 500 MHz 162 525 ...
Страница 7: ...which are slightly out of time with each other The two signals tend to cancel each other out This condition is most common in built up areas which reflect the signals A multipath area is often only a few inches wide At home you can locate the antenna to avoid a multipath area but in your vehicle you may drive in and out of multipath areas Flutter Flutter occurs when the signal strength is too low ...
Страница 8: ...cal devices or other high power radio signals Strong FM band signals are usually not affected by electrical interference Atmospheric Interference A loss of sensitivity especially from stations more than 25 miles away may be due to atmospheric conditions An increase in sensitivity for a short period may be due to a complementing atmospheric alignment Electrical storms will cause atmospheric interfe...
Страница 9: ...nsmitter station increases on board components may begin to compete with desired radio signals The following pages will help isolate the cause of radio noise and suggest a fix EMI RFI EMI Electromagnetic Interference is the undesirable interference of an electrical system via radiated emissions from another electrical system The term EMI includes all disturbances in the electromagnetic spectrum Wi...
Страница 10: ...le sources of interference Charging system Solenoids Motors Engine electronics 2 way radios Citizen band CB radios Cellular phones Satellite Communication systems After market electrical devices Troubleshooting Consideration When troubleshooting radio reception problems consider problems associated with radio signals Do not attempt to troubleshoot radio problems inside buildings steel and concrete...
Страница 11: ...atures a Delco Delphi Heavy Duty stereo receiver with weather band The basic stereo receiver is also available with a cassette tape player The stereo receiver is installed in the dash and receives constant battery power for its clock and memory functions The basic stereo receiver does not have ability to detect and display error messages ...
Страница 12: ...d AM FM or WX will be displayed on band choice Note The last station heard on each band will be stored in memory When switching back to that band it will automatically return 3 SEEK Press SEEK 3 to automatically search for the next higher or lower listenable station and stay there It will find another station and stay there It will find another station each time that you press the button 4 Manual ...
Страница 13: ...L 8 control in the corresponding direction from the detent position 9 FADE Using the tab behind the BAL control adjust the FAD 9 control to the right to fade toward the rear speakers Adjust it to the left to fade toward the front speakers 10 Treble Rotate TRE 10 control to the left to decrease treble rotate TRE control to the right to increase treble 11 Bass Rotate BAS 11 control to the left to de...
Страница 14: ...ape or CD Player The VN 770 and VN 660 are also available with optional Six disc CD Changer Premium speaker system including a 8 channel amplifier and a subwoofer Theft Deterrent Feature THEFTLOCK is designed to discourage theft of your radio It works by using a secret code that you select to disable all radio functions whenever the radio is disconnected from the vehicle or battery power is remove...
Страница 15: ...he HR button 2 until the desired hour appears on the display 3 Press MN button 3 until the desired minute appears on the display When the alarm icon and the time appears on the display the alarm has been set If the radio is on the alarm sounds To turn off the alarm sound activate snooze or turn off the alarm by pressing the alarm button 5 To check the time for which the alarm is set momentarily pr...
Страница 16: ...ows to toggle between the two displays 2 Press DISPL again hold it until it beeps to set the display To Find a Station Band Press the BAND 4 button to switch between AM FM1 and FM2 The radio display shows the selection TUNE Press the TUNE SEEK button 5 once to tune to the next higher or lower station one frequency at a time Press and hold TUNE SEEK until it beep to seek the next station When a sta...
Страница 17: ...to the front or rear speakers TREBLE Rotate the VOL knob to adjust treble sound BASS Rotate the VOL knob to adjust the bass sound DIM Rotate the VOL knob to adjust the brightness of the radio display The brightness can be only be adjusted when the vehicle lights are on SEEK To set the radio to seek and find station with a weak signal press the AUDIO button until SEEK 2 appears To set the radio to ...
Страница 18: ...t a tape from the tape player DISPL Press the DISPL button 7 to view the time SIDE 1 or SIDE 2 Pressing DISPL more than one time allows to toggle between the displays Press DISPL and hold it until it beeps to set the default display TAPE Press the tape button 2 and hold for 2 seconds any time the radio is on to enable or disable Radio Monitor This feature allows you listen to the radio while a tap...
Страница 19: ...te head with magnetic or hard objects or and lubricating the player mechanism 1 Turn off the Bad Tape Detect 2 Insert a wet type nonabrasive scrubbing cassette cleaner 3 Follow the cleaning instructions provided with the cassette cleaner 4 Press the AUDIO button until the display reads CLEAN 5 Rotate the VOL knob until YES appears 6 Approximately 5 seconds after YES appears the cleaning reminder w...
Страница 20: ...c may not play and ERROR and a number may appear for 5 seconds on the display Error may also appear if a disc is dirty wet or the air is very humid Note If a CD is inserted upside down FOCUS will appear on the display Remove the CD and insert it with the label up RDM Press the RDM button 4 to activate random track selection RDM will illuminate All tracks on the CD will be played in random order RD...
Страница 21: ...ake the last two digits agree with the secret code you have chosen 7 Press HR 6 as many times as needed to make the first two digits agree with the secret code you have chosen 8 Confirm that the code on the display matches your secret code 9 Press BAND 1 The display will show REPEAT to let you know that you need to confirm your code 10 Repeat step 5 8 to confirm your code 11 Press BAND 1 The displ...
Страница 22: ...D Press to select AM FM1 FM2 FM3 or WX SEEK Press this button to move to the next strongest radio station or to go to the next track of your cassette or CD 1 6 Press this button to advance through the presets in the current band II Press this button to reduce volume to a minimum The display will read MUTE To deactivate mute press this button again The music will continue to play while the volume i...
Страница 23: ...rs and the tape head When the cassette is properly loaded the motor starts The motor will then rotate the capstan The capstan is a rod which comes up rotates and allows the tape to feed over the head One of the pinch rollers comes forward and squeezes the tape between it and the capstan Simultaneously the head pulls into place For the cassette to play the head can be no more than 0 7 0 8 micros aw...
Страница 24: ...aged or too tight If it is damaged try a new tape If the tape is too tight the player cannot turn the tape hubs Remove the tape and hold it with the open end down Turn the right hub counterclockwise with a pencil Turn the tape over and repeat If the hubs do not turn easily your tape may be damaged and should not be used in the player In order to use a CD adapter or a cleaning cassette the bad tape...
Страница 25: ...outside unlike the record player which plays outside to inside The speed of a record player does not change but the rotation speed of a disc does change to maintain the same velocity as the spiral diameter changes The speed slows down as the laser moves from the inside to the outside of the disc A CD player reads the information as digital electronic signals whereas a phonograph reads the informat...
Страница 26: ...nter of disc to the outer edge Note Do not use volatile chemicals such as benzine thinner record sprays or antistatic agents which can damage the disc If a cleaner is needed use a solution of mild neutral detergent Do not attempt to play cracked or warped discs Should a player exhibit playability problems substitute another clean new disc to verify whether the problem in the disc or the player The...
Страница 27: ...he XTA Uplevel family receivers are equipped with a newer generation of six disc changers The newer generation changers can be distinguished from the earlier versions by the loading door which is on the left side Once the discs have been loaded in the magazine slide the door of the CD Changer open completely You should hear a click Push the magazine into the changer in the direction of the arrow m...
Страница 28: ...ice Bulletin 4 2004 392 08 28 47 All CD functions except ejecting of the magazine are controlled by stereo buttons While the CD changer is loading CDs the CD changer icon in the radio display will blink This process takes approximately one minute W3003006 ...
Страница 29: ...ct discs Do not attach a label or tape to a disc The use of benzine thinner insecticide or other volatile chemicals may damage the magazine surface Clean with a soft dry cloth Inserting Discs Load the CDs from the bottom of the CD Magazine to the top The disc numbers are listed on the front of the magazine with 1 on the bottom and 6 on the top Be sure to place the discs in the magazine straight an...
Страница 30: ...e Family To Insert a Disc 1 Be sure to hold a disc with the label the side where titles are printed up as shown 2 With the disc mark on the magazine up insert disc one at a time straight into slots of the magazine until it is locked with a click CAUTION Insert each disc straight and level not tilted into a slot to avoid trouble W3003004 1 Label side ...
Страница 31: ...or the unit because it may cause malfunction W3002997 1 Disc release lever Inserting and Removing the CD Magazine High Performance Family To Load a CD Magazine 1 Slide the door to the left until it is fully open with a click 2 Check the unit for its top and magazine inserting direction and carefully push the magazine into it until you hear a click 3 Close the slid door fully until you hear a click...
Страница 32: ... arrow side of the magazine It is important that both sides of the discs are in the same tray 5 Push each disc in slowly until it is completely in a tray and each tray is in the magazine as far as it will go W3006165 Method 2 1 Select up to six discs to load into the magazine 2 With one hand hold the magazine so that the grooved side faces up and the arrow side faces down 3 With the thumb or finge...
Страница 33: ...ack into the magazine until it stops Note Additional magazines can be purchased for the changer See your dealer for details Note Be sure to use the magazine supplied with the changer or optional accessory magazine Part no 16246955 No other magazine type can be used in the changer Note Never use commericially available protective film or stabilizer as a CD accessory Using either can damage the maga...
Страница 34: ... and the changer is ready to play W3006163 To Insert the CD Magazine into the Changer 1 Carefully load the magazine according to the Loading and Unloading the CD Magazine section of this manual Ensure that all your CDs are loaded with the label facing the arrow side of the magazine and that they are completely in the disc tray 2 Using the CD Changer door handle slide the changer s door all the way...
Страница 35: ...ct do not pry the magazine out of the changer Trying to remove the magazine forcefully may damage the CD Changer and magazine If the magazine will not eject send the changer and the magazine to an authorized repair center Damage to the CD Changer and magazine caused by prying is not covered by warranty Note Unless you are loading or unloading a magazine be sure to keep the changer door closed to p...
Страница 36: ...loaded 2 Turn on the radio 3 Press the CD changer button 1 on the radio When a CD begins to play the display will show the disc and track number followed by the elapsed time on the track and then return to the default display you have chosen 4 While the CD is playing use the VOL knob 2 AUDIO button 3 and the push button 4 just as when playing a CD player see Compact Disc Player page 20 ...
Страница 37: ...ed into the changer Once in the CD Changer mode press this button to increment the disc Random Play Random Play allows all tracks on all discs in the changer to be played in random order It operates the same as in the CD mode with the 3 RDM button Repeat The repeat function may repeat the current selection or repeat the entire disc Pressing the 2 RPT button once repeats the current track and the d...
Страница 38: ...nly a portion of the frequencies of the input signal as in the case of a subwoofer or a mid range amplifier The amplifier provides better sound performance in general and can be played at higher volume levels without noticeable distortion The Delco Delphi Electronics amplifier in the VN 770 s High Performance Premium speaker package has been tuned with special volume levels and filters at specific...
Страница 39: ...posite directions during the same input This will lead to less effective sound reproduction because the speakers are out of phase with each other W3002993 1 Magnet 2 Frame basket 3 Basket mounted connector 4 Cone 5 Dome 6 Surround 7 Gasket 8 Spider 9 Pole piece 10 Voice coil When the speaker is at rest such as during minimum volume the voltage applied to each side of the speaker is 1 2 ignition sy...
Страница 40: ... Door speaker all models both sides 2 Dash speaker all models both sides 3 Rear speaker VN 660 770 both sides 4 Rear speaker VN 770 both sides 5 Subwoofer VN 770 6 Rear speaker VNL 420 both sides 7 Rear speaker VNL 610 both sides Note Rear speakers in the day cab vehicles have the same location as in the VNL 420 7 ...
Страница 41: ...lengths between roughly 3 meters FM and 566 meters AM 10 ft and 1856 ft A vehicle antenna is a compromise of utility over performance with the receiver carrying the additional burden The vehicle antenna system consists of not only the mast but also the ground plane The ground plane is more important than the antennae itself However a ground plane cannot exist without an antenna The ground plane is...
Страница 42: ... on the Volvo VN VHD series truck Fixed Mast Offer excellent overall performance currently available The antenna is grounded at the base to the metal roof of the cab by the mounting bracket W3003140 The fixed mast antenna is standard on the VNM VNL and VNL 420 These vehicles can also be equipped with the multiplexer antenna system as an option ...
Страница 43: ...the longest conductor is tuned to the AM band The ribbon antenna is located between the headliner and the SMC roof panel in the area immediately above the windshield The metal antenna base is grounded to the cab with a steel rivet or screw The ribbon antenna should be secured with vinyl tape to the SMC roof at least 0 1 m 4 in away from any metal objects that may tend to de tune the antenna W30032...
Страница 44: ...e antenna windings and a top cap with the RAMI logo Note Multiplex antennas are available with single drivers side only or dual antennas W3003138 The multiplexer antenna system is standard on the Volvo VN 660 VN 770 and optional on other VN VHD model vehicles 1 Cellular phone antenna cable option 2 Radio antenna cable 3 Left side antenna mount 4 CB radio antenna connection 5 Right side antenna 6 M...
Страница 45: ...c Date Group No Page Service Bulletin 4 2004 392 08 45 47 Schematics Amplified 8 Speaker Subwoofer System Schematic W3003007 Note For detailed vehicle specific electrical schematics see VN VHD Series Electrical Schematics Group 37 ...
Страница 46: ...North America Inc Date Group No Page Service Bulletin 4 2004 392 08 46 47 6 Speaker System Schematic W3003399 Note For detailed vehicle specific electrical schematics see VN VHD Series Electrical Schematics Group 37 ...
Страница 47: ...North America Inc Date Group No Page Service Bulletin 4 2004 392 08 47 47 4 Speaker System Schematic W3003396 Note For detailed vehicle specific electrical schematics see VN VHD Series Electrical Schematics Group 37 ...