31
8. OPERATION
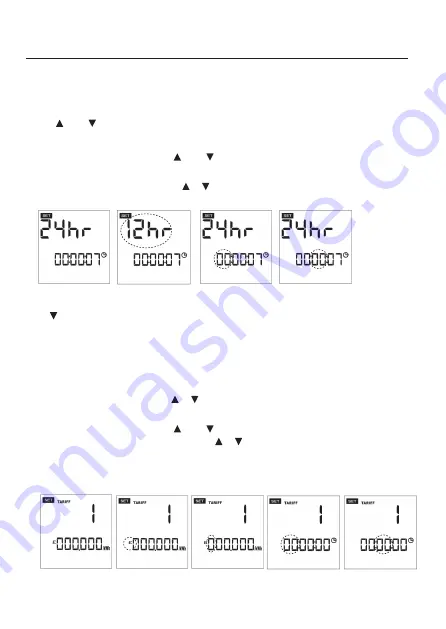
a) Setting the clock:
1. Press and hold SET button for approx. 3 seconds.
2. Press SET button once. The hour format indicator “24Hr” or “12Hr” starts flashing (fig. 11 + 12).
3. Use (5) or (6) buttons to select “12Hr” or “24Hr”.
4. Press SET button to confirm your settings.
5. The hour value starts flashing. Use (5) or (6) buttons to set the hour and press SET to
confirm (fig. 13).
6. The minute value starts flashing. Use or buttons to set the minutes and press SET to
confirm (fig. 14).
fig. 11
fig. 14
fig. 13
fig. 12
Press button to switch to the area for entering the electricity rate.
b) Entering the electricity rate “costs/kWh”:
1. You can program 2 tariffs and 2 time settings within a period of 24 hours. Press SET button once.
The currency symbol starts flashing (fig. 16).
2. You may select between the currencies “€“, “$”, “£“ or “CHF”. Press SET to confirm your choice.
3. The rate value starts flashing. Use or buttons to enter the rate and press SET to confirm
(fig. 16, 17).
4. The hour value starts flashing. Use (5) or (6) buttons to set the hour and press SET to
confirm. The minute value starts flashing. Use or buttons to set the minutes and press SET
to confirm (fig. 18, 19).
5. Press SET button to enter the second tariff. Follow steps 3. to 4. After confirming with SET button
the display will change to tariff 1.
fig. 15
fig. 19
fig. 18
fig. 17
fig. 16
Содержание 4000PRO
Страница 6: ...6 3 BEDIENELEMENTE 1 2 3 4 5 6 7 8 9 10 13 12 11 14 15...
Страница 23: ...23 3 OPERATING ELEMENTS 1 2 3 4 5 6 7 8 9 10 13 12 11 14 15...
Страница 40: ...40 3 ELEMENTS DE FONCTIONNEMENT 1 2 3 4 5 6 7 8 9 10 13 12 11 14 15...
Страница 58: ...58 3 BEDIENINGSELEMENTEN 1 2 3 4 5 6 7 8 9 10 13 12 11 14 15...
Страница 72: ...72...


