background image

27

•  Use the 

REC

 button (6) to select the ‘Unit’ menu item. Here you can switch the unit of measurement.

•  Press the 

MODE - DC AC

 button (7) to select the unit of measurement.

 - t = millitesla (mT)
 - g = Gauss (g)

• 

Confirm your selection with the

 REC 

button (6) or end setting without saving with the 

 HOLD

 button (5). Your 

selection will be saved. The display switches back to normal measuring mode.

d)  Calibration setting

  The ‘CLr’ calibration function is only intended for maintenance and adjustment work by trained specialist 

personnel. Access this menu only without making adjustments. Do not change its settings.

10. Carrying out a measurement

  The highly sensitive sensor always displays a low value in normal operation. This value corresponds to the 

earth’s magnetic field and can be compensated for with the zero adjustment.

The measuring device can measure magnetic DC and AC fields. The measuring mode must be adjusted according to 

the field type as well as the measurement resolution.

  Every movement of the sensor can lead to a measured value fluctuation. For stationary measurements, 

move the sensor to the object being tested before testing and only then switch on the measuring device.

a)  Zero adjustment (relative measurement)

The display already shows earth’s magnetic field as picked up by the highly sensitive sensor. The display can be reset 

to zero to ensure that this value is not incorporated into the measurement. Always carry out zero adjustment before 

measuring very weak field strengths. Proceed as follows:

•  Switch on the measuring device.
•  Position and fasten the measuring device to the intended measuring point.
•  Press and hold the 

 ZERO

 button (1) for approx. 2 seconds until the display is zeroed. As soon as the value ‘0’ 

appears on the LC display (3) and you can see the zero display, take your finger off the button. A beep confirms this 

process. Active zero calibration has been carried out.

•  The measurements can now be carried out.
•  To switch off zero adjustment, press and hold the 

ZERO

 button (1) for approx. 2 seconds. The ‘0’ display goes out 

and the value ‘0’ changes, if necessary. The display value again represents the influences of the ambient magnetic 

field. A beep confirms that zero adjustment has been switched off.

Содержание 1665723

Страница 1: ...5723 Seite 2 17 Operating Instructions Magnetic field analyser GM 70 Item No 1665723 Page 18 33 Notice d emploi Analyseur de champ magnétique GM 70 N de commande 1665723 Page 34 49 Gebruiksaanwijzing Magneetveld Analyseapparaat GM 70 Bestelnr 1665723 Pagina 50 65 ...

Страница 2: ...Anschluss des Mess Sensors 9 d Positionierung des Mess Sensor 9 e Aufstellen des Messgerätes 9 9 Bedienung 10 a Gerät ein und ausschalten 10 b Erweiterte Einstellungen 10 c Messeinheit wählen 10 d Kalibriereinstellung 11 10 Durchführung einer Messung 11 a Nullabgleich Relativ Messung 11 b HOLD Funktion 12 c Messen von DC Magnetfeldern statisch 12 d Messen von AC Magnetfeldern veränderlich 13 e REC...

Страница 3: ...hten Sie hierauf auch wenn Sie dieses Produkt an Dritte weitergeben Heben Sie deshalb diese Bedienungsanleitung zum Nachlesen auf Bei technischen Fragen wenden Sie sich bitte an Deutschland www conrad de Österreich www conrad at Schweiz www conrad ch 2 Symbol Erklärung Das Symbol mit dem Blitz im Dreieck wird verwendet wenn Gefahr für Ihre Gesundheit besteht z B durch einen elektrischen Schlag Das...

Страница 4: ...fang enthalten Optional ist auch der Betrieb mit einem Netzteil möglich Das Netzteil ist nicht im Lieferumfang enthalten Eine Verwendung ist nur in geschlossenen Räumen also nicht im Freien erlaubt Der Kontakt mit Feuchtigkeit z B im Badezimmer u ä ist unbedingt zu vermeiden Aus Sicherheits und Zulassungsgründen dürfen Sie das Produkt nicht umbauen und oder verändern Falls Sie das Produkt für ande...

Страница 5: ...egen Dieses könnte für Kinder zu einem gefährlichen Spielzeug werden Schützen Sie das Produkt vor extremen Temperaturen direktem Sonnenlicht starken Erschütterungen hoher Feuchtigkeit Nässe brennbaren Gasen Dämpfen und Lösungsmitteln Setzen Sie das Produkt keiner mechanischen Beanspruchung aus Wenn kein sicherer Betrieb mehr möglich ist nehmen Sie das Produkt außer Betrieb und schützen Sie es vor ...

Страница 6: ...blichen Berufsgenossenschaften für elektrische Anlagen und Betriebsmittel zu beachten In Schulen und Ausbildungseinrichtungen Hobby und Selbsthilfewerkstätten ist der Umgang mit Messgeräten durch geschultes Personal verantwortlich zu überwachen Das Messgerät darf nicht in explosionsgefährdeten Bereichen eingesetzt werden Beachten Sie auch die Sicherheitshinweise in den einzelnen Kapiteln c Batteri...

Страница 7: ...2 Batteriefachschraube 13 Geräte Aufstellbügel 14 Stativ Buchse 15 Sensor Kopf 16 Schutzkappe für den Sensor Kopf 17 Sensor Griff 18 Sensor Anschlussstecker 1 Taste ZERO 2 Taste POWER 3 LC Display 4 Messbuchse für externen Sensor 5 Taste HOLD 6 Taste REC 7 Taste MODE DC AC SET 8 RS232 Schnittstelle RS232 OUTPUT 9 Rückstelltaste RESET ...

Страница 8: ... der Messeinheiten und Messmodi Gleich und Wechselfelder 8 Inbetriebnahme a Einlegen Wechseln der Batterie Bevor Sie erstmalig mit dem Messgerät arbeiten können müssen Sie eine 9 V Blockbatterie Alkaline einlegen Optional kann auch ein Netzteil zur Stromversorgung verwendet werden Zur Erstinbetriebnahme oder wenn im Display das Symbol für den Batteriestand sichtbar wird muss die Batterie neu einge...

Страница 9: ... Polarität außen minus innen plus Das benötigte Netzteil hat folgende Daten für den Ausgang Spannung 9 V DC Strom 0 5 bis max 1 A c Anschluss des Mess Sensors Verbinden Sie den Sensor Anschlussstecker 18 mit der Messbuchse 4 am Messgerät Der Stecker ist verpolungsgeschützt und passt nur seitenrichtig in die Buchse Achten Sie stets auf einen festen Sitz des Steckers in der Buchse da es sonst zu Feh...

Страница 10: ...kann eine automatische Abschaltung aktiviert werden Das Messgerät schaltet dann automatisch ab wenn ca 10 Minuten lang keine Taste gedrückt wurde Diese Funktion ist im Lieferzustand eingeschaltet Zum Aktivieren der automatischen Ausschaltfunktion gehen Sie wie folgt vor Schalten Sie das Messgerät ein Halten Sie die Taste MODE DC AC 7 für wenigstens 2 Sekunden gedrückt um in den Einstellungsmodus z...

Страница 11: ...Messauflösung umgestellt sein Jede Bewegung des Sensors kann zu einer Messwertschwankung führen Bringen Sie bei ortsfesten Messungen den Sensor vor Messbeginn bereits an das zu prüfende Objekt und schalten erst dann das Messgerät ein a Nullabgleich Relativ Messung Durch den hochempfindlichen Sensor wird bereits das natürliche Erdmagnetfeld angezeigt Um diesen Anzeigewert nicht mit in die Messung e...

Страница 12: ...itt in der Auswahlschleife weiter Der Messmodus für Gleichfelder wird mit dem Displaysymbol N S angezeigt Die Messeinstellungen a1 Auflösung 0 1 und b1 Auflösung 0 01 siehe in der Abbildung unten dienen zur Messung von DC Magnetfeldern in der Einheit mT Die Messeinstellungen a2 Auflösung 1 und b2 Auflösung 0 1 siehe in der Abbildung unten dienen zur Messung von DC Magnetfeldern in der Einheit G Je...

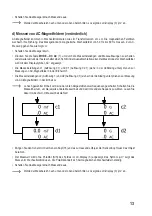
Страница 13: ...nd d1 Auflösung 0 01 siehe in der Abbildung unten dienen zur Messung von AC Magnetfeldern in der Einheit mT Die Messeinstellungen c2 Auflösung 1 und d2 Auflösung 0 1 siehe in der Abbildung unten dienen zur Messung von AC Magnetfeldern in der Einheit G Je nach gewählter Einheit wird eine der unten dargestellten zwei Sequenzen geschaltet Schalten Sie die Messeinheit um um die jeweils andere Messeinh...

Страница 14: ...n zu deaktivieren halten Sie die Taste REC 6 für ca 2 Sekunden gedrückt Das Symbol REC erlischt Der aktuell gemessene Wert der Feldstärke erscheint wieder im LC Display 3 Die gespeicherten Messwerte bleiben nur im REC Messbetrieb erhalten Wird diese Funktion beendet bzw das Messgerät ausgeschaltet so wird auch der Speicher gelöscht Wenn Sie Messungen an DC statischen Magnetfeldern durchführen und ...

Страница 15: ...LSD Bei einer Displayanzeige von 1234 ergibt sich folgender Bitsatz 00001234 D0 Endzeichen RS232 Schnittstelle Baudrate 9600 Parität Keine Parität Anzahl Datenbit Anzahl Datenbit Stoppbit 1 Stoppbit g Zurücksetzen Wenn es zu Störungen des Messgerätes kommt z B bei einem System Freeze setzen Sie das Gerät zurück Gehen Sie wie folgt vor Öffnen Sie die seitliche Klappe Lesen Sie dazu im Abschnitt f R...

Страница 16: ...r gar die Funktion beeinträchtigt werden kann Trennen Sie das Produkt vor jeder Reinigung von der Stromversorgung Verwenden Sie ein trockenes faserfreies Tuch zur Reinigung des Produkts 13 Entsorgung a Produkt Elektronische Geräte sind Wertstoffe und gehören nicht in den Hausmüll Entsorgen Sie das Produkt am Ende seiner Lebensdauer gemäß den geltenden gesetzlichen Bestimmungen Entnehmen Sie die ev...

Страница 17: ...iten G Gauß mT Millitesla Felder DC AC Feldmessung Messbereiche DC 300 mT x 0 01 mT 3000 mT x 0 1 mT oder 3000 G x 0 1 G 30000 G x 1 G Feldstärke AC 150 mT x 0 01 mT 1500 mT x 0 1 mT oder 1500 G x 0 1 G 15000 G x 1 G Genauigkeit bei 23 C 5 C DC 5 rdg 10 Stellen AC 5 rdg 20 Stellen Auflösung 0 01 0 1 mT 0 1 1 G Frequenzbereich 50 60 Hz für AC Polanzeige Nordpol Südpol Feldrichtung uniaxial Datenans...

Страница 18: ...easuring sensor 25 d Positioning the measuring sensor 25 e Setting up the measuring device 25 9 Operation 26 a Switch the device on and off 26 b Advanced settings 26 c Selecting the unit of measurement 26 d Calibration setting 27 10 Carrying out a measurement 27 a Zero adjustment relative measurement 27 b HOLD function 28 c Measuring DC magnetic fields static 28 d Measuring AC magnetic fields chan...

Страница 19: ... a third party without the operating instructions Therefore retain these operating instructions for reference If there are any technical questions please contact International www conrad com contact United Kingdom www conrad electronic co uk contact 2 Explanation of symbols The symbol with the lightning in a triangle indicates that there is a risk to your health e g due to an electric shock The sy...

Страница 20: ... 9 V block battery is required for operation included Operation with a power adapter is also possible The power adapter is not included with the product This product is intended for indoor use only Do not use it outdoors Contact with moisture e g in a bathroom must be avoided under all circumstances For safety and approval purposes do not rebuild and or modify this product Using the product for pu...

Страница 21: ...lying around carelessly It may become a dangerous plaything for children Protect the product from extreme temperatures direct sunlight strong jolts high humidity moisture flammable gases vapours and solvents Never expose the product to mechanical stress If it is no longer possible to operate the product safely stop using it and prevent unauthorised use Safe operation can no longer be guaranteed if...

Страница 22: ...ties In schools educational facilities hobby and DIY workshops measuring devices must be operated under the responsible supervision of qualified personnel The measuring device must not be used in areas at risk of explosion Observe the safety information in each section c Battery Always ensure that the battery is inserted in the correct polarity To prevent the battery from leaking remove it from th...

Страница 23: ...artment cover 12 Battery compartment screw 13 Device stand 14 Tripod socket 15 Sensor head 16 Protective cap for sensor head 17 Sensor handle 18 Sensor connection plug 1 ZERO button 2 POWER button 3 LC display 4 Measurement socket for external sensor 5 HOLD button 6 REC button 7 MODE DC AC SET button 8 RS232 interface RS232 OUTPUT 9 RESET button ...

Страница 24: ...tment MODE DC AC button 7 This button is used to switch between units of measurement and measuring modes DC and AC fields 8 Setup a Installing replacing the battery Before initial operation of this measuring device you must first install a 9 V block alkaline battery A power adapter can also be used optional The battery must be inserted or replaced for initial operation or when the battery status s...

Страница 25: ... 2 5 mm Polarity outside minus inside plus The required power adapter has the following specifications for the output Voltage 9 V DC Current 0 5 to max 1 A c Connecting the measuring sensor Connect the sensor connection plug 18 to the socket 4 on the measuring device The plug is protected against incorrect polarity and only fits into the socket in the right direction Ensure that the plug is firmly...

Страница 26: ...ic shut off function can be activated The measuring device is automatically switched off if no button has been pressed for approx 10 minutes This function is switched on in the as delivered condition Proceed as follows to activate the automatic shut off function Switch on the measuring device Press and hold the MODE DC AC button 7 for at least 2 seconds to open settings mode The setting of the shu...

Страница 27: ...to a measured value fluctuation For stationary measurements move the sensor to the object being tested before testing and only then switch on the measuring device a Zero adjustment relative measurement The display already shows earth s magnetic field as picked up by the highly sensitive sensor The display can be reset to zero to ensure that this value is not incorporated into the measurement Alway...

Страница 28: ...dicated with the display symbol N S Measurement settings a1 resolution 0 1 and b1 resolution 0 01 see the figure below are used for measurement of DC magnetic fields in unit mT Measurement settings a2 resolution 1 and b2 resolution 0 1 see the figure below are used for measurement of DC magnetic fields in unit G One of the two sequences indicated below is switched according to the unit selected Sw...

Страница 29: ...in unit mT Measurement settings c2 resolution 1 and d2 resolution 0 1 see the figure below are used for measurement of AC magnetic fields in unit G One of the two sequences indicated below is switched according to the unit selected Switch the unit of measurement to select the other unit of measurement and therefore the other sequence See Section c Selecting the unit of measurement Place the sensor...

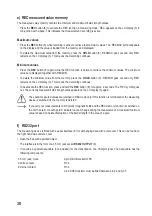
Страница 30: ...ues To deactivate the REC function press and hold the REC button 6 for approx 2 seconds The REC symbol goes out The currently measured field strength value appears on the LC display 3 again The saved measured values are retained in REC mode only If this function is terminated or the measuring device is switched off the memory is deleted If you carry out measurements on DC static magnetic fields an...

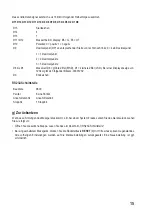
Страница 31: ...ue D8 largest figure MSD D1 lowest figure LSD If 1234 is displayed the bit rate is 00001234 D0 End signal RS232 port Baud rate 9600 Parity No parity Number of data bits Number of data bits Stop bit 1 stop bit g Restoring the default settings If you experience problems with the measuring device for example in the event of a system freeze reset the device Proceed as follows Open the side flap See Se...

Страница 32: ...product from the power supply before cleaning it Use a dry lint free cloth to clean the product 13 Disposal a Product Electronic devices are recyclable waste and must not be placed in household waste At the end of its service life dispose of the product according to the relevant statutory regulations Remove any inserted battery and dispose of it separately from the product b Battery information Yo...

Страница 33: ... 30000 G x 1 G Field strength AC 150 mT x 0 01 mT 1500 mT x 0 1 mT or 1500 G x 0 1 G 15000 G x 1 G Accuracy At 23 C 5 C DC 5 rdg 10 digit AC 5 rdg 20 digit Resolution 0 01 0 1 mT 0 1 1 G Frequency range 50 60 Hz for AC Pole indication North pole south pole Field direction Uniaxial Data connection RS232 Display size 52 x 38 mm dual LC display Display sampling Approx 1 second Cable length Approx 105...

Страница 34: ...onde de mesure 41 d Positionnement de la sonde de mesure 41 e Installation de l appareil de mesure 41 9 Utilisation 42 a Allumer et éteindre l appareil 42 b Réglages avancés 42 c Choisir l unité de mesure 42 d Réglage de la calibration 43 10 Exécution d une mesure 43 a Réglage sur zéro mesure relative 43 b Fonction de maintien HOLD 44 c Mesure des champs magnétiques DC statiques 44 d Mesure des ch...

Страница 35: ...on du produit Tenez compte de ces remarques même en cas de cession de ce produit à un tiers Conservez ce mode d emploi afin de pouvoir le consulter à tout moment Pour toute question technique veuillez vous adresser à France email technique conrad france fr Suisse www conrad ch 2 Explication des symboles Le symbole de l éclair dans un triangle indique un risque pour votre santé par ex suite à un ch...

Страница 36: ...une telle pile est fournie à la livraison Il est également possible d utiliser un bloc d alimentation L adaptateur n est pas fourni avec le produit L utilisation est uniquement autorisée en intérieur dans des locaux fermés l utilisation en plein air est interdite Évitez impérativement tout contact avec l humidité par ex dans la salle de bains etc Pour des raisons de sécurité et d homologation tout...

Страница 37: ...ur les enfants Gardez le produit à l abri de températures extrêmes de la lumière directe du soleil de secousses intenses d humidité élevée d eau de gaz inflammables de vapeurs et de solvants N exposez pas le produit à des contraintes mécaniques Si une utilisation en toute sécurité n est plus possible cessez d utiliser le produit et protégez le contre toute utilisation accidentelle Une utilisation ...

Страница 38: ...onnels Dans les écoles les centres de formation les ateliers de loisirs et de réinsertion la manipulation d un appareil de mesure doit se faire sous la surveillance d un personnel responsable spécialement formé à cet effet N utilisez pas l appareil dans des atmosphères explosibles Respectez également les consignes de sécurité des différents chapitres c Piles accus Respectez bien le sens de la pola...

Страница 39: ...iment des piles 13 Pied d appui de l appareil 14 Douille pour trépied 15 Tête de sonde 16 Capuchon de protection pour la tête de sonde 17 Poignée de sonde 18 Connecteur de raccordement de la sonde 1 Touche ZERO 2 Touche POWER 3 Écran à CL 4 Borne pour sonde externe 5 Touche HOLD 6 Touche REC 7 Touche MODE DC AC SET 8 Interface RS232 RS232 OUTPUT 9 Touche de réinitialisation RESET ...

Страница 40: ...ge du zéro Touche MODE DC AC 7 Cette touche permet de changer d unités de mesure et de modes de mesure champ continu et alternatif 8 Mise en service a Insérer remplacer la pile Avant de pouvoir utiliser l instrument de mesure pour la première fois vous devez y insérer une pile 9 V alcaline Alternativement vous pouvez également utiliser un bloc d alimentation Lors de la première mise en marche ou l...

Страница 41: ...arité extérieur négatif intérieur positif Le bloc d alimentation nécessaire présente les caractéristiques suivantes pour la sortie Tension 9 V CC Courant 0 5 à 1 A max c Branchement de la sonde de mesure Reliez le connecteur de raccordement de la sonde 18 à la prise de mesure 4 de l appareil de mesure Le connecteur est protégé contre l inversion de la polarité et ne s insère dans la prise que du b...

Страница 42: ... de vie de la pile L appareil de mesure s éteint alors automatiquement si vous n appuyez sur aucune touche pendant environ 10 minutes Cette fonction est activée par défaut Pour activer la fonction d arrêt automatique veuillez procéder comme suit Mettez l appareil de mesure en marche Appuyez sur la touche MODE DC AC 7 pendant env 2 secondes pour accéder au mode de réglage Le réglage de la fonction ...

Страница 43: ...ement de la sonde peut faire varier la valeur de mesure Lors de mesures fixes placez la sonde sur l objet à mesurer avant de commencer la mesure et allumez l instrument de mesure seulement ensuite a Réglage sur zéro mesure relative La sonde haute sensibilité affiche déjà le champ magnétique terrestre Pour ne pas inclure cette valeur dans la mesure l affichage peut être réglé sur zéro Lors de la me...

Страница 44: ... boucle Le mode de mesure pour les champs continus est indiqué à l écran par le symbole N S Les réglages de mesure a1 résolution 0 1 et b1 résolution 0 01 voir l illustration ci dessous servent à mesurer des champs magnétiques DC dans l unité mT Les réglages de mesure a2 résolution 1 et b2 résolution 0 1 voir l illustration ci dessous servent à mesurer des champs magnétiques DC dans l unité G Selo...

Страница 45: ...ir l illustration ci dessous servent à mesurer des champs magnétiques AC dans l unité mT Les réglages de mesure c2 résolution 1 et d2 résolution 0 1 voir l illustration ci dessous servent à mesurer des champs magnétiques AC dans l unité G Selon l unité choisie l une des deux séquences ci dessous est activée Changez d unité de mesure pour choisir l autre unité et donc l autre séquence Veuillez lire...

Страница 46: ...r désactiver la fonction REC maintenez la touche REC 6 enfoncée pendant env 2 secondes Le symbole REC disparaît La valeur de mesure actuelle de l intensité du champ apparaît à nouveau sur l écran LCD 3 Les valeurs de mesure enregistrées sont sauvegardées uniquement en mode REC Si vous quittez cette fonction ou éteignez l instrument de mesure la mémoire sera effacée Lorsque vous effectuez des mesur...

Страница 47: ...En cas d affichage à l écran de 1234 il résulte le jeu de bits suivant 00001234 D0 Signe final Interface RS232 Débit en bauds 9600 Parité Aucune parité Nombre de bits de données Nombre de bits de données Bit d arrêt 1 bit d arrêt g Réinitialisation Si l instrument de mesure présente un dysfonctionnement par exemple si l affichage est figé réinitialisez l appareil Procédez comme suit Ouvrez le clap...

Страница 48: ...bon fonctionnement de l appareil Débranchez toujours le produit avant de le nettoyer Pour nettoyer le produit utilisez un chiffon sec et non pelucheux 13 Élimination des déchets a Produit Les appareils électroniques sont des matériaux recyclables et ne doivent pas être éliminés avec les ordures ménagères En fin de vie éliminez l appareil conformément aux dispositions légales en vigueur Retirez la ...

Страница 49: ...TC Unités de mesure G Gauss mT Millitesla Champs Mesure de champ DC et AC Plages de mesure DC 300 mT x 0 01 mT 3000 mT x 0 1 mT ou 3000 G x 0 1 G 30000 G x 1 G Intensité du champ AC 150 mT x 0 01 mT 1500 mT x 0 1 mT ou 1500 G x 0 1 G 15000 G x 1 G Précision à 23 C 5 C DC 5 rdg 10 chiffres AC 5 rdg 20 chiffres Résolution 0 01 0 1 mT 0 1 1 G Plage de fréquence 50 60 Hz pour AC Affichage de pôle Pôle...

Страница 50: ...apter 57 c Aansluiten van de meetsensor 57 d Positionering van de meetsensor 57 e Opstellen van het meetapparaat 57 9 Bediening 58 a Het apparaat aan en uitzetten 58 b Instellingen 58 c Meeteenheid kiezen 58 d Kalibratie instelling 59 10 Uitvoeren van een meting 59 a Nulinstelling relatieve meting 59 b HOLD functie 60 c Meten van DC magneetvelden statisch 60 d Meten van AC magneetvelden wisselveld...

Страница 51: ...t product doorgeeft aan derden Bewaar deze gebruiksaanwijzing daarom voor later gebruik Bij technische vragen kunt u zich wenden tot onze helpdesk Voor meer informative kunt u kijken op www conrad nl of www conrad be 2 Verklaring van de symbolen Het symbool met een bliksemschicht in een driehoek wordt gebruikt wanneer er gevaar bestaat voor uw gezondheid zoals bijv door een elektrische schok Het s...

Страница 52: ...rij wordt meegeleverd Gebruik van een netspanningsadapter is ook mogelijk als optie De netspanningsadapter is niet inbegrepen Het product is alleen bedoeld voor gebruik in gesloten ruimtes dus gebruik buitenshuis is niet toegestaan Contact met vocht bijv in badkamers e d dient absoluut te worden vermeden In verband met veiligheid en normering zijn aanpassingen en of wijzigingen aan dit product nie...

Страница 53: ...kkingsmateriaal niet achteloos rondslingeren Dit kan gevaarlijk materiaal worden voor spelende kinderen Bescherm het product tegen extreme temperaturen direct zonlicht sterke schokken hoge vochtigheid vocht ontvlambare gassen dampen en oplosmiddelen Stel het product niet bloot aan welke mechanische belasting dan ook Als het product niet langer veilig gebruikt kan worden stel het dan buiten bedrijf...

Страница 54: ...et voorkomen van ongevallen in acht In scholen en opleidingsinstellingen hobby en werkplaatsen moet werken met meetapparatuur gebeuren onder toezicht van daartoe opgeleid personeel Het meetapparaat mag niet in een explosiegevaarlijke omgeving worden gebruikt Neem ook de veiligheidsinstructies in de afzonderlijke hoofdstukken in acht c Batterij accu Zorg ervoor dat de batterij accu met de juiste po...

Страница 55: ...atterijvakdeksel 12 Batterijvakschroef 13 Beugel apparaat 14 Statief bus 15 Sensorkop 16 Beschermkap voor de sensorkop 17 Sensor greep 18 Sensor aansluitstekker 1 Toets ZERO 2 Toets POWER 3 Lcd display 4 Aansluiting voor externe sensor 5 Toets HOLD 6 Toets REC 7 Toets MODE DC AC SET 8 RS232 poort RS232 OUTPUT 9 Terugsteltoets RESET ...

Страница 56: ... 1 Deze toets wordt gebruikt voor de nulinstelling Toets MODE DC AC 7 Deze toets dient voor het omschakelen van de meeteenheden en de meetmodi gelijk en wisselvelden 8 Ingebruikname a Plaatsen vervangen van de batterij Voor de eerste ingebruikname dient een nieuwe 9V blokbatterij alkaline in het meetapparaat geplaatst te worden Optioneel kan ook een netspanningsadapter worden gebruikt voor de stro...

Страница 57: ...eter 5 5 mm binnengat 2 5 mm Polariteit buiten min binnen plus De benodigde netspanningsadapter moet de volgende uitgangsspecificatie hebben Spanning 9 V DC Stroom 0 5 tot max 1 A c Aansluiten van de meetsensor Verbind de sensorstekker 18 met de meetbus 4 op het meetapparaat De stekker is beschermd tegen verkeerd aansluiten en past alleen op de juiste manier in de bus Zorg er steeds voor dat de st...

Страница 58: ...etapparaat wordt automatisch uitgeschakeld als gedurende ca 10 minuten geen toets is ingedrukt Deze functie is standaard ingeschakeld Ga voor het deactiveren van de automatische uitschakeling als volgt te werk Schakel het meetapparaat in Houd de toets MODE DC AC 7 ongeveer 2 seconden lang ingedrukt om naar de instellingen te gaan De instelling van de uitschakelfunctie is de eerste in de lus Het di...

Страница 59: ... van de sensor kan tot veranderingen in de meetwaarde leiden Breng bij vaste metingen de sensor voorafgaand aan de meting al naar het te testen object en schakel dan pas het meetapparaat in a Nulinstelling relatieve meting Door de zeer gevoelige sensor wordt het natuurlijke magneetveld van de aarde weergegeven Om deze waarde niet in de meting te betrekken kan de weergave wordt op nul gezet worden ...

Страница 60: ...k op de toets schakelt u een stap verder in de keuze keuzelijst De meetmodus voor gelijkvelden wordt in het display met het symbool N S weergegeven De meetinstellingen a1 resolutie 0 1 en b1 resolutie 0 01 zie in de afbeelding hieronder dienen voor het meten van DC magneetvelden in de eenheid mT De meetinstellingen a2 resolutie 1 en b2 resolutie 0 1 zie in de afbeelding hieronder dienen voor het m...

Страница 61: ...tie 0 01 zie onderstaande afbeelding dienen voor het meten van AC magneetvelden in de eenheid mT De meetinstellingen c2 resolutie 1 en d2 resolutie 0 1 zie in de afbeelding hieronder dienen voor het meten van AC magneetvelden in de eenheid G Afhankelijk van de gekozen eenheid wordt een van de onderaan weergegeven twee sequenties geschakeld Schakel de meeteenheid om om een andere meeteenheid en de ...

Страница 62: ...e doorloopt Om de REC functie uit te schakelen houdt u de toets REC 6 gedurende ca 2 seconden ingedrukt Het symbool REC verdwijnt De feitelijk gemeten waarde van de veldsterkte verschijnt weer in het lcd display 3 De opgeslagen meetwaarden blijven alleen in de REC meetbereik behouden Wanneer deze functie of het meetapparaat uitgeschakeld wordt dan wordt ook het geheugen gewist Als u metingen op DC...

Страница 63: ...lay indicatie van 1234 ontstaat als bitset 00001234 D0 Eindteken RS232 poort Baudrate 9600 Pariteit Geen pariteit Aantal databits Aantal databits Stopbit 1 stopbit g Terugzetten Wanneer er storingen van het meetapparaat ontstaan bijv wanneer het apparaat niet meer reageert kunt u het apparaat terugzetten naar de fabrieksinstellingen Ga hiervoor als volgt te werk Open het klepje aan de zijkant Zie ...

Страница 64: ...op de toets RESET 9 12 Onderhoud en reiniging Gebruik in geen geval agressieve reinigingsmiddelen reinigingsalcohol of andere chemische producten omdat de behuizing beschadigd of de werking zelfs belemmerd kan worden Verbreek voor iedere reiniging de verbinding met de stroomvoorziening Gebruik voor de reiniging van het product een droog pluisvrij doekje 13 Verwijdering a Product Elektronische appa...

Страница 65: ...0 μA Gebruiksduur batterij Ongeveer 9 uur continu gebruik Sensor Hall sensor met automatische temperatuurcompensatie ATC Meeteenheden G gauss mT millitesla Magneetvelden DC AC veldmeting Meetbereiken DC 300 mT x 0 01 mT 3000 mT x 0 1 mT of 3000 G x 0 1 G 30000 G x 1 G Veldsterkte AC 150 mT x 0 01 mT 1500 mT x 0 1 mT of 1500 G x 0 1 G 15000 G x 1 G Nauwkeurigheid bij 23 C 5 C DC 5 rdg 10 plaatsen A...

Страница 66: ...e time of printing Copyright 2019 by Conrad Electronic SE Ceci est une publication de Conrad Electronic SE Klaus Conrad Str 1 D 92240 Hirschau www conrad com Tous droits réservés y compris de traduction Toute reproduction quelle qu elle soit p ex photocopie microfilm saisie dans des installations de traitement de données nécessite une autorisation écrite de l éditeur Il est interdit de le réimprim...

Отзывы: