


Owner’s Manual #513851
11
CBB Model Machines
SECTION 4
SETTINGS & ALARMS
The control on the CBB machine allows service personnel
the ability to make adjustments to the machine through
the touchpad.
4.1 MAKING ADJUSTMENTS
A.
Press the Menu button. The fi rst adjustment
screen will be displayed (Keyboard).
B.
Press the up or down arrow to scroll through
the adjustment screens and press the Auger
Movement button
NOTE
The Auger Movement button acts as an “enter”
button in the menu screens.
C.
Press the Auger Movement button to go to the
setting screen.
D.
Press the up and down arrows to change the value
and press the Cold Selection button to move the
cursor.
E.
When the setting is correctly programmed, press
the Auger Movement button to save the setting
and return to the menu screen.
F.
Continue changing settings as needed.
G.
Press the Menu button to exit the settings screens.
4.2 SETTINGS
KEYBOARD
The Keyboard can be locked to prevent
unauthorized use. When the Keyboard Lock
is active the current status screen will show a
triangle in the upper right corner of the display.
The touchpad will remain locked until the setting
is changed or the power is disconnected and
reconnected.
DATE
The Date setting is used to set the current date.
The date format is DD/MM/YYYY.
TIME
The Time setting is used to set to the local time.
It is a 24-hour clock.
NIGHT MODE
The Night Mode keeps the product around 28ºF.
The On setting is when Night Mode starts and
the Off setting is when it ends.
TLI
The TLI setting is the lower temperature limit
setting (in ºC). When this temperature is reached
the solenoid will close and stop refrigeration to
the evaporator.
NOTE
If the menu button is held down for 10 seconds
while turning the machine on the display will show
temperature in Fahrenheit.
DOSE COUNTER
This displays the number of servings since the
counter was reset. The dose counter records
servings only when “READY TO SERVE” is on
the display. To reset the counter, press and hold
the Cold Selection button to until the display
shows “000”.
TANK TEMP
This displays the product temperature reading in
the tank.
SERVICE
The options under the Service are for use by a
qualifi ed technician and include changing the gear
motor RPMs, solenoid settings and serve ready
display time.
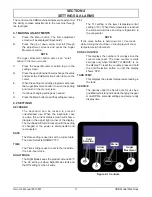
Figure 4-1 Controls
Cold
Selection
Auger
Movement
Menu
Arrow
Button
Содержание Stoelting CBB Series
Страница 1: ...Model CBB OPERATORS MANUAL Manual No 513851 Rev 0 ...
Страница 2: ......
Страница 6: ......
Страница 16: ...Owner s Manual 513851 10 CBB Model Machines ...