background image

9

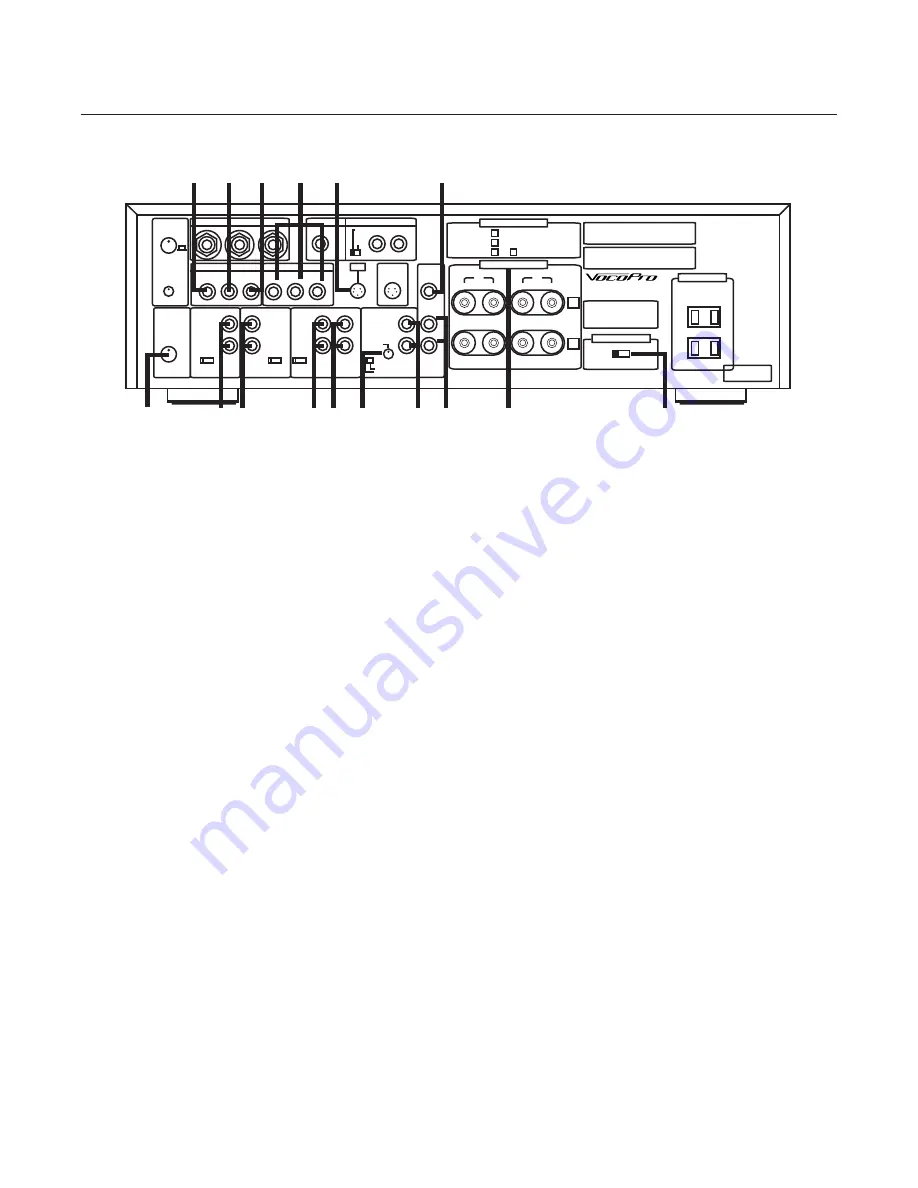
Rear Panel Descriptions

SONIC

ENHANCER

REAR MIC INPUT

VIDEO IN

VIDEO OUT

BGV      DVD      AUX

L

R

R

L

L

R

R

L

1          2          3  

MIC-OUT

MONO

INTERNAL

EXIT

GND

REMOTE IN

(MONO) L

MONO

SPEAKER IMPEDANCE

SPEAKER SYSTEM

CAUTION:

FOR CONTINUED PROTECTION AGAINST

FIRE HAZARD, REPLACE ONLY WITH SAME TYPE FUSE.

110-220V~18.A 250V.

220-240V~T4A 250V.

KARAOKE AMPLIFIER

11-220V/220-240V~50/60HZ

POWER CONSUMPTION:175W

MAX POWER CONSUMPTION: 690W

LA VERNE CALIFORNIA

U.S.A

CAUTION:

SHOCK HAZARD, DO NOT REMOVE SCREWS.

ATTENTION: RISQUE DE CHOC ELECTRIQUE.

                  NE PAS ENLEVER LES VIS.

VOLTAGE SELECTOR

220-240V ~110-120V~

AC OUTLETS

SAME AS LINE VOLTAGE

UNSWITCHED 300W

MAX TOTAL

MADE IN TAIWAN

www.vocopro.com

R

+        -

L

R

R

L

R          L

MIC-RETURN-IN

INPUT

LEVEL-ADJ

ON

MIC B IN

L M H

AUTO F LEVEL

DVD IN AUX IN

AUDIO

SERIAL NO.

L M H

AUTO F LEVEL

TAPE IN

TAPE

(MUSIC BYPASS)

  STEREO

MONO

MIN MAX

INPUT

LEVEL

BGM IN PRE-OUT

SYSTEM

1

1

2

2

SYSTEM
SYSTEM

AND

:MINIMUM 4 HOMS
:MINIMUM 4 HOMS
:MINIMUM 8 HOMS

L M H

AUTO F LEVEL

(LINE LEVEL)

MIN   MAX

1

2

-        +

1

2

3

4

5

6

7

8

9 10

11 12

13 14

15

16

1.  VOLTAGE Selector – 

Before you amplifier is shipped from the factory, the switch is set to 110-120V. If you move 

     to an area where the voltage requirements differ, set under the responsibility of the user according to the local 
     power voltage. Be sure to replace the fuse with the specified after changing the voltage setting. 
     (110-120V~7A 220-240~3.5A)

2.  SPEAKER SYSTEMS Terminals –

 Connect with the speaker OUTPUT jacks. 

     SPEAKER IMPEDANCE   

SYSTEM 1: 4-ohm

                                                 SYSTEM 2: 4-ohm
                                                 SYSTEM 1 AND 2: 8-ohm

3.  Monaural Pre-Out Jacks –

 Connect with the INPUT jacks of a powered monitor speaker etc.

4.  VIDEO Output Jacks –

 Connect with the video INPUT of the monitor TV.

5.  AUX Video Input Jack –

 Connect the video OUTPUT jack of an external video player to this jack.

6.  DVD Video Input Jack –

 Connect the video OUTPUT jack of the player to this jack.

7.  BGV Input Jack –

 Connect the video OUTPUT jack of the background video player, video camera, etc., to 

     this jack.

8.  Microphone B Input Jacks –

 Connect the OUTPUT jack of the wireless microphone receiver.

9.  DVD Input Jacks –

 Connect the OUTPUT jacks of the player to these jacks.

10. AUX Input Jacks –

 Connect the OUTPUT jacks of the Source to these jacks.

11. TAPE Input jacks –

 Connect the OUTPUT jacks of the TAPE deck to these jacks.

12. TAPE Output Jacks –

 Connect the INPUT jacks of the TAPE deck to these jacks. 

13. BGM Input Jacks –

 Connect the OUTPUT jacks of the BGM device (cable broadcasting) to these jacks.

14. PRE-OUT Output Jacks –

 Connect the INPUT jacks of the extension Power amplifier or the Mixer 

      to these jacks.

15. BGM (Background Music) Input Level Control-

Adjust this control to optimize the BGM input level.

      Note

 that the BGM level cannot be varied by the MUSIC VOL. control on the front panel. 

16. GROUND Terminal –

 The grounding wire to be connected to a grounding line is connected here.

Содержание DA-9800RV

Страница 1: ...tional Sounding Vocals Sonic Enhancer with High Low Frequency Controls Vocal Cancel and Partner Modes for Multiplex Karaoke Media Music Bass and Treble controls 6 Microphone Inputs with Bass and Trebl...

Страница 2: ...a Lifetime Before Getting Started Features and Specifications Front Panel Descriptions Rear Panel Descriptions Remote Descriptions Getting Connected Troubleshooting Recommended VocoPro Gear Contents...

Страница 3: ...other appliances including amplifiers that produce heat 10 Power Sources The appliance should be connected to a power supply only of the type described in the operating instructions or as marked on t...

Страница 4: ...onnecting to other equipment Never pull the cord itself 7 Do not attempt to clean the unit with chemical solvents this might damage the finish Use a clean dry cloth 8 Be sure to read the Troubleshooti...

Страница 5: ...728 Curtiss Court La Verne CA 91750 Toll Free 800 678 5348 TEL 909 593 8893 FAX 909 593 8890 VocoPro Company Email Directory Customer Service General Information info vocopro com Tech Support techsupp...

Страница 6: ...dial and leave it there Pay attention to the different levels in various recordings Taking a minute to do this now will help to prevent hearing damage or loss in the future After all we want you liste...

Страница 7: ...ke sure you allow adequate ventilation Position Cables Properly to Avoid Audio Interference Insert each cable firmly into the designated jack If you place components above the DA 9800RV route all cabl...

Страница 8: ...ly Supply Voltage AC 115V 110 120V 230V 220 240V 50 60 Hz Power Consumption 230W AC Power Outlets 200W Max Dimensions W x D x H 17 x 15 x 5 1 2 Weight 25 Lbs Accessories Owners Manual Remote Control 2...

Страница 9: ...urn controls clockwise to increase levels and counter clockwise to decrease levels 4 TAPE RECORD BYPASS Control Press this button when you want to record music only For mixed music and vocals karaoke...

Страница 10: ...he MUSIC TREBLE and BASS controls adjust the levels of high and low frequencies on the MASTER MUSIC output To add more TREBLE or BASS simply turn either of the knobs clockwise to increase levels or co...

Страница 11: ...ed after changing the voltage setting 110 120V 7A 220 240 3 5A 2 SPEAKER SYSTEMS Terminals Connect with the speaker OUTPUT jacks SPEAKER IMPEDANCE SYSTEM 1 4 ohm SYSTEM 2 4 ohm SYSTEM 1 AND 2 8 ohm 3...

Страница 12: ...to microphone output Set to EXIT for an external device or INTERNAL for the built in Echo 21 REAR MIC INPUT Jacks 1 A 2 Connect additional microphones to these jacks 22 AUX SENSITIVITY Switch This swi...

Страница 13: ...to its ORIGINAL key 3 KEY CONTROL DOWN BUTTON Press to transpose the key of music 1 4 tone DOWN per step 4 MUSIC VOLUME UP BUTTON Press to RAISE the volume of the music 5 MUSIC VOLUME DOWN BUTTON Pre...

Страница 14: ...MONITOR 2 MONITOR 3 DVD CD G PLAYER LASER DISC PLAYER TAPE PLAYER PRE OUT TO RECORD BOTH MUSIC AND MIC TAPE OUT MUSIC BYPASS TO RECORD MUSIC ONLY CABLE BOX A V SPEAKER SYSTEM 1 WARNING MINIMUM SPEAKE...

Страница 15: ...hone volume Lower the treble levels The input level for the source player is set too low to be recognized The output jacks of the DA 9800 RV may not have proper cable connected Faulty connection withi...

Страница 16: ...ection during pitch changes Single Track Mode Frame Search W Jog Dial 4 Speed Fast Forward Rewind Shuttle Pitch Slider Pitch Bend and Jog Dial BPM Beat Per Minute Synchronization Cue Detect Function P...

Страница 17: ...fessional Power Amplifier 300W 300W RMS 600W 600W Max THD 0 05 Frequency Response 20HZ 20KHZ Signal to Noise 1 4 or XLR Inputs Input Ratio Less than 100DB Input Sensitivity 1 23V Dimension W x D x H 1...

Страница 18: ...olor Monitor TFT LCD Color Monitor Audio Video Input 3 Watts Stereo Speakers Headphone Output With Volume Control Color Brightness Adjustment Reversible Screen Control For Both Table Top Or Auto Roof...

Страница 19: ...Sold in Pair Design for Karaoke Studio or Singers Monitor Power Rating 180 Watts Peak 90 Watts RMS Metal Grill Impedance 8 OHM Sensitivity 92 DB Frequency Response 20HZ 20KHZ Dimensions H x W x D 19...

Отзывы: