VMS Touring 600 Скачать руководство пользователя страница 13

TM

13

6.5 EXTENDED USER MANUAL

The information contained in this quick start guide is intended to get you up and running quickly. For 

a detailed user manual visit: 

www.vms4x4.com/vms_support

7. GPS NAVIGATION USER GUIDE

For help and guides on topographic software, please refer to the 

GPS NAVIGATION USER GUIDE 

included with this product or visit our website 

www.vms4x4.com/vms_support

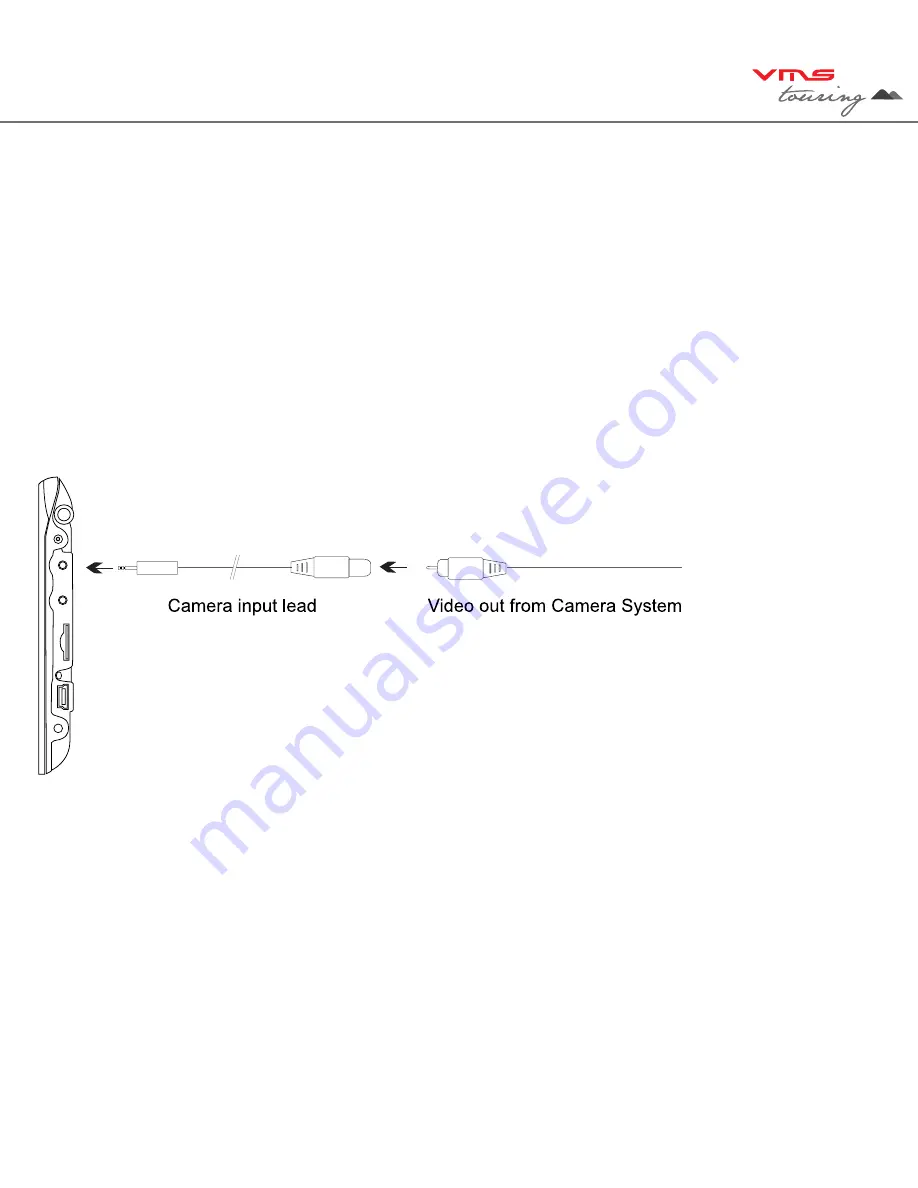
8. Reverse Camera Setup

The Touring 600 has the capability to display reverse camera images from up to two VMS cameras

8.1 Setting up reverse camera

8.2 REVERSE CAMERA OPERATION

Single Vehicle Camera: 

The image will automatically appear on the screen, when reverse gear is  


                           selected.

Dual Camera kit: 

When the second camera on the trailer is plugged in, the image from the second  


                camera will appear automatically. If the trailer camera is not connected, the 


                image will revert to the vehicle camera.

VMS Camera part numbers:

Single Camera:

    0501-0001

Dual Camera kit:  P

0501-0002

Содержание Touring 600

Страница 1: ...quick start guide TM Touring 600...

Страница 2: ...rough tracks can switch to the iTOPO 1 250 000 scale topographic maps This map collection covers the entire country and displays the majority of 4x4 tracks Street navigation features the latest Where...

Страница 3: ...ngs 4 1 Main menu 7 4 2 Date and time 4 2 1 Time 8 4 2 2 Date 8 4 2 3 Time zone 9 4 3 Calibrating the touchscreen and device information 9 4 4 Multimedia extras 9 4 4 1 Photos 10 4 4 2 Videos 10 4 4 3...

Страница 4: ...with a VMS icon 3 Copy all data from the sd card to your PC hard drive PERFORM A RESTORE FROM YOUR BACK UP RESTORE BACK UP DATA TO INTERNAL STORAGE 1 Power on the device 2 Connect the device to the P...

Страница 5: ...e 3 Camera input Input for Reverse Camera cable 4 USB charger Car charger input USB type 5 LED indicator Red when charging green when fully charged 6 Earphone jack 3 5mm Audio output 3 5 mm earphone 7...

Страница 6: ...sary 6 Place the suction cup on the windscreen and secure with rotary latch 7 Place the bottom of the GPS on to the cradle and gently click the top of the GPS into the cradle 8 Plug the car charger in...

Страница 7: ...ccess the Setup menu Back Access the Extras menu Access the GPS Console 100 0 Charging Back Back TIP Each navigation software has it s own settings To access software settings refer to the correspond...

Страница 8: ...m Time Touch to enter time settings System Date Touch to enter date settings 4 2 1 DEVICE TIME or hour toggle Minutes Display Hour Display Back to Date Time Settings or min toggle 4 2 2 DEVICE DATE or...

Страница 9: ...ICE INFORMATION and CALIBRATING THE TOUCHSCREEN Reset GPS receiver To calibrate the touchscreen tap this button follow the on screen instructions System Information Display Back to Settings menu Reset...

Страница 10: ...r down Browse up one folder 4 4 1 PHOTO VIEWER Photo Display Area Zoom in or out of photo Back to Main menu Back to Photo Browser Menu Next or Prev photo Full screen mode rotate photo 4 4 2 VIDEO BROW...

Страница 11: ...l indicator Stop Play FF Back to Video browser menu Status indicator 4 4 3 MUSIC BROWSER SD card content Back to Main menu Back to Main Menu Scroll up or down 4 4 3 MUSIC PLAYER Back to Main Menu Cont...

Страница 12: ...urn on your GPS and select the navigation icon Select the following options a Street navigation b Off road GPS The default Off Road application is Mud Map c Change Off road GPS software If you wish to...

Страница 13: ..._support 8 Reverse Camera Setup The Touring 600 has the capability to display reverse camera images from up to two VMS cameras 8 1 Setting up reverse camera 8 2 REVERSE CAMERA OPERATION Single Vehicle...

Страница 14: ...ng and use voice prompts when possible Do not input destinations change settings or access any functions requiring prolonged use of the device s controls while driving Pull over in a safe and legal ma...

Страница 15: ...f time store within the following temperature range 0 to 55 C When storing the device for an extended time store within the following temperature range 0 to 25 C Do not operate the unit outside the fo...

Страница 16: ...IVES YOU SPECIFIC LEGAL RIGHTS WHICH MAY VARY FROM STATE TO STATE IN NO EVENT SHALL VMS BE LIABLE FOR ANY INCIDENTAL SPECIAL INDIRECT OR CONSEQUENTIAL DAMAGES WHETHER RESULTING FROM THE USE MISUSE OR...

Страница 17: ...this may cause permanent damage The device is not water proof Do not expose to water Contact with water can cause this unit to malfunction Never use a hard or sharp object to operate the touchscreen...

Страница 18: ...d is protected under Australia copyright laws and international copyright treaties You further acknowledge that the structure organisation and code of the software are valuable trade secrets of VMS an...

Страница 19: ...this page has been left intentionally blank...

Страница 20: ...om June 2010 Rev 1 0 Printed in China VMS is a trademark of XIA GROUP PTY LTD registered in Australia and other countries and may not be used with out the express permission of XIA GROUP Pty Ltd copyr...

Отзывы: