background image

VMAC - Vehicle Mounted Air Compressors

VMAC Technical Support: 888-241-2289

VMAC Knowledge Base: www.kb.vmacair.com

85

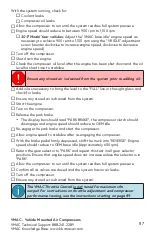
If an air receiver tank will be used with this system, a check valve 

(not supplied) must be installed to prevent damage to the system. 
Once a check valve is installed, pressure in the air receiver tank will 

not be relieved when the compressor system blows down. This is 

normal operation. 
Prior to performing any service work on the system, discharge any 

stored air in the air receiver tank.

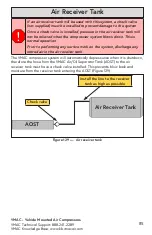
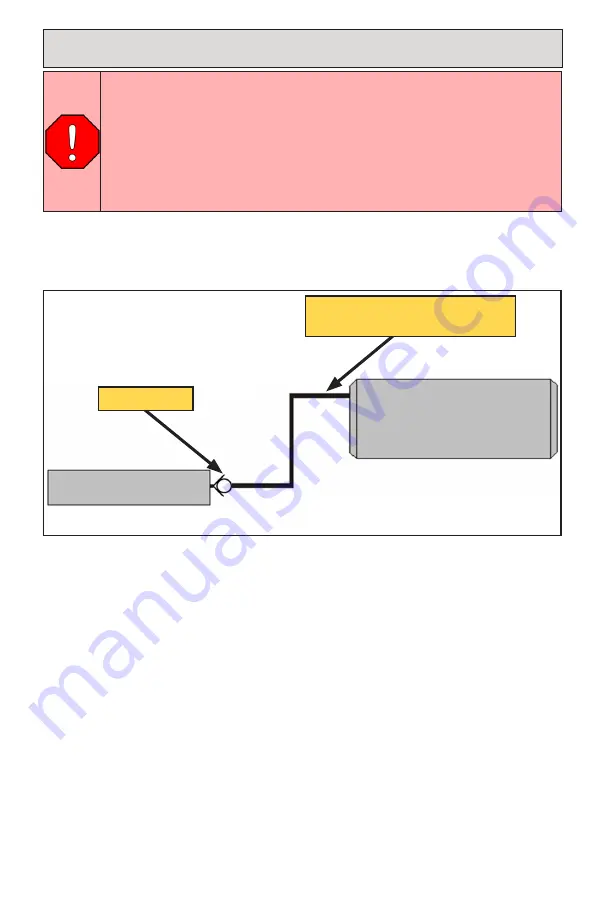
The VMAC compressor system will automatically depressurize when it is shutdown, 

therefore the hose from the VMAC Air/Oil Separator Tank (AOST) to the air 

receiver tank must have a check valve installed. This prevents blow back and 

moisture from the receiver tank entering the AOST (Figure 129).

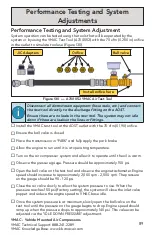
Figure 129  —  Air receiver tank

Install the line to the receiver 

tank as high as possible

Air Receiver Tank

Air Receiver Tank

AOST

Check valve

Содержание V900140

Страница 1: ...www vmacair com Installation Manual for VMAC System V900140 2017 2019 Ford Super Duty F 250 F 550 6 7 L Diesel...

Страница 2: ......

Страница 3: ...and VMAC Degas Bottle 25 Modifying the Fan Shroud and Fan Stator 31 Installing the Main Bracket Idler Bracket and Compressor 35 Installing the Air Oil Separator Tank 41 Hose Requirements 44 Connecting...

Страница 4: ...Notice Copyright 2018 VMAC Global Technology Inc All Rights Reserved These materials are provided by VMAC for informational purposes only without representation or warranty of any kind and VMAC shall...

Страница 5: ...lure of any person to properly adhere to the procedures set out in this manual or standard safety practices Safety should be the first consideration when performing any service operations If there are...

Страница 6: ...oducts as defined by VMAC provided that i the purchaser fully completes and submits a warranty registration form within 3 months of purchase or 200 hours of operation whichever occurs first ii service...

Страница 7: ...Service Ticket CSR number VMAC System ID hours on the compressor mileage on the vehicle and a detailed description of the work performed 6 VMAC Warranty does not cover consequential damage overtime ch...

Страница 8: ...nstallation manual Before Starting Read this manual prior to beginning the installation to ensure familiarity with the components and how they will fit on the vehicle Identify any variations from the...

Страница 9: ...ers torque values for OEM fasteners Apply Loctite 242 blue or equivalent on all engine mounted fasteners Torque values are with Loctite applied unless otherwise specified Standard Grade 8 National Coa...

Страница 10: ...port at 888 241 2289 The VMAC warranty form must be completed and returned to VMAC at the time of installation for any subsequent warranty claim to be considered valid Complete the warranty form The V...

Страница 11: ...e panel underneath the steering wheel Figure 4 Figure 2 Battery relocation warning label To alert any technicians that may service the vehicle affix the servicing caution contact label in the engine c...

Страница 12: ...y the service brake to supply power to the dash display The resistance to ground should read close to 0 in PARK and open circuit in all other gears If this is correct put the vehicle in PARK and turn...

Страница 13: ...the driver side battery tray and degas bottle assembly This will not be reused but can be retained should the vehicle be reverted to stock Mark the washer fluid pump wire harness for modification in...

Страница 14: ...sing to the outside of the frame just after the forward body mount Installation will continue later in the manual Figure 7 Figure 7 Routing the negative battery Reinstall the inner fender liner bolts...

Страница 15: ...r steering reservoir cap will leak if the reservoir is not kept upright Remove the upper radiator shroud Disconnect the radiator fan harness and remove and discard the OEM bolt Figure 8 Figure 8 Disco...

Страница 16: ...upper forward mount position Figure 10 Figure 10 Adaptive power steering pump Unbolt the power steering pump and secure it out of the way Adaptive power steering bushing OEM location Adaptive power s...

Страница 17: ...pressors VMAC Technical Support 888 241 2289 VMAC Knowledge Base www kb vmacair com 15 Remove the primary drain back hose running between the engine and the OEM degas bottle Figure 11 Figure 11 Remove...

Страница 18: ...ir from entering the brake system as brake fluid is forced out of the system Do not pump the brakes at any time while the brake lines are loose as air may be drawn into the system Have an assistant ge...

Страница 19: ...macair com 17 Figure 12 Relocating the HCU Remove the bolt and 2 nuts securing the HCU and lift it clear of the shock tower Figure 12 Apply Loctite 242 blue to the supplied flat head fastener and inst...

Страница 20: ...macair com 18 Gently shift the HCU towards the firewall taking care not to bend or kink the brake lines Align the bracket with the second set of mounting holes Figure 14 Install the bolt and 2 nuts Fi...

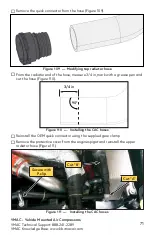
Страница 21: ...rom the OEM quick connector cuff on the radiator side of the hose measure 4 1 2 in along the outside radius towards the center of the hose and mark with a grease pen Figure 17 Figure 17 Lower radiator...

Страница 22: ...t the radiator hose in the two marked locations ensuring that cuts are square to the hose section Install the modified radiator side of the lower radiator hose onto the radiator Install the modified e...

Страница 23: ...r in place and discard Route the engine side coolant tube P N 1720719 up between the crossmember and the radiator support on the driver side of the vehicle and insert it into the modified radiator hos...

Страница 24: ...e The end with the sharpest bend goes toward the radiator Figure 21 on page 21 Reinstall the transmission cooler using the supplied spacers and fasteners Figure 22 Installing the Cooler Position the c...

Страница 25: ...amp Disconnect flexible hose Cable run for reference Front of vehicle Insert the supplied aluminum plug into the flexible hose section and secure using the OEM spring clamp Figure 25 Connect one end o...

Страница 26: ...er and over the cooler towards the passenger side of the vehicle Connect the hose to the small spigot on the passenger side of the cooler using a hose clamp Figure 27 Figure 27 Connect hose to VMAC co...

Страница 27: ...y Tray Air Intake and VMAC Degas Bottle Modifying the passenger side battery tray Remove the snorkel and lower duct assembly from the battery tray Figure 28 Remove the battery hold down U bolt This wi...

Страница 28: ...ut line along the base of the of the battery tray Figure 30 Figure 31 Mark a vertical cut line along the forward side of the engine face of the battery tray Figure 30 Figure 31 Cut the tray along the...

Страница 29: ...VMAC degas bottle and battery post relocation bracket into the modified battery tray Figure 32 Install and secure the VMAC degas bottle to the bracket Figure 33 Figure 32 Installing the degas bottle b...

Страница 30: ...elocation Install the OEM negative battery terminal using the supplied post and fastener Figure 34 Reinstall the ground strap to the inner fender Install the passenger side OEM positive battery cable...

Страница 31: ...se square Figure 36 Figure 36 Primary drain back hose modification Figure 37 Modified primary drain back hose Install a hose barb and the supplied 45 in length of hose and secure with hose clamps Inst...

Страница 32: ...ne and up to the original engine inlet The A C lines may need to be deflected slightly to facilitate routing Figure 38 Secure the primary drain back hose to the transmission cooler lines using the sup...

Страница 33: ...VMAC crank pulley between the 2 lower stator mounts Figure 40 Figure 40 Stator modifications From the bottom left stator mount count 4 vanes in a clockwise direction and mark the left side of the vane...

Страница 34: ...or count clockwise 6 vanes and mark the outer edge tracing the profile of the cowl Figure 41 Using a die grinder or similar tool cut the hard plastic lip flush with the cowl of the stator Figure 41 Cu...

Страница 35: ...is enough clearance Figure 43 Fan shroud modification Figure 44 Fan shroud modification Remove the power steering mounting boss and cut out the shaded area Figure 43 Figure 44 Use the VMAC power steer...

Страница 36: ...b vmacair com 34 Install the supplied steering reservoir bracket to the shroud using 2 of the supplied fasteners Place the 2 supplied fender washers on the radiator side of the fan shroud and secure w...

Страница 37: ...Loctite 242 blue to all engine mounted fasteners Main bracket installation Ensure the alternator slide bushing is flush with the inside face of the alternator mount Figure 46 Remove the upper bolt se...

Страница 38: ...the pulley facing up Align the VMAC main bracket over the top of the alternator with the mating surface facing down Lower the bracket over the alternator Figure 47 Pull the alternator up and rotate it...

Страница 39: ...to the VMAC main bracket using the 3 OEM bolts Reinstall OEM cable tray bolt Protect the battery cables in the cable tray using a piece of the scrap radiator hose retained from earlier in the installa...

Страница 40: ...ressors VMAC Technical Support 888 241 2289 VMAC Knowledge Base www kb vmacair com 38 Install and tension the OEM belt Figure 51 or Figure 52 Figure 51 OEM single alternator belt routing Figure 52 OEM...

Страница 41: ...the compressor on the mounting bracket and secure with the 4 supplied bolts Torque to specification Remove the protective covering and reinstall the Viton O ring and inlet onto the compressor Torque t...

Страница 42: ...using the supplied fasteners Torque the crank pulley bolts to 22 ft lb Additional torque instructions below Remove the tensioner and idlers from the FEAD bracket Install the FEAD bracket onto the VMAC...

Страница 43: ...of hoses other than those supplied or recommended by VMAC may cause compressor damage and may void the warranty Please contact VMAC for replacement hoses and further information When installing the AO...

Страница 44: ...washer 4 in nut The top bolt on the forward tank mount will need to be installed from the inside of the frame Figure 57 Apply Loctite 242 blue to the 2 3 8 in 6 in bolts and install the rear tank mou...

Страница 45: ...kb vmacair com 43 Rotate the tank so that the directional arrow on the rear of the tank is pointing upwards Figure 58 Figure 58 Securing the AOST Rear view AOST orientation is critical The arrow must...

Страница 46: ...s not effective the hoses can be shortened or replaced as necessary or hose extenders can be used VMAC recommends shortening these hoses as a preferred alternative to coiling up and securing the exces...

Страница 47: ...side cutters as they will deform the tube Slide the collet out once the tube is fully inserted Figure 59 Push to connect fittings O ring Push To Connect Fittings Figure 59 Lubricate the tube and firm...

Страница 48: ...n the 3 4 in hose to the compressor discharge port Route the discharge hose from the compressor down and in between the engine and steering column Figure 60 Figure 60 Routing the hoses If necessary ge...

Страница 49: ...ssary with cable ties Connect the 90 fitting on the longest 1 2 in hose to the driver side fitting of the cooler and route it along the frame to the AOST Figure 62 Figure 62 Connecting the hoses Secur...

Страница 50: ...y relocation bracket is designed to accommodate a multitude of frame variations Due to the universal nature of the bracket it will protrude slightly from the side of the vehicle Final battery location...

Страница 51: ...ox Insert 1 M10 x 1 5 x 150 bolt into the bottom of the rear battery box mount this will be inaccessible once the battery box is attached Figure 65 Figure 65 Installing the front battery box Figure 66...

Страница 52: ...p of the battery box cover Figure 67 Ensure the battery mounts and fasteners will not crimp or pinch any wire harness or brake lines that run along the top of the frame rail Run the fasteners below an...

Страница 53: ...er rear fastener securing the battery box to the mounting brackets and lift the battery box up and to the rear of the vehicle to remove it from the bracket Figure 69 Mounting the rear battery box Depe...

Страница 54: ...the rear battery box If equipped remove the cable run tray from the body mount It should be secured with push in fasteners and cable ties Figure 71 Figure 72 Modifying the cable run tray Remove the fa...

Страница 55: ...1 5 x 30 bolts through the battery mount brackets into the battery mount joiner bracket and torque to specification Figure 73 Figure 74 Installing the rear battery box Thread the nuts onto the bolts...

Страница 56: ...ttery box Install the backing straps and tighten the assembly to the frame to prevent the bracket from shifting Torque the mounting fasteners to specification The rear battery box mounting location ma...

Страница 57: ...uard and remove the 2 OEM fasteners underneath the forward park brake cable standoff and set them aside Figure 77 If required install the supplied clip nuts Figure 78 or Figure 79 Figure 77 Vehicle su...

Страница 58: ...the master battery disconnect assembly If the vehicle was supplied with a skid plate use the OEM fasteners to install the master battery disconnect assembly Figure 80 If the vehicle was not supplied...

Страница 59: ...short Figure 82 Installing the batteries Wrap the ring terminal end of the 2 2 AWG positive battery cables with tape to prevent electrical shorts Figure 82 Figure 83 Installing the batteries Apply die...

Страница 60: ...mended to prevent personal injury or damage to the battery Figure 84 Mounting the front battery box Raise the forward battery box and mount it onto the brackets Install the top rear fastener and tight...

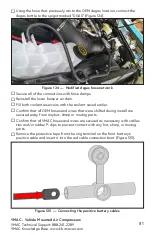
Страница 61: ...asteners Figure 86 Install the safety cables onto the brackets When connecting the positive battery cable to the starter solenoid avoid overtightening the nut as this can damage the starter solenoid F...

Страница 62: ...AC hoses Figure 88 Continue routing the cable over the frame and to the rear of the forward body mount where it will join up with the main grounding cable and continue toward the main battery disconne...

Страница 63: ...ct and secure it in place with the flange nut Figure 90 Install the supplied carriage bolt into the main battery disconnect Connect the 1 0 AWG negative battery cable to the negative post on the top o...

Страница 64: ...r washer and bolt Connect the fan harness Install the upper fan shroud Install the power steering reservoir into the bracket Ensure the power steering reservoir is not being pulled or stressed by the...

Страница 65: ...ted below the plane of the bracket so they do not interfere with the CAC hose connections Figure 94 CAC and washer bottle relocation brackets Mount the washer reservoir bracket to the CAC relocation b...

Страница 66: ...the brake lines at the HCU Install the OEM battery clamps onto the VMAC battery posts Connect the OEM windshield washer hoses to the VMAC washer reservoir Cut the OEM windshield washer pump motor harn...

Страница 67: ...clamp from the cold side of the CAC and mount it onto the supplied VMAC cold side hose Install the CAC onto the VMAC CAC relocation bracket Figure 97 Figure 98 Installing the CAC Secure the CAC to the...

Страница 68: ...ive covering from the intake port Remove the quick connect fitting from the OEM hose and reinstall it on the vehicle Save the hose clamp for reuse Figure 99 Install the VMAC supplied cold CAC hose and...

Страница 69: ...e tube is inserted 1 1 2 in into the silicone hose Figure 101 Separate the engine side coupler from the OEM steel duct Install the VMAC hot CAC tube into the OEM silicone hose on the engine side OEM h...

Страница 70: ...Figure 103 Install the OEM hot CAC tube into the VMAC silicone hose Ensure the silicone hose has equal coverage of both components Install the gear clamps with the screw heads facing the firewall to p...

Страница 71: ...l the assembly onto the turbo port The wire locking bail should be heard to click into place as it secures the quick connect onto the turbo port Figure 105 Install the OEM CAC tube onto the CAC Rotate...

Страница 72: ...ed 11 in heater hose onto the 90 hose barb and secure with a hose clamp Install the straight hose barb into the hose extension and connect it to the OEM hose that runs along the top of the radiator ro...

Страница 73: ...all the OEM quick connector using the supplied gear clamp Remove the protective cover from the engine spigot and reinstall the upper radiator hose Figure 111 Remove the quick connector from the hose F...

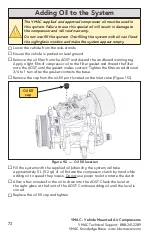
Страница 74: ...he cardboard warning tag Apply a light film of compressor oil to the filter gasket and thread the filter onto the AOST until the gasket makes contact Tighten the filter an additional 3 4 to 1 turn aft...

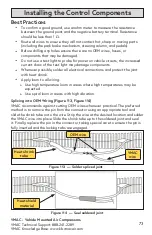
Страница 75: ...maged Do not use a test light to probe for power on vehicle circuits the increased current draw of the test light may damage components Whenever possible solder all electrical connections and protect...

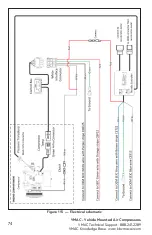
Страница 76: ...VMAC Vehicle Mounted Air Compressors VMAC Technical Support 888 241 2289 VMAC Knowledge Base www kb vmacair com 74 Figure 115 Electrical schematic...

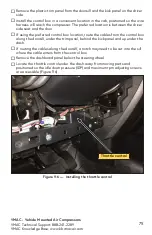
Страница 77: ...door If using the preferred control box location route the cables from the control box along the doorsill under the trim panel behind the kick panel and up under the dash If routing the cables along...

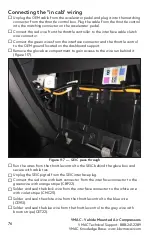
Страница 78: ...control to the OEM ground located on the dashboard support Remove the glove box compartment to gain access to the wire run behind it Figure 117 Figure 117 SEIC pass through Run the wires from the thr...

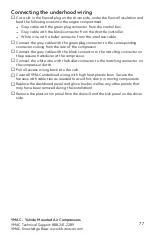
Страница 79: ...green plug connector to the corresponding connector coming from the rear of the compressor Connect the grey cable with the black connector to the matching connector on the pressure transducer at the...

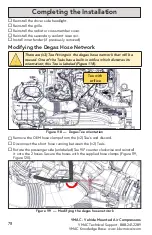
Страница 80: ...e Network There are 2 Tee fittings in the degas hose network that will be reused One of the Tee s has a built in orifice which dictates its orientation this Tee is labeled Figure 118 Figure 118 Degas...

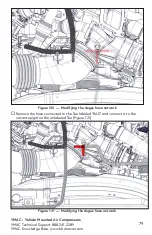
Страница 81: ...888 241 2289 VMAC Knowledge Base www kb vmacair com 79 Figure 120 Modifying the degas hose network Figure 121 Modifying the degas hose network Remove the hose connected to the Tee labeled RAD and conn...

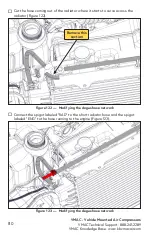
Страница 82: ...ose coming out of the radiator where it starts to curve across the radiator Figure 122 Connect the spigot labeled RAD to the short radiator hose and the spigot labeled ENG to the hose running to the e...

Страница 83: ...nnections with hose clamps Reinstall the lower bumper air dam Fill both coolant reservoirs with the coolant saved earlier Confirm that all OEM hoses and wires that were shifted during install are secu...

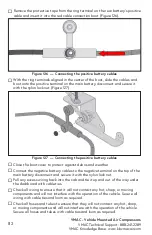
Страница 84: ...ttery cables Close the boot cover to protect against debris and weather Connect the negative battery cables to the negative terminal on the top of the main battery disconnect and secure it with the ny...

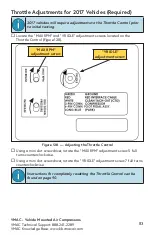
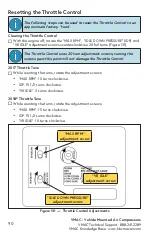
Страница 85: ...te the MAX RPM and VR IDLE adjustment screws located on the Throttle Control Figure 128 Using a mini slot screwdriver rotate the MAX RPM adjustment screw 5 full turns counterclockwise Using a mini slo...

Страница 86: ...he advantage of lowering the duty cycle of the compressor system Pressure Gauge While not critical to system performance a pressure gauge is important for fine tuning the system and simplifies any pot...

Страница 87: ...ows down This is normal operation Prior to performing any service work on the system discharge any stored air in the air receiver tank The VMAC compressor system will automatically depressurize when i...

Страница 88: ...checks have been completed Testing the Installation Place the vehicle in a safe operating position and adequately block the wheels Ensure that there are no people around the vehicle before beginning...

Страница 89: ...ctions starting on page 89 Ensure any stored air is drained from the system prior to adding oil Add oil as necessary to bring the level to the FULL line in the sight glass and check for leaks Ensure a...

Страница 90: ...le for approximately 14 miles 20 km Observe the compressor while it is operating to ensure the belts rotate properly pulleys rotate smoothly and nothing is rubbing or contacting hot parts Check all co...

Страница 91: ...When the pressure reaches 150 psi factory setting the system will close the inlet valve poppet and reduce the engine speed to VMAC base idle Once the system pressure is at maximum slowly open the ball...

Страница 92: ...full turns Figure 131 The Throttle Control uses 20 turn adjustment screws turning the screws past this point will not damage the Throttle Control 2017 Throttle Tune While counting the turns rotate th...

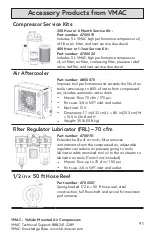
Страница 93: ...cm W 14 5 in 36 8 cm H Weight 35 lb 15 8 kg Filter Regulator Lubricator FRL 70 cfm Part number A700151 Extends the life of air tools filter removes contaminants from the compressed air adjustable reg...

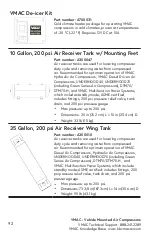
Страница 94: ...sions 73 3 4 in 187 3 cm L 14 in 35 6 cm D Weight 95 lb 43 1 kg 10 Gallon 200 psi Air Receiver Tank w Mounting Feet Part number A300047 Air receiver tanks are used for lowering compressor duty cycle a...

Страница 95: ...VMAC Vehicle Mounted Air Compressors VMAC Technical Support 888 241 2289 VMAC Knowledge Base www kb vmacair com 93 Notes...

Страница 96: ...VMAC Vehicle Mounted Air Compressors VMAC Technical Support 888 241 2289 VMAC Knowledge Base www kb vmacair com 94 Notes...

Страница 97: ...VMAC Vehicle Mounted Air Compressors VMAC Technical Support 888 241 2289 VMAC Knowledge Base www kb vmacair com 95 Notes...

Страница 98: ...received by VMAC within 30 days of installation VMAC s Warranty policy and registration can be viewed online at www vmacair com warranty VMAC Dealer Information Company Name City State Province Owner...

Страница 99: ......

Страница 100: ...888 241 2289 tech vmacair com 877 740 3202 warranty vmacair com www vmacair com www kb vmacair com 1333 Kipp Road Nanaimo B C V9X 1R3 Canada Manufactured by...

Отзывы: