background image

11

6. 

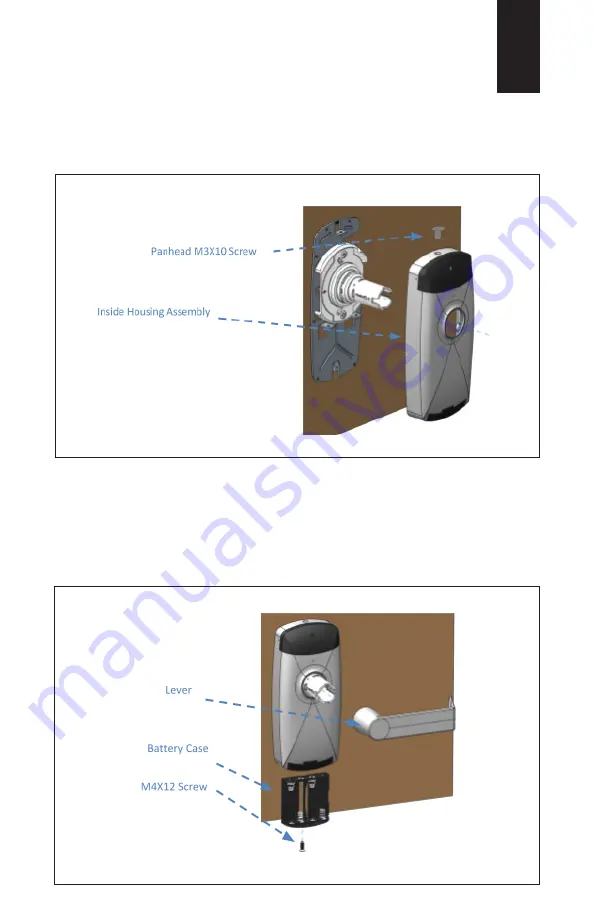
Install the Inside Housing Assembly to Mounting Plate using 

one Panhead M3X10 Screw.

7.  Install inside and outside Levers.

8.  Install four (4) AA alkaline batteries in the Battery Case.

9. 

Install the Battery Case using a flathead M4x12 screw.

Содержание Grade 1 Cylindrical Smartlock

Страница 1: ...Grade 1 Cylindrical Smartlock Installation Instructions Part Number VPSLCS1 ...

Страница 2: ... door 1 Four 4 AA Batteries Not Included 2 2 Philips Head Screwdriver 3 5 16 Drill Bit Only required for ANSI Grade 1 Installation That is between 1 3 8 and 2 3 8 thick That has a 2 1 8 door prep That has 2 or 2 3 8 backset Before You Begin A Checklist ...

Страница 3: ...e which Backset fits your installation 2 3 8 60mm or 2 3 4 70 mm 2 Fold installation template place it on the door and mark the holes 3 Drill the two 5 16 8mm holes for the mounting screws and securing B ANSI GRADE 1 Installation ONLY TEMPLATE FOLD LINE LATCH HOLE ...

Страница 4: ...04 Ensure the latch bolt bevel faces the closing direction and secure the latch to the door using two 8 x 3 4 screws C Latch Installation CLOSING DIRECTION ...

Страница 5: ...Determine the direction of your door Default is for a right hand door 2 Install the Lock Body Assembly using the correct diagram below D Lock Handing RIGHT HAND RIGHT HAND REVERSE LEFT HAND LEFT HAND REVERSE ...

Страница 6: ...side Lever Catch Pin E To Change Direction to a Left Hand Door IF YOU HAVE A RIGHT HAND DOOR SKIP TO SECTION F OUTSIDE ASSEMBLY SCREWS OUTSIDE ASSEMBLY OUTSIDE LEVER CATCH PIN 2 Remove the four 4 Outside Assembly Screws and take out the assembly ...

Страница 7: ...crews 3 Remove the inside lever using the Inside Lever Catch Pin 4 Remove the two 2 Inside Assembly screws and take out the Inside Assembly 5 Rotate the Inside Assembly 180 degrees 6 Replace the two 2 Inside Assembly Screws INSIDE LEVER CATCH PIN INSIDE ASSEMBLY INSIDE ASSEMBLY SCREWS ...

Страница 8: ...t for Door Thickness CONVEX KEY ROTATE CLOCKWISE 2 Make sure the convex key should is facing the door and install the Outside Mounting Plate on lock body by rotating clockwise 3 Set the Catch Tool to the appropriate position on the Door Thickness Mark 4 Rotate the Outside Mounting Plate to the appropriate door thickness using Catch Tool ...

Страница 9: ...09 1 Mount the Lock Body to the Outside Housing G Install Lock Housing IF THIS IS NOT AN ANSI GRADE 1 INSTALLATION REMOVE THE OUTER STUDS 2 Insert the Outside Housing Assembly in the door Outer Studs ...

Страница 10: ...Housing M6 X 10 SCREWS 2 1 Mount the Lock Body to the Outside Housing 2 Insert the Outside Housing Assembly in the door 3 FOR ANSI Grade1 Installations only attach the Mounting Plate to the outer Studs 4 Make sure the Mounting Plate is aligned with the vertical center line and install it using two M5x38 screws ...

Страница 11: ...side Housing Assembly to Mounting Plate using one Panhead M3X10 Screw 7 Install inside and outside Levers 8 Install four 4 AA alkaline batteries in the Battery Case 9 Install the Battery Case using a flathead M4x12 screw ...

Отзывы: