background image

VIZIO VF551XVT User Manual 
 

 24  

www.VIZIO.com


CD DVD

CD DVD

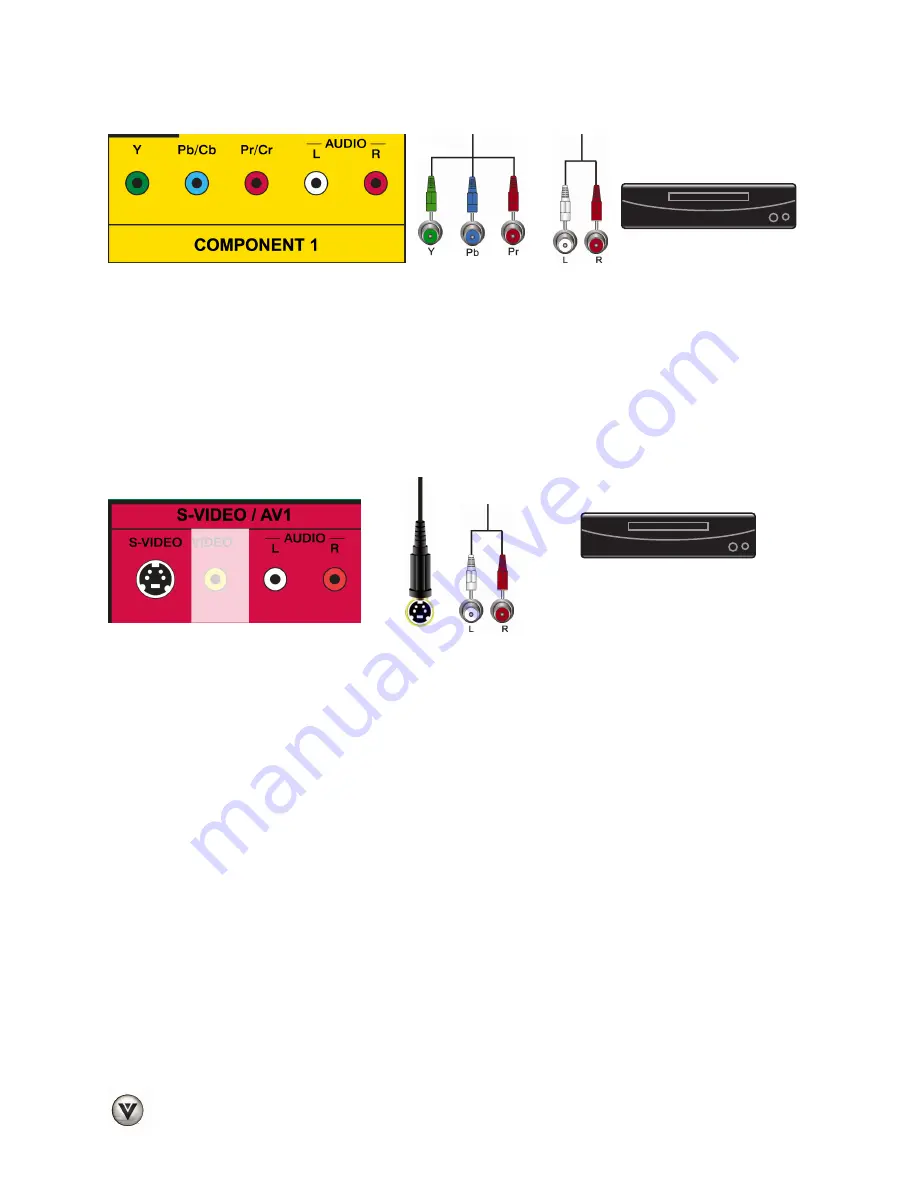
Using Component Video (Better) 


1. 

Turn off the power to the HDTV and DVD player. 

2. 

Connect the component cable (green, blue, and red) from your DVD player to an available 
set of 

COMPONENT 

jacks on the back or side of the HDTV. 

3. 

Connect the audio cables (white and red) from your DVD player to the 

COMPONENT


and 

R AUDIO

 jacks on the back or side of the HDTV. 

4. 

Turn on the power to the HDTV and DVD player. 

5. Select 

COMPONENT 1

 or 

COMPONENT 2

 using the 

INPUT

 button on the remote control, or 

directly by pressing the 

COMPONENT 

button on the remote control. 

Using S-Video (Compatible) 


1. 

Turn off the power to the HDTV and DVD player. 

2. 

Connect the S-VIDEO cable from your DVD player to the 

S-VIDEO

 jack on the back of the 

HDTV. 

3. 

Connect the audio cables (white and red) on your DVD player to the corresponding 

L

 and 

R


AUDIO

 jacks on the back of your HDTV. 

4. 

Turn on the power to the HDTV and DVD player. 

5. Select 

AV1

 using the 

INPUT 

button on the remote control, or directly by pressing the 

AV 

button on the remote control. 

Содержание VF551XVT - 55" LCD TV

Страница 1: ...s on site extended warranty service plans These plans give additional coverage during the standard warranty period Visit our website or call us to purchase a plan Write down the serial number located on the back of your HDTV __ __ __ __ __ __ __ __ __ __ __ __ __ Purchase Date _____________________ VIZIO is a registered trademark of VIZIO Inc dba V Inc HDMI logo and High Definition Multimedia Inte...

Страница 2: ...nings in the back and bottom of the cabinet are provided for ventilation To ensure reliable operation of your HDTV and to protect it from overheating be sure these openings are not blocked or covered Do not place your HDTV in a bookcase or cabinet unless proper ventilation is provided Never push any object into the slots and openings on your HDTV cabinet Do not place any objects on the top of your...

Страница 3: ... the power cord and contact your dealer immediately Do not try to repair your HDTV yourself Avoid using dropped or damaged appliances If your HDTV is dropped and the housing is damaged the internal components may function abnormally Unplug the power cord immediately and contact your dealer for repair Continued use of your HDTV may cause fire or electric shock Do not install your HDTV in an area wi...

Страница 4: ...ng structure grounding of the lead in wire to an antenna discharge unit size of the grounding conductors location of antenna discharge unit connection to grounding electrodes and requirements of the grounding electrode Lightning Protection For added protection of the TV during a lightning storm or when it is left unattended or unused for long periods of time unplug the TV from the wall outlet and ...

Страница 5: ...ould continue to work as before to receive low power Class A or translator television stations and with cable and satellite TV services gaming consoles VCRs DVD players and similar products For additional information please contact the parties listed below as appropriate FCC US Federal Communications Commission http www fcc gov Phone 1 888 CALL FCC 1 888 225 5322 TTY 1 888 TELL FCC 1 888 835 5322 ...

Страница 6: ... Component Video Better 20 Using S Video Compatible 21 Using Composite Video Compatible 21 Using Coaxial Antenna Compatible 21 Connecting Coaxial RF 22 Using Your Antenna or Digital Cable for Standard TV or Digital TV 22 Using the Antenna or Cable through Your VCR 22 Connecting Your DVD Player 23 Using HDMI Best 23 HDMI Connections for DVD Players with DVI 23 Using Component Video Better 24 Using ...

Страница 7: ...g the Time Zone 37 Watching a TV Program 38 Adjusting Basic HDTV Settings 39 Program Information 39 CHAPTER 5 ADVANCED ADJUSTMENT OF HDTV 40 Using the On Screen Display OSD 40 Picture Menu 41 Picture Mode 41 Backlight 41 Brightness 41 Contrast 41 Color 41 Tint 41 Sharpness 41 Advanced Video 42 Reset Picture Mode 43 Audio Menu 43 Audio Mode 43 Equalizer 43 Balance 43 SRS TSHD 43 SRS TruVolume 43 Di...

Страница 8: ...IZIO UNIVERSAL REMOTE CONTROL 53 Using a Cable or Satellite Box Remote 53 Programming other devices 53 Programming your DVD Player 53 Programming your Home Theater System 53 Programming your Cable or Satellite Set Top Box 54 Searching for Component Codes 54 Remote Control Codes 55 CHAPTER 8 MAINTENANCE AND TROUBLESHOOTING 65 Maintenance 65 Troubleshooting Guide 66 Telephone Technical Support 68 Co...

Страница 9: ...hipping Package Contents VIZIO VF551XVT VIZIO remote control VUR8M AA batteries for the remote control 2 Power cord Safety Strap Cleaning Cloth This user manual Quick Setup Guide Registration Card Additional certified accessories for your HDTV are sold separately Wall mounts High Definition cables Extra or replacement remote control VIZIO also offers installation services and extended warranty ser...

Страница 10: ...nformation Avoid installing your HDTV in places with high humidity dust or smoke so you do not shorten the service life of the electronic components Install your HDTV in a level landscape orientation with the VIZIO logo at the bottom to prevent poor ventilation and excessive component damage VIZIO offers professional installation services Contact VIZIO for more information on these services at 888...

Страница 11: ...nse practice such as ensuring that children or adults do not climb up grabbing the top of the HDTV and pulling it onto themselves 1 Attach one end of the strap to the wall If you have a drywall finish attach it to a stud using a washer underneath the screw head If you have a solid wall you should use a lag bolt again using a washer under the nut 2 Attach the other end of the Safety Strap to one of...

Страница 12: ...ing this button will proceed to the next level INPUT ENTER Repeated pressing of this button steps through the input sources in the following sequence TV AV1 AV2 Component1 Component2 RGB HDMI1 HDMI2 HDMI3 HDMI4 and HDMI SIDE Once you have stepped through the entire sequence you will return to the beginning If a sub menu is active pressing this button will return to the previous menu level Addition...

Страница 13: ...r digital TV stations in your area visit www antennaweb org 5 AUDIO OUT a OPTICAL The audio associated with the programming will be available on the SPDIF Optical connector for connection to your home theater system b ANALOG L R Connect the audio from the HDTV to an external device such as a home theater system external amplifier or stereo Speakers can not be connected directly here 6 HDMI 4 Conne...

Страница 14: ...rce Note The red and white audio connectors are shared between AV2 and COMPONENT2 2 COMPONENT2 YPb CbPr Cr with Audio L R Connect the secondary source for component video devices such as a DVD Player or set top box here Note The red and white audio connectors are shared between AV2 and COMPONENT2 3 HDMI SIDE Connect another digital video device such as a DVD multimedia player or set top box throug...

Страница 15: ...ssword INPUT Repeatedly pressing this button will step you through the input sources in the following sequence TV AV1 AV2 Component1 Component2 RGB HDMI1 HDMI2 HDMI3 HDMI4 and HDMI SIDE Once you have stepped through the entire sequence you will return to the beginning DASH When selecting a digital channel directly use this button between the main and sub channels For example channel 28 2 would be ...

Страница 16: ...rding when using the remote to control your pre programmed DVD Player or Cable Satellite Box DVR SLEEP PAUSE This button cycles through the sleep options from 30 120 minutes This button also pauses playback when using the remote to control your pre programmed DVD Player or Cable Satellite Box DVR MTS PLAY This button selects Stereo SAP or Mono in standard TV mode and alternate audio channels where...

Страница 17: ...te Control Range Point the remote control at the remote control sensor to transmit the commands Do not place any obstacles between the remote control and the receiver window The effective range of the remote control is approximately 30 feet 9 1 meters from the front of the receiver window 30 to the left and right 20 up and down VIZIO Remote Control Precautions The remote control should be kept dry...

Страница 18: ...able Best digital Compatible analog Connect a digital or analog antenna cable or coaxial cable to watch TV programming Best analog RGB PC VGA This is most commonly used for PC input Better analog Component Component video provides a sharper image than composite video and S video because the three video signals are transmitted via three separate channels Compatible analog S Video AV1 Combining the ...

Страница 19: ...E 1 888 849 4623 for details 1 Turn off the power to the HDTV and HDTV Set Top Box 2 Connect an HDMI cable to the HDMI output of your HDTV Set Top Box and the other end to an HDMI input on the back or side of the HDTV 3 Turn on the power to the HDTV and HDTV Set Top Box 4 Select HDMI 1 HDMI 2 HDMI 3 HDMI 4 or HDMI SIDE using the INPUT button on the remote control or directly by pressing the HDMI b...

Страница 20: ...the remote control Note The HDMI input on the HDTV supports High bandwidth Digital Content Protection HDCP HDCP encrypts the transmission between the video source and the digital display for added security and protection Refer to your HDTV Set Top Box user manual for more information about the video output requirements of the product or consult your cable or satellite operator Using Component Vide...

Страница 21: ...low from your set top box to the AV jack yellow on the back of your HDTV 3 Connect the audio cables white and red on your set top box to the corresponding L and R AUDIO jacks on the back of your HDTV 4 Turn on your HDTV and set top box 5 Select AV1 using the INPUT button on the remote control or directly by pressing the AV button on the remote control Using Coaxial Antenna Compatible 1 Turn off th...

Страница 22: ...emote control or directly by pressing the TV button on the remote control Using the Antenna or Cable through Your VCR 1 Turn off the power to the HDTV and VCR 2 Connect the Output to TV RF Out or Antenna Out connector on the rear of your VCR to the DTV TV CABLE ANTENNA connector on the back of the HDTV 3 Turn on the power to the HDTV and VCR 4 Select TV using the INPUT button on the remote control...

Страница 23: ... HDMI 1 HDMI 2 HDMI 3 HDMI 4 or HDMI SIDE using the INPUT button on the remote control or directly by pressing the HDMI button on the remote control HDMI Connections for DVD Players with DVI 1 Turn off your HDTV and DVD player 2 Using a HDMI DVI cable connect the DVI end to your DVD player and the HDMI end to the HDMI 4 Input on the back of the HDTV 3 Connect the audio cables white and red from th...

Страница 24: ...o the HDTV and DVD player 5 Select COMPONENT 1 or COMPONENT 2 using the INPUT button on the remote control or directly by pressing the COMPONENT button on the remote control Using S Video Compatible 1 Turn off the power to the HDTV and DVD player 2 Connect the S VIDEO cable from your DVD player to the S VIDEO jack on the back of the HDTV 3 Connect the audio cables white and red on your DVD player ...

Страница 25: ...by pressing the AV button on the remote control Connecting Your VCR or Video Camera 1 Turn off the power to the HDTV and VCR or Video Camera 2 Connect the S VIDEO cable from your VCR or video camera to the S VIDEO jack on the back of your HDTV 3 Connect the audio cables on your set top box to the corresponding L and R AUDIO jacks on the back of your HDTV 4 Turn on the power to the HDTV and VCR or ...

Страница 26: ... to highlight the Audio menu and then press OK to select 6 Press on the remote control to select SPEAKERS 7 Press on the remote control to select OFF so the sound from the HDTV will be routed through your Receiver Amp system Note Refer to your Receiver Amp user manual to select the corresponding audio input The audio output is not amplified and cannot be connected directly to external speakers Opt...

Страница 27: ...ptional and only needed if you want to transmit audio from the computer through the TV 4 Turn on the power to the HDTV and Computer 5 Select RGB using the INPUT button on the remote control Note For a better picture quality when connecting a PC computer through RGB PC set your PC computer timing mode to VESA 1920 x 1080 at 60Hz Refer to your PC computer user manual for more information about the v...

Страница 28: ... 72 188 P P 50 000 Windows 5 800 x 600 75 46 875 75 000 P P 49 500 Windows 6 1024 x 768 60 48 363 60 004 N N 65 000 Windows 7 1024 x 768 70 56 476 70 069 N N 75 000 Windows 8 1024 x 768 75 60 023 75 029 P P 78 750 Windows 9 720 x 400 70 31 469 70 087 N P 28 322 DOS 10 1920 x 1080 60 66 587 59 934 P N 138 50 Windows Note P positive N negative Primary mode Resolution through RGB Input If your PC sup...

Страница 29: ...Folders can be up to 20 levels deep The first folder on the drive is Level 1 A folder within that folder is Level 2 a folder within that folder is Level 3 etc Display Limits The Multimedia Viewer will show the first 1000 folders and 1000 files in the list Supported File Formats The following are the supported file formats that can be played on your HDTV Media server content protected by digital ri...

Страница 30: ...r hear and then press OK to select it A sub menu will be displayed showing the folders and files that are on your USB device 4 Press or to highlight the folder or file you want to play and then press OK to select it The file will being playing 5 While playing videos or music fast forward or fast reverse by pressing or a Press or to increase the playback speed forward or reverse 2X The display at t...

Страница 31: ...stop the slideshow Press OK to begin the slideshow Press EXIT to stop the slideshow Slideshow with Music Choose from Off Single Sequence and Shuffle to set the slideshow with music mode The music will automatically stop when the slideshow stops Press OK to begin the slideshow Press EXIT to stop the slideshow Music file browser Select the slideshow music Press OK to browse for music on your USB dev...

Страница 32: ...ce and select the Music Folder 2 Press the MENU button on the remote control The Music menu will be displayed 3 Press or on the remote control to highlight Music menu option and then press or to adjust the setting 4 Press the MENU button once to close the menu Sort By You can choose to sort the songs by File Title Genre Artist or Album Play Mode Choose from Shuffle Single and Sequence to set the p...

Страница 33: ...p playing at the end of that song Sequence will play the videos in the order they are listed on your USB device until you stop it Shuffle will play the videos in random order until you stop it Repeat When set to On the video s will continue playing until you stop it Picture Mode Choose from Custom Standard Movie Game Vivid Football Golf Basketball and Baseball to adjust the overall quality of the ...

Страница 34: ...reen will come up Press the OK button on the remote control b The Language choice screen will be displayed the default English option is highlighted If you wish to change the OSD language to Español or Français press the button on the remote control to select the language you want c Press the OK button on the remote control to go to the next screen d The next screen will display the options Home M...

Страница 35: ... available channels The screen will show the progress of the search for Analog NTSC and Digital ATSC channels Note If you select Skip Scan you can scan channels at a later time by selecting the TV input then going to the Menu and selecting the Auto Search option in the TV menu Refer to www antennaweb org to get information about availability in your area type of antenna and in which direction to p...

Страница 36: ...ing the channel which has been selected on the back of the VCR Cable Box External TV Tuner or Satellite Receiver please refer to Owner or User s Manual of such equipment for details Note Your HDTV will display the television station or program selected by the cable box VCR external tuner or satellite receiver Use the remote control that came with that component to change programs or channels If th...

Страница 37: ...to scroll to the TV option and then press OK to select it 8 Press the MENU button repeatedly to exit the menu Setting the Time Zone 1 Select TV using the INPUT button on the remote control or directly by pressing the TV button on the remote control 2 Press the MENU button to bring up the Menu display The Picture Menu is highlighted 3 Press or to highlight the TV menu and then press OK to select it...

Страница 38: ...e remote control or by selecting HDMI from the Input menu after pressing INPUT on the remote control c If you are watching broadcasts through a cable or satellite set top box connected by a Component YPbPr cable select Component directly by pressing the COMP button on the remote control or by selecting Component from the Input menu after pressing INPUT on the remote control Note You should be able...

Страница 39: ...hen watching a digital TV program the On Screen Display will function as follows When a channel is selected an information header is shown over the picture for a few seconds When you press the INFO button on the remote control the information header and a short summary of the program content when available from the broadcaster is displayed This information consists of the channel number and name t...

Страница 40: ...me of the main menu options may have additional submenus for example the TV Rating submenu for Parental Controls 1 Press the MENU button on the remote control and the Picture menu will be shown on the screen 2 Press either or on the remote control to select one of the other menu options Picture Picture Adjust Audio Mode Audio Adjust TV TV Tuner Setup Setup Global Settings 3 Press OK to select the ...

Страница 41: ...l of the picture Brightness The Brightness adjusts the black levels in the picture If the brightness is too low you will not be able to see the detail in darker parts of the picture and if the brightness is too high the picture will look washed out Contrast The Contrast adjusts the white levels in the picture If the contrast is too low the picture will look washed out and if the contrast is too hi...

Страница 42: ...rt Dimming functions Press to enter the submenu Smart Dimming Provides true black for the highest quality picture Choose On or Off Smart Dimming Demo Demonstration of the Smart Dimming Effect The demo turns Smart Dimming On then Off at three second intervals Press to initiate the demo Press MENU to exit the demo Color Temperature Color Temperature is the warmness or coolness of the white areas of ...

Страница 43: ...new menu will be displayed showing the volumes of different frequencies Starting from lowest to the highest they are 120 Hz 500Hz 1 5 kHz 5 kHz and 10 kHz 1 Press or to select the frequency to be adjusted 2 Use or to adjust to adjust the selected frequency to your preference Values above 0 will boost the frequency and values below 0 will attenuate the frequency Note The Equalizer adjustment will o...

Страница 44: ...e When set to Variable volume from the external speakers will change according to the volume setting on the TV If it is set to Fixed the volume can only be changed by the settings on the external stereo system Lip Sync Lip Sync is designed to adjust the audio of the program being viewed so that it matches the movement of the lips of someone talking on the screen Reset Audio Mode Return all Audio s...

Страница 45: ...nnel search to look for channel in a certain channel range again Select to scan for Analog Digital or both Analog Digital channels then press the button to highlight the From and To selection Press the button to select the range of channel numbers you want to start searching in Press OK to start channel search Skip Channel After the TV has stored all of the available channels in memory you will fi...

Страница 46: ...en or repeatedly to return to your program if the task has been completed Language Select to change the Language of the OSD The default is English You can also select Español or Français PIP Your TV features PIP mode so you can watch two pictures at the same time One picture is displayed as the full screen main screen and the other picture is displayed in a small window sub screen Note PIP is only...

Страница 47: ...and POP modes PIP Position Select where you want the PIP screen positioned over the main screen Size Set the size of the PIP window Choose from Small Medium or Large Audio Source Select the audio source associated with the main screen or the sub screen Sleep Timer Select the timer to turn off the TV in 30 60 90 or 120 minutes Tech Logo Set the animated illumination of the Tech Logo in the glass ab...

Страница 48: ...ancel the setting CC Closed Caption To select the options in the CC sub menu press the OK button or the button A new menu will be displayed showing the following CC settings CC The CC feature is available when watching regular analog NTSC TV Select from CC1 CC2 CC3 CC4 Service1 Service2 Service3 Service4 Service5 or Service6 Closed Caption for regular TV is usually CC1 or CC2 Digital CC Style The ...

Страница 49: ...nly available in HDMI Component or RGB modes Parental If you want to restrict certain channel and program viewing you can do this by turning on the Parental Control Selected programs movies and channels can then be made available only after an authorized password has been entered and accepted by the TV To select the options in the Parental sub menu press OK Enter a password to access the Parental ...

Страница 50: ...en Rating Enable is OFF US Movie Rating adjustments are not available Press the OK button to block locked or allow unlocked channels by the following US Movie ratings G General audience PG Parental guidance suggested PG 13 Recommended for children 13 years of age or older R Mature audience NC 17 No one under 17 years of age X No one under 17 years of age Canadian English Rating Note When Rating En...

Страница 51: ...hat does not have a rating Change the Password Select Access Code Edit to enter a new 4 digit password using the number buttons on the remote control Enter it a second time to confirm you entered it correctly Note Make sure you write down and store the new password in a secure place The System Reset feature see page 44 does NOT reset the password System Info Display the technical information inclu...

Страница 52: ...y Zoom 1 When watching a standard broadcast or full frame movie in this mode the display image is stretched proportionately to fill the TV screen When watching a widescreen 1 78 1 source program or movie the display image fills the TV screen If you are watching a widescreen 1 85 1 or 2 35 1 source program or movie there will still be black bars at the top and bottom Zoom 2 Zooms in by 14 to crop t...

Страница 53: ...low and enter it using the number buttons If the code is accepted the LED flashes twice after the last digit is entered If the LED does not flash twice repeat Steps 2 through 4 with the next code listed 5 Point the remote control at the DVD player and press the POWER button The DVD player will turn off If the DVD player does not turn off repeat Steps 2 through 4 with the next code listed for the c...

Страница 54: ...ox will turn off If the Cable or Satellite Set Top Box does not turn off repeat Steps 2 through 4 with the next code listed for the component and manufacturer Notes If the codes do not work or your brand is not listed see Searching for Component Codes Sometimes a code listed will only include limited functions Try other codes that may include more functionality Searching for Component Codes If you...

Страница 55: ...00014 Maspro 01510 Memorex 00000 Mitsubishi 00003 Motorola 01376 00476 00810 00276 01187 01254 00014 01106 Multitech 00883 Myrio 01822 NEC 01496 Nova Vision 00008 Novaplex 00008 00017 NSC 00012 00637 Oak 00017 Pace 01877 00877 00237 00008 Panasonic 00000 00008 00144 00107 01488 Panther 00637 Paragon 00000 00008 00525 Penney 00000 00637 Philips 01305 00317 Pioneer 01877 00877 00144 00533 01500 Pris...

Страница 56: ...vox 00724 00722 Maspro 01530 McIntosh 00869 Memorex 00724 Mitsubishi 00749 Motorola 00869 NEC 01519 Netsat 00099 Next Level 00869 Optimus 00724 Panasonic 00247 00701 01508 Pansat 01807 Paysat 00724 Philips 01142 00749 01749 00775 00724 00819 01076 00722 00099 01442 20739 Pioneer 01142 01442 Primestar 00869 Proscan 00392 00566 Proton 01535 RadioShack 00566 00775 00869 RCA 00392 00566 01142 00775 00...

Страница 57: ... Player Codes 3D LAB 20503 20539 Accurian 21072 21416 Acoustic Solutions 20730 Advent 21016 Afreey 20698 Aiwa 20641 Akai 20695 20705 20770 20899 21089 Alba 20672 20717 Alco 20790 Allegro 20869 Amphion Media Works 20872 AMW 20872 Apex Digital 20533 20672 20717 20755 20794 20796 20797 20830 21004 21020 21056 21061 21100 Arrgo 21023 DVD Player Codes Aspire Digital 21168 21407 Audiovox 20717 20790 210...

Страница 58: ...wasaki 20790 Kenwood 20490 20534 KLH 20717 20790 21020 21149 Kloss 20533 Koss 20651 21061 Lasonic 20627 20798 Lecson 21533 Lenoxx 21127 LG 20591 20741 20801 20869 LiteOn 21058 21158 21416 21440 Loewe 20511 20741 Logix 20783 Magnasonic 20651 20675 Magnavox 20503 20539 20646 20675 20821 21268 Malata 20782 21159 Marantz 20503 20539 20675 McIntosh 21533 Medion 20651 Memorex 20695 20831 21270 Microsoft...

Страница 59: ...ion 20651 Theta Digital 20571 Thomson 20522 20511 Tivo 21503 21588 Toshiba 20503 20573 20539 20695 21045 21154 21503 21588 21639 Tredex 20800 Unimax 20770 United 20730 Universum 20591 Urban Concepts 20503 20539 US Logic 20839 V 21064 21226 Venturer 20790 Victor 21597 Vizio 21064 21226 Xbox 20522 21708 Yamaha 20490 20539 20545 Yamakawa 20872 Zenith 20503 20591 20741 20869 Zeus 20784 Zoece 21265 Amp...

Страница 60: ... 30531 30670 31074 Oritron 31366 31497 Outlaw 30391 Panasonic 31308 31518 30309 30367 31288 31316 31548 31633 31763 31764 Philips 31189 31269 30189 30391 30891 31266 Pioneer 31023 30014 30150 30244 30531 30630 31384 Polaroid 31508 Polk Audio 30189 31289 31414 Proscan 31254 RadioShack 31609 RCA 31023 31609 31254 30531 31074 31390 31511 Realistic 31609 30121 30186 Regent 31437 Revox 30189 Rio 31869 ...

Страница 61: ...240 Bell Howell 20035 20048 20039 20000 20104 20046 20479 Broksonic 20184 20121 20209 20002 20208 20479 21479 Calix 20037 Candle 20037 20038 Canon 20035 Capehart 20002 20020 20062 Carrera 20240 Carver 20035 20081 CCE 20072 20278 Cineral 20278 Citizen 20035 20037 20240 20000 20209 20278 20479 21278 Classic 20037 Colortyme 20060 20035 20045 20278 Colt 20000 20072 Craig 20037 20047 20240 20072 VCR Co...

Страница 62: ...KEC 20037 20278 Kenwood 20067 20041 20038 20046 KLH 20072 Kodak 20035 20037 KTV 20000 LG 20037 20240 20038 21037 Linksys 21972 Lloyd s 20240 20000 20072 20038 20208 Loewe 20081 Logik 20240 20000 20072 Lumatron 20278 Luxor 20046 20106 LXI 20037 20000 20042 20067 M Electronic 20240 Magnasonic 20037 20240 20000 20072 20278 20020 20593 21278 Magnavox 20035 20037 20048 20039 20081 20240 20000 20149 205...

Страница 63: ...046 Quartz 20035 20047 20046 Quasar 20035 20162 20002 21035 21162 RadioShack 20035 20162 20037 20048 20047 20240 20000 20104 20046 20062 21037 21162 Radix 20037 Randex 20037 RCA 20060 20035 20048 20240 20045 20000 20042 20149 20105 20106 20202 20760 20807 20880 21035 21060 Realistic 20035 20162 20037 20048 20047 20240 20000 20104 20121 20278 20046 20062 21162 ReplayTV 20614 20616 Ricavision 21972 ...

Страница 64: ...08 TNIX 20037 Tocom 20240 Toshiba 20240 20045 20000 20042 20043 20209 20041 20062 20845 21008 21145 21972 21996 VCR Codes Tosonic 20278 Totevision 20037 20240 Touch 21972 Trix 20037 Ultra 20045 20278 20020 Unitech 20240 Vector 20045 Vector Research 20184 20038 Vextra 20072 Victor 20067 20041 20008 Video Concepts 20045 20061 Videomagic 20037 Videosonic 20240 20000 20072 Viewsonic 21972 Villain 2000...

Страница 65: ...eriously contaminated use a soft cloth moistened with diluted neutral cleaner to clean the display Wring water out of the cloth before cleaning to prevent water from penetrating into the housing Wipe the display with a dry cloth after cleaning Cleaning the Screen 1 Use a soft cloth to gently clean the screen 2 The screen is very fragile Do not scrape it with any sharp object Do not press or tap th...

Страница 66: ...se to a window If the screen is black Make sure the power button is ON VIZIO Logo glows white Press the INPUT button on the remote control to select a different input source Check the connections of external devices that may be connected to the HDTV Press the TV button on the top of the remote to return to the TV mode Power is ON but there is no image on the screen Make sure all cables attached to...

Страница 67: ...tenna the signal strength of the channel may be low Make sure your antenna is connected securely to the TV and move the antenna around the room or close to a window The display image does not cover the entire screen If you are in RGB mode Computer make sure that H Size and V Position in the On Screen Display OSD are set correctly If you are using TV AV1 AV2 or Component with 480i input press WIDE ...

Страница 68: ...serted Make sure that the file complies with the supported format bit rate and or profile Also check the file for damage Some files that comply with the supported format may not play back or display properly Slideshow doesn t start Make sure the viewer isn t in pause rotation or zoom mode Telephone Technical Support Products are often returned due to a technical problem rather than a defective pro...

Страница 69: ...in a particular installation If this equipment does cause harmful interference to radio or television reception which can be determined by turning the equipment off and on the user is encouraged to try to correct the interference by one or more of the following measures 1 Reorient or relocate the receiving antenna 2 Increase the separation between the equipment and receiver 3 Connect the equipment...

Страница 70: ...r ATSC QAM Signal Compatibility 480i SDTV 480P EDTV 720P HDTV 1080i HDTV 1080P FHDTV Channel skip add Video input naming capability Closed caption Parental control V Chip 2 0 Programmable Timer Freeze PIP POP VESA mount compatible SRS TSHD TruVolume ATSC Clear QAM tuner NTSC video decoding 3 2 or 2 2 reverse pull down Motion adaptive de interlace Progressive video scan via Component VGA HDMI FHDTV...

Страница 71: ... Product specifications may change without notice or obligation Note The Federal Communications Commission FCC the Consumer Electronics Association CEA and the Consumer Electronics Retailers Coalition CERC have made a new tip sheet available for digital television DTV retailers to reproduce and distribute to consumers on the sales floor The file may be downloaded online at www dtv gov While you re...

Страница 72: ... date of purchase VIZIO Technical Support is available from 6 00AM to 9 00PM Pacific Time Monday through Friday and 10 00AM to 2 00PM Pacific Time Saturday and Sunday Please note that holiday hours may vary For up to date information please visit www VIZIO com VIZIO reserves the right to assess all warranty claims and to determine if defects or damages are covered by this limited warranty In case ...

Страница 73: ...se see complete details online at www VIZIO com VIZIO Return Policy VIZIO s return policy allows for products purchased directly from VIZIO to be returned by the original purchaser during the initial thirty 30 day period following the date of purchase A VIZIO return authorization number must first be obtained as provided below The refund will be the purchase price actually paid by the purchaser le...

Страница 74: ...y unit may be within the terms and conditions of the VIZIO Limited Product Warranty and that a repair is not economically possible based on certain manufacturing defects in materials and or workmanship and or at VIZIO s option and sole discretion the customer will be provided with a return authorization number and replacement instructions Proof of purchase is required to confirm the product is wit...

Страница 75: ...12 Side Panel 12 Daylight Savings 45 DTV Transition 5 DVD Player Connecting 23 DVI Cable Box 20 DVD Player 23 Satellite Box 20 Fine Tuning the picture 37 GUIDE Button 39 HDMI 18 Horizontal Vertical Position adjustments 49 INFO Button 39 Inputs Antenna 4 Connectors 18 Installation services 9 Maintenance of TV 65 Media Port 29 Music Settings 32 Picture Settings 31 Video Settings 33 Naming Inputs 48 ...

Страница 76: ...rt 29 TV 70 Stereo Connecting 26 S Video 18 Technical Support 68 Time Zone 45 Time Zone 37 Tint 41 Troubleshooting 66 TV Menu 45 Auto Search adjustments 45 Partial Channel Search 45 Skip Channel 45 Tuner Mode adjustments 45 VCR Connecting 25 Viewing Modes 52 Volume 39 Wall mounting 10 Warranty 72 Warranty services 9 Watching TV Basic Adjustments 39 Basic connections 34 First Startup 34 Getting you...

Отзывы: