background image

English - 15

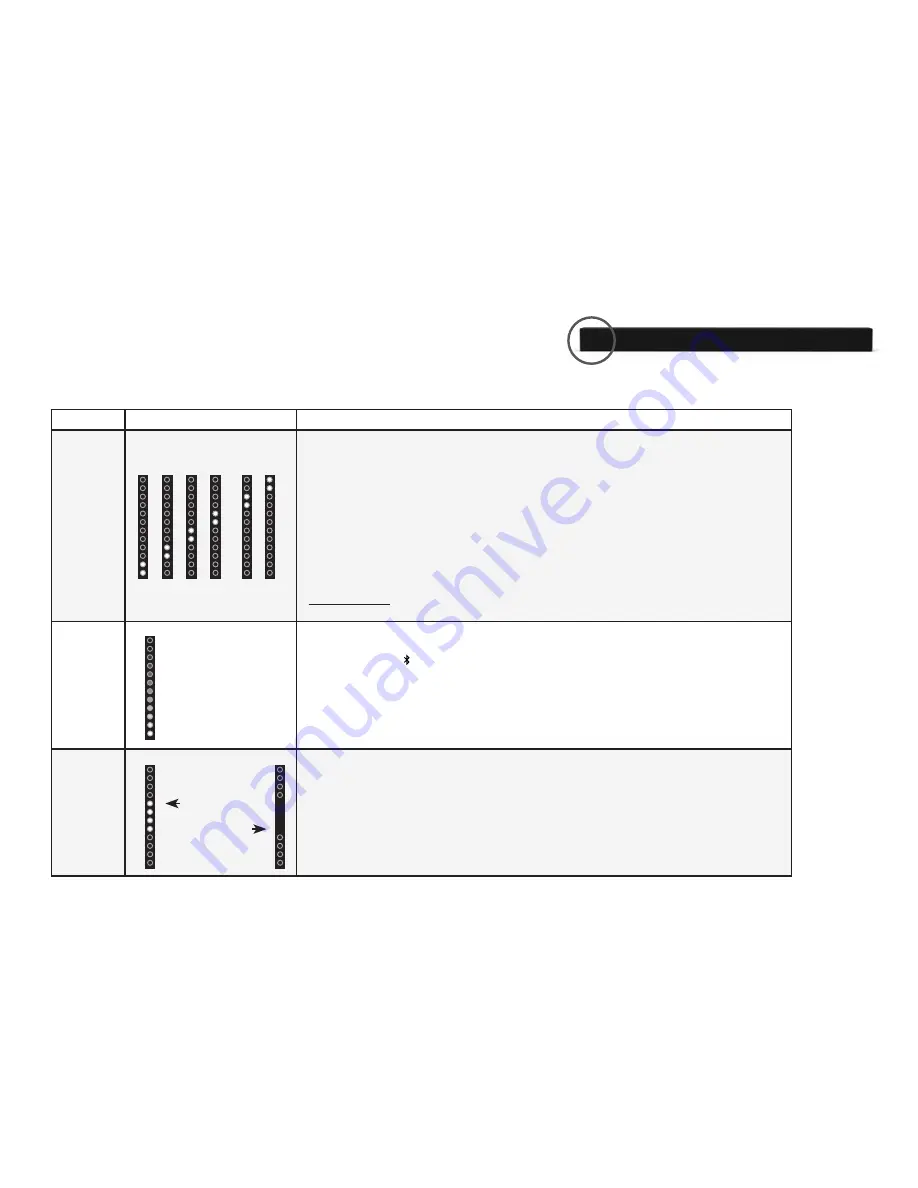
LED Indicators are located here.

Function

LED Behavior

Description

Input

Press the INPUT button on the remote to cycle through the available inputs:

•  Analog Audio In - AUX Stereo RCA (1)
•  Analog Audio In - AUX Stereo 3.5mm (2)
•  Coaxial In - Digital (3)
•  Digital Optical Audio In - Optical (4)
•  Bluetooth
•  USB In - USB (6)

Press and hold the INPUT button on the remote control for 3 seconds to enable the auto 

input detect function.

Bluetooth 

Pairing

Press and hold the   button on the remote. The Sound Bar will be discoverable for 15 minutes.  

You can now search for the Sound Bar (VIZIO SB2821) using your Bluetooth Device. The sound 

bar will power down if no device is found.

Note: Set your Bluetooth device into pairing mode prior to the Sound Bar.

DTS 

TruVolume  

On/Off

Press the 

TVOL button to enable/disable TruVolume. 

When enabled (On), TruVolume provides a consistent and comfortable volume level for a more 

enjoyable listening experience.

LED Indicators

(When searching for device)


Flash from the bottom 

to the top and back 

continuously.

TruVolume On

TruVolume Off

Analog Audio In - AUX (1)

Analog Audio In - AUX 

(2)

Coaxial In - Digital (3)

Digital Optical Audio In 


Optical (4)

Bluetooth

USB In - USB (6)

Содержание SB2821-D6

Страница 1: ...QUICK START GUIDE VIZIO Please read this guide before using the product SB2821 D6...

Страница 2: ...r before connecting other components to your Unit Unplug the power cord before cleaning your Unit A damp cloth is sufficient for cleaning Do not use a liquid or a spray cleaner on your Unit Do not use...

Страница 3: ...only with the same or specified type Do not leave the batteries exposed to direct sunlight for a long period of time with doors and windows closed Do not disassemble the batteries or dispose of it in...

Страница 4: ...7 Controls Connections 8 First Time Setup 10 LED Indicators 15 Bluetooth Pairing 17 Using Bluetooth Mode 18 Reconnecting the Subwoofer 19 Using Button Combinations 20 Wall Mounting the Sound Bar 21 He...

Страница 5: ...ol with 2 x AAA Batteries High Definition Sound Bar with Wireless Subwoofer 2 x Sound Bar Wall Mount Brackets Wall Mount Template 2 x Wall Mount Screws Size M4 x 10mm Digital Optical Cable Stereo RCA...

Страница 6: ...Press to skip to the next track Changes Subwoofer Treble and Bass levels 8 TruVolume Press to enable disable TruVolume 9 TruSurround HD Press to enable disable TruSurround HD 10 Mute Press to mute un...

Страница 7: ...ies included Be sure to align the and signs on the batteries and remote 3 Replace the battery cover When needed VIZIO recommends replacing the batteries that came with this remote with two new Duracel...

Страница 8: ...ions 1 Power Press to turn sound bar on or off 2 Input Press to change the audio source 3 Bluetooth Input Hold to pair See Bluetooth Pairing for more information 4 Volume Increase or decrease the loud...

Страница 9: ...English 9 1 DC IN Power Port 2 USB USB In 3 Optical Digital Optical Audio in 4 Digital Coaxial In 5 AUX Analog Audio In Stereo RCA 6 AUX Analog Audio In Stereo 3 5mm 1 2 3 4 5 6 Back of Sound Bar...

Страница 10: ...YOUR TV 2 Note Not all TVs have the audio outputs shown above To connect the Sound Bar directly to your other devices Blu Ray player game system etc see your device s user manual When using either of...

Страница 11: ...English 11 Connect the included power adapter to the Sound Bar DC IN as shown Plug the power adapter into an electrical outlet 3...

Страница 12: ...English 12 Connect the power cable to the Subwoofer AC IN as shown Plug the power cable into an electrical outlet Flip the Power Switch into the On position 4...

Страница 13: ...centered below the TV Subwoofer For the best surround sound experience position the Sound Bar as shown The Sound Bar should be close to ear level The Subwoofer should be placed in a corner of the room...

Страница 14: ...ress the INPUT button to switch between audio sources For example if you connected your TV to Input 1 set the Sound Bar to Input 1 Tip Pressing the INPUT button will stop the auto detect function Auto...

Страница 15: ...d Bar will be discoverable for 15 minutes You can now search for the Sound Bar VIZIO SB2821 using your Bluetooth Device The sound bar will power down if no device is found Note Set your Bluetooth devi...

Страница 16: ...bottom with decreasing levels Bass Levels Press the BASS button then press the Next Previous button to increase decrease the bass level The LED indicators will move to the top with increasing levels a...

Страница 17: ...dicators on the Display Panel on the front of the Sound Bar will light sequentially from bottom to top and back again Once the device is paired the LED Indicators will stop flashing 2 You can now sear...

Страница 18: ...compared to a wired connection Try the following if your sound quality is less than optimal If you hear any break up or disconnect while streaming music from your device move the source device closer...

Страница 19: ...the ON position Press and hold the Pairing button on the back of the Subwoofer for 5 seconds The LED on the back of the Subwoofer will begin to blink 2 Press and hold the Power button on the top of t...

Страница 20: ...o power on and adjust the volume of the sound bar To enable disable this function Press and Hold the Power and Volume Up buttons for 5 seconds Note This function is enabled by default Energy Star When...

Страница 21: ...Insert the two wall mount screws into the wall mount screw holes and then tighten them with a Phillips screwdriver 1 2 Place the included wall mounting template against the wall under your TV Mark the...

Страница 22: ...the brack ets to the wall are not included Choose the screw type and length appropriate to your home s construction If in doubt consult a professional installer 21 87 in 55 55 cm Wall Mount Screw Scr...

Страница 23: ...TRATION Why register Customized Support Get assistance quickly with your information on hand News and Offers Take advantage of the latest news and special offers from VIZIO Safety and Satisfaction Sta...

Страница 24: ...9 am to 6 pm CST Phone 877 698 4946 toll free You can also contact our popular support team at Live chat support available Find help with New product setup Connecting your devices Technical problems P...

Страница 25: ...an unsupported format is present Set the source to output PCM Your TV may be set to variable audio output Confirm that the audio output setting is set to FIXED or STANDARD not VARIABLE Consult your TV...

Страница 26: ...ention of non VIZIO products is for informational purposes only Warning To reduce risk of electric shock fire or damage to your device or other property do not attempt to power the device with a volta...

Страница 27: ...ipment 2 Shielded interface cables and AC power cord if any must be used in order to comply with the emission limits 3 The manufacturer is not responsible for any radio or TV interference caused by un...

Страница 28: ...al Support will provide instructions for packing and shipping the product to the VIZIO service center ALL USER DATA AND DOWNLOADED APPLICATIONS STORED ON A PRODUCT WILL BE DELETED IN THE COURSE OF SOM...

Страница 29: ...T OF ALL PARTIES TO ANY SUCH ARBITRATION OR PROCEEDING Exceptions to Binding Arbitration Agreement and Class Action Waiver IF YOU DO NOT WISH TO BE BOUND BY THE BINDING ARBITRATION AGREEMENT AND CLASS...

Страница 30: ...HOME AND ALL SHIP IN WARRANTY SERVICE If this occurs your product will be restored to its original state You will be responsible for restoring all applicable user data and downloaded applications Reco...

Страница 31: ...will be severed from this warranty and all other terms will remain in effect This warranty applies to the maximum extent not prohibited by law Changes to Warranty This warranty may change without noti...

Страница 32: ...2016 VIZIO INC ALL RIGHTS RESERVED 160804OC US NC...

Отзывы: