14
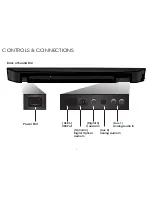
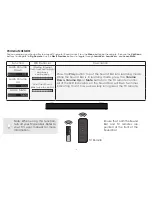
LED Indicators are located here:
ADJUSTING SOUND BAR SETTINGS
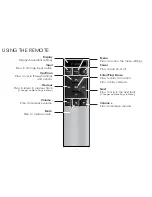
Press the
Menu
button and use the
Up/Down Arrow
buttons on the remote to access the different functions and acoustic settings
of the Sound Bar. Each function and setting will be displayed on the remote control’s LCD display. The LED Indicators will behave
differently with each function.
Function
LED Behavior
Description
Bluetooth Pairing
(When searching for device)
Flash from Left to Right
and back continuously.
Press the
Enter
button on the remote. The Sound Bar will be discoverable for
15 minutes. You can now search for the Sound Bar (VIZIO S4221w) using your
Bluetooth Device. The sound bar will power down if no device is found.
Note:
Set your Bluetooth device into pairing mode prior to the Sound Bar.
Bass Levels
Two center LEDs
indicate Bass level 0.
Press the
Next/Previous
button to increase/decrease the bass level. The LED
indicators will move to the right with increasing levels and to the left with
decreasing levels.
Treble Levels
Two center LEDs
indicate Treble level 0.
Press the
Next/Previous
button to increase/decrease the treble level. The
LED indicators will move to the right with increasing levels and to the left with
decreasing levels.
Dialog Levels
Two center LEDs
indicate dialog is
centered.
Press the
Next/Previous
button to increase/decrease the presence of dialog
in the virtual center channel. The LED indicators will move to the right when
the dialog presence is increased and to the left when the dialog presence is
decreased.
Surround Levels
Two center LEDs
indicate surround is
centered.
Press the
Next/Previous
button to increase/decrease the virtual surround sound
level. The LED indicators will move to the right with increasing levels and to the
left with decreasing levels.
Note:
DTS TruSurround must be
On
to adjust the surround level.
BT Pair
Bass
Treble
Dialog
Surround
Содержание S4221w-C4
Страница 1: ...QUICK START GUIDE Model S4221w C4 VIZIO ...
Страница 7: ...7 Back of Subwoofer Pairing Button LED Indicator Power Switch Power Port ...
Страница 9: ...9 2 3 Connect a Power Cable to the Sound Bar Plug the Power Cable into a Power Outlet ...
Страница 32: ... 2013 VIZIO INC ALL RIGHTS RESERVED 130430OC A ...


