background image

VIZIO M260MV User Manual 

36 

www.VIZIO.com


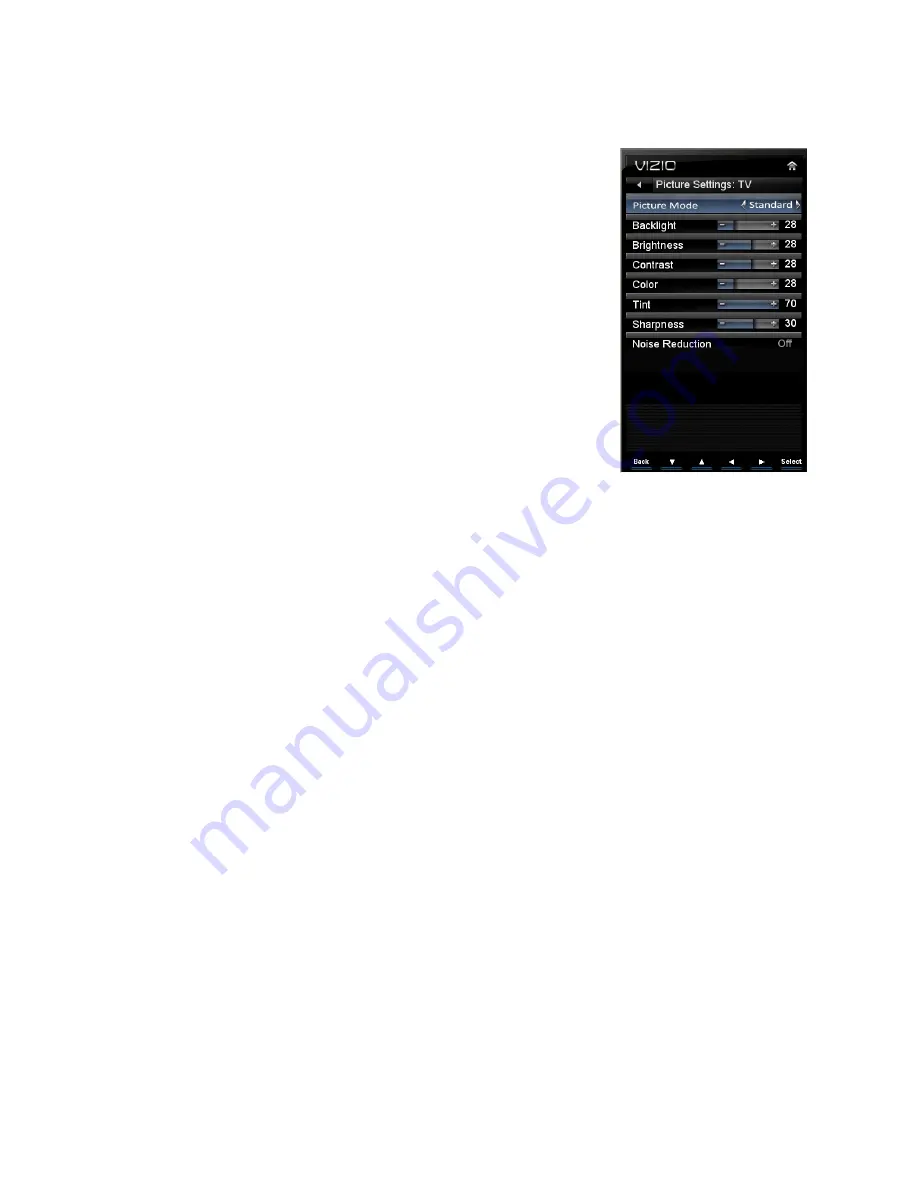
Picture Settings Menu  

Picture Mode  

Choose from 

Standard, Movie, Game, Vivid, 

or

 Custom

. Each input (i.e. 

HDMI, COMP, etc) remembers the custom setting you created. Select 

Custom

 to manually adjust 

Backlight, Brightness, Contrast, Color, Tint, 

Sharpness

, and to access the 

More

 menu where further adjustments can 

be made. 

Backlight 

Adjust the LED brightness to affect the overall brilliance of the picture not 
the Brightness (black level) or Contrast (white level) of the picture. 

Note: 

Backlight is only available when

 Picture Mode

 is set to 

Custom

Brightness 

Adjust black levels in the picture. If the brightness is too low you will not be 
able to see the detail in darker parts of the picture and if the brightness is 
too high the picture will look washed out. 

Note: 

Brightness is only available when

 Picture Mode

 is set to 

Custom

Contrast 

Adjust the white levels in the picture. If the contrast is too low the picture will look washed out and 
if the contrast is too high you will not be able to see any detail in the bright parts of a picture. 

Note: 

Contrast is only available when

 Picture Mode

 is set to 

Custom

Color 

Adjust the amount of color in the picture. 

Note: 

Color is only available when

 Picture Mode

 is set to 

Custom

Tint 

Adjust the hue of the picture. The easiest way to set tint is to look at flesh tones and adjust for a 
realistic appearance. In most cases, the default middle position is correct. If people’s faces look 
too orange try reducing the level of color first. 

Note: 

Tint is only available when

 Picture Mode

 is set to 

Custom

Sharpness 

Adjust the sharpness of the edges of elements in the picture. It does not produce detail that 
otherwise does not exist. This adjustment is helpful when viewing Standard Definition sources. 

Note: 

Sharpness is only available when

 Picture Mode

 is set to 

Custom

Noise Reduction 

This feature diminishes picture artifacts caused by the digitizing of image motion content that may 
be present in the picture. Choose from 

Off, Low, Medium, 

or

 High

Содержание M260MV

Страница 1: ...al number located on the back of your HDTV for easy reference when obtaining warranty support Serial _____________________ Purchase Date _____________________ VIZIO is a registered trademark of VIZIO Inc dba V Inc HDMI logo and High Definition Multimedia Interface are registered trademarks of HDMI Licensing LLC Manufactured under license from Dolby Laboratories Dolby and the double D symbol are tr...

Страница 2: ...ure may cause fire or electric shock Slots and openings in the back and bottom of the cabinet are provided for ventilation To ensure reliable operation of your HDTV and to protect it from overheating be sure these openings are not blocked or covered Do not place your HDTV in a bookcase or cabinet unless proper ventilation is provided Never push any object into the slots and openings on your HDTV c...

Страница 3: ... apparent unplug the power cord and contact your dealer immediately Do not try to repair your HDTV yourself Avoid using dropped or damaged appliances If your HDTV is dropped and the housing is damaged the internal components may function abnormally Unplug the power cord immediately and contact your dealer for repair Continued use of your HDTV may cause fire or electric shock Do not install your HD...

Страница 4: ... cable is intended to be connected to earth in the building installation Advisory of the DTV Transition The nationwide switch to digital television broadcasting will be complete on June 12 2009 but your local television stations may switch sooner After the switch analog only television sets that receive TV programming through an antenna will need a converter box to continue to receive over the air...

Страница 5: ...5 Viewing Digital TV Program Information 16 INFO Button 16 CHAPTER 6 CONNECTING EQUIPMENT 17 Which Video Connection Should I Use 17 Using HDMI Best 18 HDMI Connections for Cable or Satellite Boxes with DVI 18 Using Component Video Better 19 Using S Video Better 19 Using Composite Video Compatible 20 Using Coaxial Antenna Compatible 20 Connecting Your DVD Player 21 Using HDMI Best 21 HDMI Connectio...

Страница 6: ...re Settings Menu 36 Picture Mode 36 Backlight 36 Brightness 36 Contrast 36 Color 36 Tint 36 Sharpness 36 Noise Reduction 36 More 37 Photo Menu 37 Start Slideshow 37 Browse Photos 38 Sort By 38 View 38 Picture Mode 38 Slide Settings 38 Exit 38 Slide Size 38 Help Menu 38 System Info 38 Reset All Settings 38 CHAPTER 9 MAINTENANCE AND TROUBLESHOOTING 39 Cleaning the TV and Remote Control 39 Troublesho...

Страница 7: ...b screw VIZIO remote control VR9 AAA batteries for the remote control 2 AC power cord This user manual Cleaning cloth Quick Setup Guide Registration Card HDTV Accessories and Services Additional certified accessories for your HDTV are sold separately including Wall mounts High Definition cables Extra or replacement remote controls Sound Bars Blu ray DVD Players VIZIO also offers installation servi...

Страница 8: ... logo at the bottom to prevent poor ventilation and excessive component damage If you want to mount your HDTV on the wall see below for additional information Read this user manual carefully before installing your HDTV VIZIO offers professional installation services including home networking Contact VIZIO for more information on these services at 877 MYVIZIO 877 698 4946 or www VIZIO com Attaching...

Страница 9: ...lace your HDTV face down on a soft flat surface to prevent damage to the screen c Flip the base 90 degrees In this manner the stand neck will be out of view after the base is removed d Loosen the wing screw and remove the stand base 3 Mount your HDTV on the wall a Attach your HDTV to a wall mount sold separately using the mounting holes in the back panel of your HDTV see illustration at the right ...

Страница 10: ...ress to launch the on screen menu If a sub menu is active this button will proceed to the next level 3 CH Press to change the channels up or down While the menu is active these buttons function as up and down controls 4 VOL Press to increase or decrease the speaker volume While the menu is active these buttons function as left and right controls 5 INPUT SELECT Press to cycle through the various de...

Страница 11: ...omputer here Connect a 1 8 mini plug stereo connector from the computer to the TV if you want the sound to come from the HDTV speakers 6 USB PORT Insert a FAT FAT32 formatted USB drive to view pictures This port is also used for service 7 DTV TV Connect to an antenna or digital cable source For digital TV stations in your area visit www antennaweb org For Cable and Satellite Set Top boxes we recom...

Страница 12: ...l Range Point the remote control directly at this sensor for the best response to the remote signal Do not place any obstacles between the remote control and the remote control sensor The effective range of the remote control is approximately 22 feet 7 meters from the front of the remote control sensor 30 to the left and right 20 up and down VIZIO Remote Control Precautions The remote control shou...

Страница 13: ...to go to the previous level or out of the On Screen Menu completely Number Button Pad Press to select a channel or enter a password INPUT Press to cycle through the various devices connected to your TV called Inputs The inputs cycle in the following sequence TV AV Composite COMP Component HDMI 1 HDMI 2 and RGB VGA After you have stepped through the entire sequence you will return to the beginning ...

Страница 14: ...r HDTV and then plug into a wall outlet 3 Connect your devices to your HDTV see Chapter 2 for detailed steps 4 Turn on your TV The Setup App will automatically play and guide your thru the initial setup of your HDTV Use the Arrow and OK buttons to navigate through the setup App During the setup process you will Choose your Menu language Set the TV to Home Mode for the best picture and most efficie...

Страница 15: ...e you start watching TV make sure that any cable satellite or off air antenna connections are secure Also verify that the power adapter is plugged into a correctly grounded electrical outlet or surge protector 1 Press the power button on the remote control The VIZIO logo on the front will light up white 2 Select the input to which your device is connected that provides TV programming i e TV HDMI C...

Страница 16: ...g Digital TV Program Information INFO Button When the channel is changed or when you press the INFO button an information header is shown over the picture for a few seconds Each press of the INFO button will display more information about the program ...

Страница 17: ...ou can use the TV as your monitor Better analog Component consists of three cables for transmitting video and two cables for transmitting audio one red and one white Component video provides a sharper image than Composite video and should be used instead of composite when possible However because it is still an analog connection it won t provide the high quality video and audio that HDMI can produ...

Страница 18: ...HDTV supports High bandwidth Digital Content Protection HDCP HDCP encrypts the transmission between the video source and the digital display for added security and protection Refer to your Cable Satellite Set Top Box user manual for more information about the video output requirements of the product or consult your cable or satellite operator HDMI Connections for Cable or Satellite Boxes with DVI ...

Страница 19: ...TV and Cable Satellite Box 5 Select Comp using the INPUT button on the remote control or directly by pressing the COMP button on the remote control Using S Video Better 1 Turn off your HDTV and Cable Satellite Box 2 Connect the S VIDEO cable from your Cable Satellite Box to the S VIDEO jack on your HDTV 3 Connect the audio cables white and red on your Cable Satellite Box to the corresponding L and...

Страница 20: ... Cable Satellite Box 5 Select AV using the INPUT button on the remote control or directly by pressing the AV button on the remote control Using Coaxial Antenna Compatible 1 Turn off the power to your HDTV 2 Connect the coaxial RF connector from your Cable Set Top Box or Satellite Set Top Box to the DTV TV connector on your HDTV 3 Turn on the power to your HDTV 4 Select TV using the INPUT button on...

Страница 21: ...tly by pressing the HDMI button on the remote control Note The HDMI input on your HDTV supports High bandwidth Digital Content Protection HDCP HDCP encrypts the transmission between the video source and the digital display for added security and protection Refer to your DVD player user manual for more information about the video output requirements HDMI Connections for DVD Players with DVI 1 Turn ...

Страница 22: ...TV and DVD player 5 Select Comp using the INPUT button on the remote control or directly by pressing the COMP button on the remote control Using S Video Better 1 Turn off the power to your HDTV and DVD player 2 Connect the S VIDEO cable from your DVD player to the S VIDEO jack on your HDTV 3 Connect the audio cables white and red on your DVD player to the corresponding L and R AUDIO jacks on your ...

Страница 23: ...VD Player 5 Select AV using the INPUT button on the remote control or directly by pressing the AV button on the remote control Connecting Coaxial RF Using Your Antenna or Digital Cable for Standard TV or Digital TV 1 Turn off the power to your HDTV 2 Connect the coaxial RF connector from your antenna or cable to the DTV TV connector on your HDTV 3 Turn on the power to your HDTV 4 Select TV using t...

Страница 24: ...sing the INPUT button on the remote control or directly by pressing the AV button on the remote control Note Refer to your VCR or Video Camera user manual for more information about the video output requirements of the product Using AV 1 Turn off the power to your HDTV and VCR or Video Camera 2 Connect the yellow AV cable from your VCR or video camera to the AV jack on your HDTV 3 Connect the audi...

Страница 25: ... Theater to optical See your Home Theater user manual for more information Connecting a Computer 1 Set computer to a resolution supported by your HDTV If your computer supports it we recommend 1920 x 1080 See Preset PC Resolutions 2 Turn off the power to your HDTV and Computer 3 Connect the VGA cable from your computer to the RGB PC jack on your HDTV 4 Connect the 1 8 inch audio cable from your co...

Страница 26: ... files found on your USB device 3 Select Start Slideshow or Browse Photos a In Slideshow Mode the pictures found automatically play i Press Left or Right Navigation buttons to manually go to the next or previous picture ii Press OK to open the Modify Photo menu There you can zoom in and out pan the photo left right up down rotate the photo see information about the photo or remove it from the slid...

Страница 27: ...nus for example the TV Rating submenu for Parental Controls 1 Press the OK button on the remote control The HDTV Settings App opens 2 Use the navigation keys around the OK button to select one of the menu options 3 Press OK to select the option or feature you want to adjust 4 After the menu option is displayed press Up or Down Navigation buttons to select one of the items to adjust 5 Press OK to s...

Страница 28: ...tire picture Recommended for HDMI and RGB Computer viewing so you can see the complete picture without the image overstretching beyond the viewing area If you experience noise along the border switch to Zoom 1 For 720p 1080i 1080p only Stretch Mode When watching a widescreen program 1 78 1 source with black bars on the sides the display image will stretch to fill the TV screen People will appear w...

Страница 29: ...C Style feature is available when watching digital TV Select either As Broadcaster or Custom If Custom is selected then you can customize the way Closed Caption is displayed The options available are Caption Style custom or as broadcast Note the following options will only be available if Caption Style is set to Custom Text Size letter size Color text color Opacity color of the background where Cl...

Страница 30: ...n of each setting Audio The Audio menu allows you to adjust the same settings as the Audio Settings menu option on the main menu See Audio Settings Menu below for a detailed explanation of each setting Tuner Note The tuner option can only be selected when your HDTV is in TV input mode Tuner Mode Select Cable or Antenna depending upon which you have attached to the DTV TV Input Auto Channel Search ...

Страница 31: ...n can only be selected when you are in the VGA input mode Auto Adjust The TV will automatically position and tune the display for optimum performance Horiz Position Adjust the horizontal left right position of the image Vertical Position Adjust the vertical up down position of the image Fine Tune Fine tunes the image for crisp content over the entire display area Name Input This feature makes it e...

Страница 32: ...assword has been entered and accepted by the TV To select the options in the Parental sub menu press OK and then create and or enter a password Note The Parental menu does not appear when the input mode is set to HDMI or VGA A new menu will be displayed showing the following Parental settings Rating Enable Select from ON or OFF If set to OFF you will not be able to set the US TV US Movie Canadian ...

Страница 33: ...s or older G General Programming suitable for all audiences PG Parental guidance 14 Viewers 14 years or older 18 Adult programming CAN French Note When Rating Enable is OFF Canadian French Rating adjustments are not available Press the OK button to block locked or allow unlocked channels by the following Canadian French ratings G General audience 8 ans General not recommended for young children 13...

Страница 34: ...e Setting the correct Time Zone for your area will ensure that the correct time is shown after pressing the INFO button on the remote control Daylight Saving Setting the daylight saving time for your area will ensure that the correct time is shown after pressing the INFO button on the remote control Today s Date Manually set the date when Auto Update is set to OFF Current Time Manually set the tim...

Страница 35: ...S TruSurround HD is set to Off Balance Adjust the sound to the left or the right TV Speakers Turn the internal speakers On or Off You may want to turn the internal speakers off when listening to the audio through your Home Theater System Optical Audio Out This option allows selection of the type of processing for the S PDIF Optical connector when used with a Home Theater system Select to choose fr...

Страница 36: ...If the contrast is too low the picture will look washed out and if the contrast is too high you will not be able to see any detail in the bright parts of a picture Note Contrast is only available when Picture Mode is set to Custom Color Adjust the amount of color in the picture Note Color is only available when Picture Mode is set to Custom Tint Adjust the hue of the picture The easiest way to set...

Страница 37: ...will result in a higher Average Picture Level APL and the overall picture will look too light This feature will lower the APL to counteract this effect Choose from Off or On DCR Set this feature for Dynamic Contrast Ratio to improve the black level performance and increase contrast ratio Choose from Off or On Reset Picture Mode Return all Picture settings to factory default A screen will come up t...

Страница 38: ...Photos to browse and select a specific folder to view the contents of the folders Picture Mode Choose from Home Movie Game or Custom to vary the screen color lighting when viewing your photos Slide Settings Choose Repeat On or Off Shuffle On or Off Full Screen On or Off or Speed Slow or Fast Exit Exit the Photo menu Slide Size Set the size of the thumbnails Press Left or Right Navigation buttons t...

Страница 39: ...ing solution which can be purchased at any major retailer 3 Wring liquid out of the cloth before cleaning to prevent water from penetrating into the housing 4 Wipe the TV and remote control with a dry cloth after cleaning Important Do not use volatile solvent such as toluene rosin and alcohol Such chemicals may damage the housing screen glass and remote control and cause labeling to peel The scree...

Страница 40: ...an antenna the signal strength of the channel may be low Make sure your antenna is connected securely to the TV and move the antenna around the room or close to a window If the screen is black Make sure the power button is ON VIZIO Logo glows white Press the INPUT button on the remote control to select a different input source Check the connections of external devices that may be connected to your...

Страница 41: ...normal patterns Check the connections of external devices that may be connected to your HDTV Make sure the specifications of external devices meet the specifications of your HDTV i e resolution If you are using an antenna the signal strength of the channel may be low Make sure your antenna is connected securely to the TV and move the antenna around the room or close to a window The display image d...

Страница 42: ...omponent followed by Composite Due to variances in broadcast practices it is possible some image distortions can occur Tips for Letterbox Content Users Some Letterboxed or Widescreen versions of DVD movies are formatted for standard 4 3 Televisions Your HDTV has the ability to expand this content so the entire screen is filled at the expense of image accuracy Media Viewer Problems Solution USB dev...

Страница 43: ...eriod contact our Support Department at the number below Customer support and quality service are integral parts of VIZIO s commitment to service excellence For technical assistance contact our VIZIO Technical Support Department via email or phone Email techsupport VIZIO com 877 698 4946 Fax 949 585 9563 Hours of operation Monday Friday 6 am to 9 pm Saturday Sunday 8 am to 4 pm Have your VIZIO mod...

Страница 44: ...ular installation If this equipment does cause harmful interference to radio or television reception which can be determined by turning the equipment off and on the user is encouraged to try to correct the interference by one or more of the following measures 1 Reorient or relocate the receiving antenna 2 Increase the separation between the equipment and receiver 3 Connect the equipment into an ou...

Страница 45: ...1080P FHDTV Channel Skip Add VIDEO INPUT Naming Capabilitity Closed Caption Parental Control V CHIP 2 0 Programmable Timer SRS TSHD SRS TruVolume Noise Reduction MTS Stereo Decoder Dolby Digital for ATSC QAM Multimedia JPG only Speakers 2xBuilt in 5W Speakers Panel Life 30 000 hours to half the original brightness Power Input IEC Connector for direct power line connection Voltage Range 100 240Vac ...

Страница 46: ... 31 5 3 640 x 480 75Hz 37 5 75 31 5 4 800 x 600 56Hz 35 156 56 25 36 5 800 x 600 60Hz 37 897 60 317 40 6 800 x 600 72Hz 48 077 72 188 50 7 800 x 600 75Hz 46 875 75 49 5 8 1024 x 768 60Hz 48 363 60 004 65 9 1024 x 768 70Hz 56 476 70 069 75 10 1024 x 768 75Hz 60 023 75 026 78 75 11 1152 x 864 75Hz 67 5 75 108 12 1280 x 1024 60Hz 63 981 60 02 108 13 1280 x 1024 75Hz 79 976 75 025 135 14 1360 x 768 60...

Страница 47: ...d workmanship Items not covered include but are not limited to cosmetic damage normal wear and tear misuse signal issues power surges and damages from shipping acts of God any sort of customer misuse installation customer modifications adjustments and set up issues Units with unreadable or removed serial numbers image burn in and routine maintenance are not covered This warranty does not cover pro...

Страница 48: ...Box 18 DVD Player 21 Satellite Box 18 Dynamic Contrast Ratio 37 Getting Started 14 Grounding 4 HDMI 17 Help Menu Reset All Settings 38 Setup Wizard 38 System Info 38 Help Menu 38 Home Theater Connecting 25 INFO Button 16 Input Source Choosing 15 Inputs Antenna 4 Connectors 17 Maintenance of TV 39 Menu Language 34 Name Input 31 Parental Controls Block Unrated TV 33 Canadian English Rating 33 Canadi...

Страница 49: ...ner Mode 30 TV Menu 27 TV Settings App 27 CC Menu 29 Input Menu 27 Sleep Timer Menu 29 TV Settings Menu 30 Wide Menu 28 TV Settings Menu Input Source Menu 30 Menu Language 34 Name Input 31 Parental Controls Menu 32 PC Settings Menu 31 Time Local Settings 34 Tuner Menu 30 TV Stand Attaching 8 VCR Connecting 24 Video Camera Connecting 24 Viewing Photos 26 Wall mounting 9 Watching TV Getting your Pro...

Отзывы: