background image

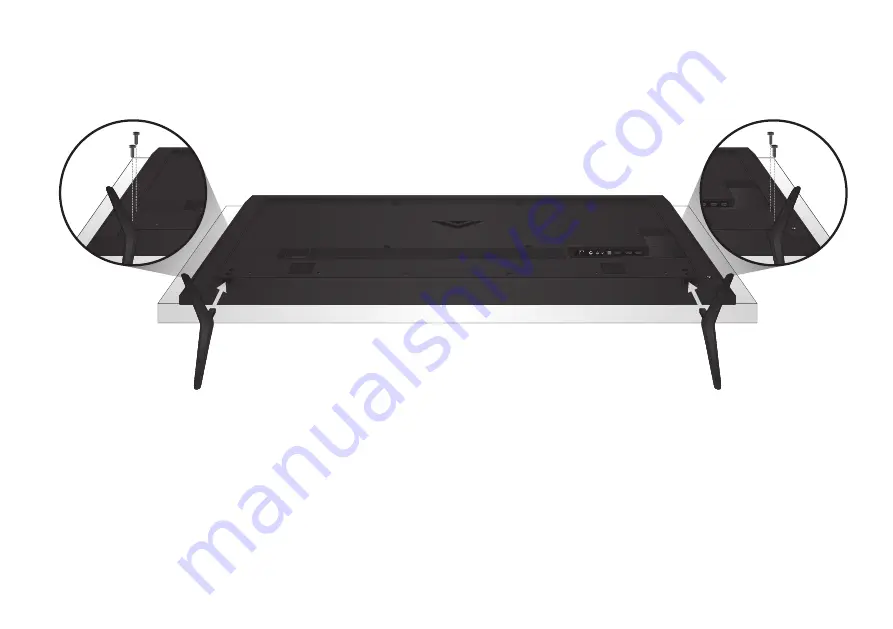
Insert stands into the base of the TV. (The stands are identical.)

Secure each stand to the TV with two (2) Phillips screws (included). Insert the screws into the back of the 

TV and tighten them using a Phillips screwdriver.

When you are finished, place the TV on a stable, level surface.

2

Содержание E65-C3

Страница 1: ...QUICK START GUIDE Models E65 C3 and E70 C3 VIZIO...

Страница 2: ...the manufacturer s instructions Do not install near any heat sources such as radiators heat registers stoves or other apparatus including amplifiers that produce heat Do not defeat the safety purpose...

Страница 3: ...of the grounding electrode TELEVISION ANTENNA CONNECTION PROTECTION Ground Clamp Antenna Lead In Wire Antenna Discharge Unit NEC Section 810 20 Grounding Conductors NEC Section 810 21 Ground Clamps P...

Страница 4: ...ER YOUR VIZIO PRODUCT NOW Customized Support Get assistance quickly with your information on hand News and Offers Take advantage of the latest news and special offers from VIZIO Safety and Satisfactio...

Страница 5: ...ems Product updates and more SUPPORT VIZIO COM You can also contact our award winning support team at Hours of Operation Monday Friday 7 am to 11 pm CST Saturday Sunday 9 am to 6 pm CST Live chat supp...

Страница 6: ...PACKAGE CONTENTS This Quick Start Guide Remote Control with Batteries VIZIO LED HDTV Power Cable E70 C3 4 x 18 mm M5 Phillips Screws E65 C3 4 x 14 mm M5 Phillips Screws TV Stands two identical stands...

Страница 7: ...e info window MENU Display the on screen menu PIC Opens the picture mode menu CHANNEL UP DOWN Change the channel GUIDE Display the info window LAST Return to the channel last viewed WIDE Change the di...

Страница 8: ...hat two people take part in the stand installation Remove the plastic wrap from the TV and stands Place the TV screen down on a clean flat surface To prevent scratches or damage to the screen place th...

Страница 9: ...he stands are identical Secure each stand to the TV with two 2 Phillips screws included Insert the screws into the back of the TV and tighten them using a Phillips screwdriver When you are finished pl...

Страница 10: ...w Red White Red Blue Connect all of your devices first Choose ONE connection type for each device Note The image shown here is for illustrative purposes only and may be subject to change The actual nu...

Страница 11: ...IDEO 480i STEREO AUDIO BEST HDMI CABLE DIGITAL HD VIDEO 1080p HD AUDIO BETTER COMPONENT CABLE ANALOG HD VIDEO 1080p STEREO AUDIO Match colored connectors to colored ports BETTER COAXIAL CABLE ANALOG H...

Страница 12: ...liding away from the remote Insert the included batteries Gently slide the battery cover back into place 3 Connect the power cord to the back of the TV The flat edge of the connector goes toward the o...

Страница 13: ...cable from your modem router to the back of the TV as shown For the best Smart TV experience VIZIO recommends using an Ethernet cable However your TV also has built in Wi Fi See the Connecting to the...

Страница 14: ...V SETTINGS menu MENU Button 2 Highlight User Manual and press OK Help VIZIO Network Sleep Timer Input CC ABC Audio Wide Normal Picture Settings Panoramic Wide Zoom 2D 3D Exit TV SETTINGS Picture Audio...

Страница 15: ...s Installing the TV Controls and Connections Connecting your Devices Completing the First Time Setup Using the On Screen Menu USE YOUR REMOTE Previous Page Next Page Menu Open TV Menu PAGE NUMBER 1 OF...

Страница 16: ...ess OK The Guided Setup menu is displayed Highlight Network Setup and press OK The Network Setup guide is displayed For streaming video your Internet connection speed should be 1 5 Mbps or higher If y...

Страница 17: ...on screen keyboard enter your network s password then highlight Connect and press OK If you are having trouble connecting to your network check your router placement Walls and large metal objects can...

Страница 18: ...er and news information and more all on demand A high speed Internet connection is required to receive product updates and to access online content Press the V Button to display the V I A Plus App Doc...

Страница 19: ...twice to launch the fullscreen V I A Plus Apps window My Apps Features the apps installed on your TV Installed Apps The Apps displayed here are also available in the V I A Plus App Dock App Tabs Brow...

Страница 20: ...s add black bars to the picture Set the TV to Wide or Zoom mode Press the WIDE button highlight Wide or Zoom and press OK Adjust the video settings of your external device There is no power Be sure th...

Страница 21: ...OR THE EXCLUSION OF INCIDENTAL OR CONSEQUENTIAL DAMAGES SO THE ABOVE LIMITATIONS OR EXCLUSIONS MAY NOT APPLY TO YOU THIS WARRANTY GIVES YOU SPECIFIC LEGAL RIGHTS AND YOU MAY ALSO HAVE OTHER RIGHTS WHI...

Страница 22: ...RRANTY on select new product purchases To determine if this guarantee applies to your product refer to the DETAILS tab of the model s product information page www vizio ca or look for the zero bright...

Страница 23: ...EGLIGENCE ALLEGED DAMAGE OR DEFECTIVE GOODS WHETHER SUCH DEFECTS ARE DISCOVERABLE OR LATENT SHALL IN NO EVENT EXCEED THE PURCHASE PRICE OF THE PRODUCT VIZIO Sales Marketing M xico S de R L de C V SHAL...

Страница 24: ...2015 VIZIO INC ALL RIGHTS RESERVED 141217EM US NC...

Отзывы: