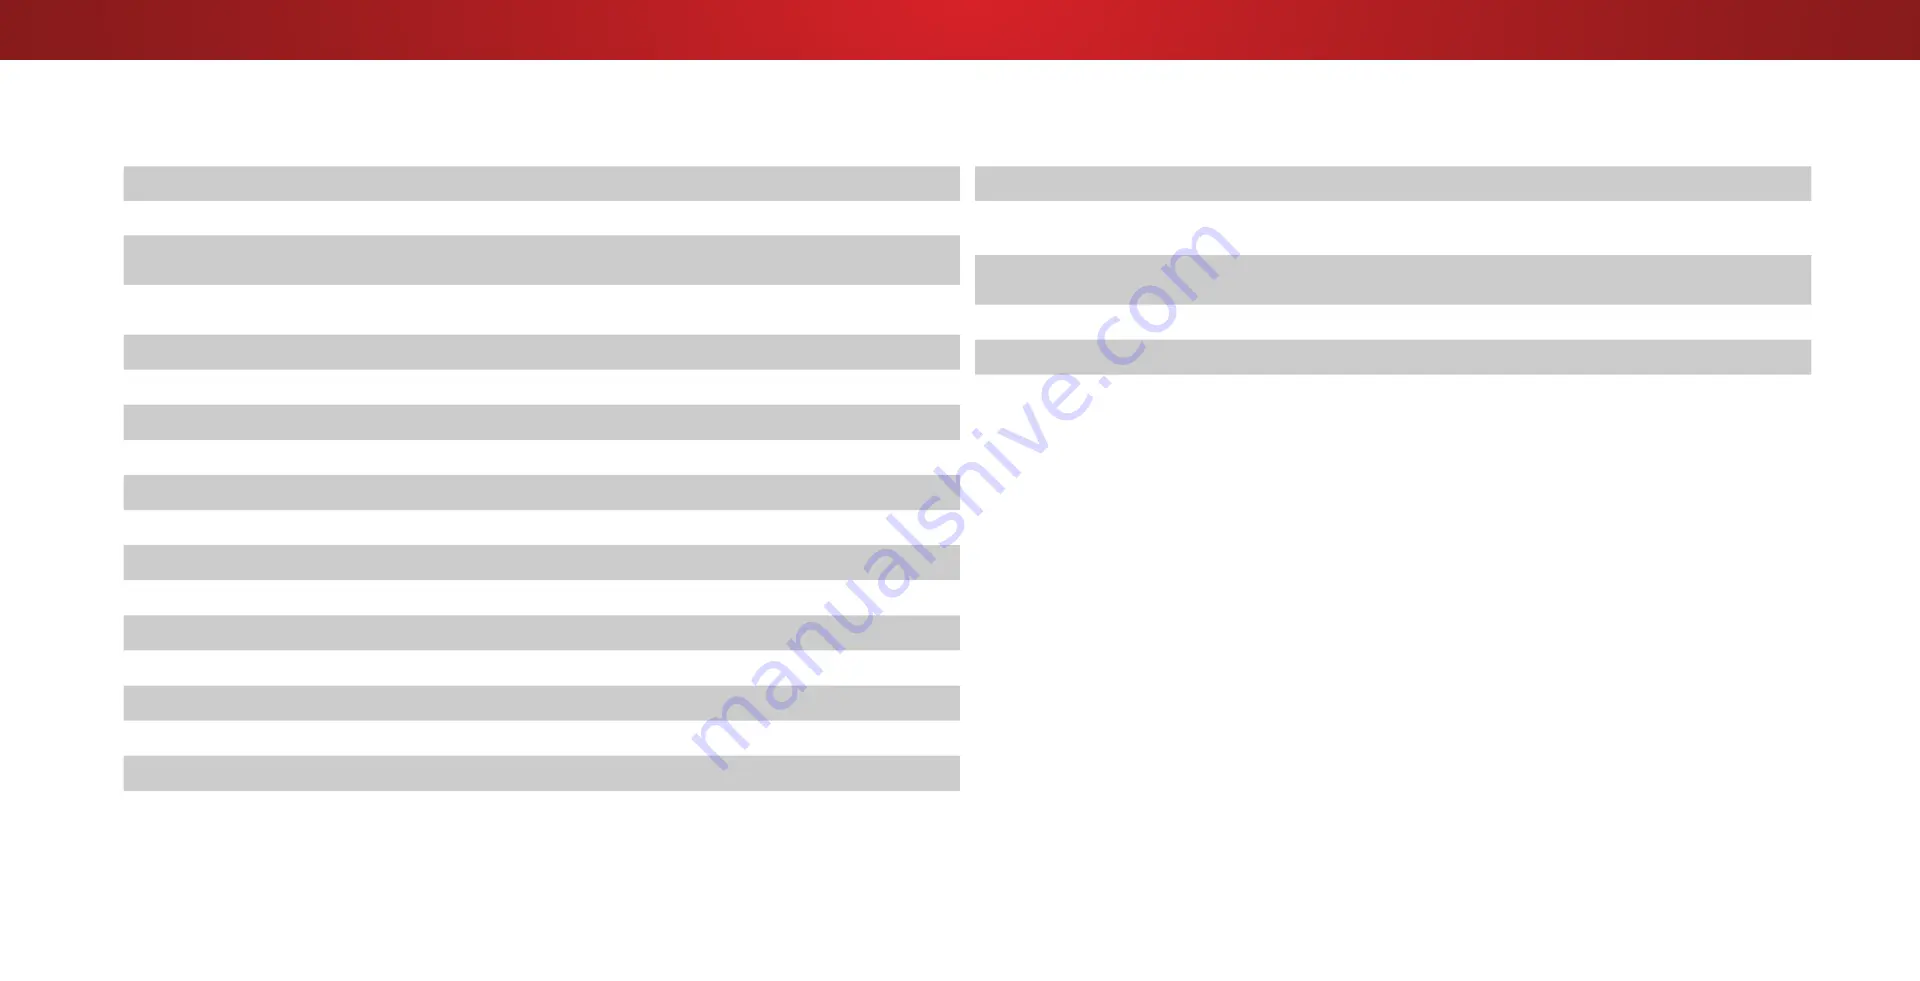
background image

B

Specifications

D24hn-D1

Screen Size:

24"

Viewable Area:

23.54"

Dimensions w/ Stand: 

w/o Stand:

21.96" x 14.98" x 4.39"

21.96" x 14.25" x 2.11"

Weight w/ Stand:

w/o Stand:

7.21 lbs

6.97 lbs

LCD Backlight:

Edge LED

Refresh Rate:

60 Hz

Maximum Resolution:

1366 x 768 (720p)

Dynamic Contrast Ratio:

200000:1

Pixel Pitch:

0.38175mm(H) x 0.38175mm(V)

Viewing Angle:

178° (H) / 178° (V)

HDMI Inputs:

1

Component Video Inputs:

1

Composite Inputs:

1 (Shared with Component)

RF Antenna Input:

1

USB Port:

1

Audio Outputs:

Stero 3.5mm (headset) jack, HDMI

OSD Language:

English, French, Spanish

Ambient Light Sensor:

Yes

D24hn-D1

Remote Control Model:

XRT020

Certifications:

UL,cUL,FCC Class B, BETS7/ICES-003 Class B, 

IC,HDMI(CEC,ARC),Dolby Digital

Voltage Range:

120 V @ 60 Hz

Power Consumption:

17.4 W

Standby Power:

<0.5W

Zero Bright Pixel Guarantee:

Yes

51

Содержание D24hn-D1

Страница 1: ...Model D24hn D1 USER MANUAL VIZIO ...

Страница 2: ... 31 Setting the Auto Power Off Feature 31 Setting Up Channels 32 Selecting a Channel Source 32 Scanning for Channels 32 Adding New Channels 32 Skipping Channels 33 Listening to Alternate Audio 34 Changing the Analog Audio Language 34 Setting Up Closed Captioning 35 Changing the Appearance of Digital Closed Captions 35 Renaming Devices on the Input Menu 37 Changing the TV Settings 38 Viewing System...

Страница 3: ...o blades and a third grounding prong The wide blade or the third prong are provided for your safety If the provided plug does not fit into your outlet consult an electrician for replacement of the obsolete outlet Protect the power cord from being walked on or pinched particularly at plugs convenience receptacles and the point where they exit from the apparatus Only use attachments accessories spec...

Страница 4: ... dust or high humidity Operating your TV in environments with heavy dust or high humidity may cause fire or electric shock Follow instructions for moving your TV Ensure that the power cord and any other cables are unplugged before moving your TV When unplugging your TV hold the AC DC power adapter not the cord Pulling on the power cord may damage the wires inside the cord and cause fire or electri...

Страница 5: ... information with regard to proper grounding of the mast and supporting structure grounding of the lead in wire to an antenna discharge unit size of the grounding conductors location of antenna discharge unit connection to grounding electrodes and requirements of the grounding electrode Lightning Protection For added protection of the TV during a lightning storm or when it is left unattended or un...

Страница 6: ...mited DTS the Symbol DTS and the Symbol together are registered trademarks and DTS Studio Sound is a trademark of DTS Inc DTS Inc All Rights Reserved This product qualifies for ENERGY STAR in the factory default settings ans this is the setting in which power savings will be achieved Changing the factory default picture settings or enabling other features will increase power consumption that could...

Страница 7: ...Use the images below to ensure nothing is missing or damaged Getting to Know Your TV PACKAGE CONTENTS Power Cord VIZIO LED HDTV with Stand Remote Control with Batteries 2 x Quick Start Guides 1 English 1 French Spanish 4 x T4 Phillips Screws INPUT EXIT GUIDE BACK 1 4 7 WIDE MENU OK VOL VOL CH CH 3 6 9 2 5 8 0 7 ...

Страница 8: ...rs and the TV is not properly secured Place the TV screen down on a clean flat surface To prevent scratches or damage to the screen place the TV on a soft surface such as carpet rug or blanket To install the stand 1 Place the TV screen down on a clean flat surface To prevent scratches or damage to the screen place the TV on a soft surface such as a blanket 2 Align the stand and hook it into the bo...

Страница 9: ...surface Be sure the surface is clear of debris that can scratch or damage the TV 3 Remove the stands by loosening and removing the screws 4 Attach your TV and wall mount to the wall carefully following the instructions that came with your mount Use only with a UL listed wall mount bracket rated for the weight load of this TV For some wall mounts you may want to use cables with right angle connecto...

Страница 10: ...n using the remote aim it directly at this sensor The power indicator flashes on when the TV turns on then goes out after several seconds To keep the power indicator on as long as the TV is on see Turning the Power Indicator On or Off on page 46 10 ...

Страница 11: ...udio Out Connect 3 5mm audio device such as a sound bar or headset RGB Connect VGA Cable From PC PC Audio In Connects 3 5mm audio cable from PC Power Press to turn on the TV Press and hold to turn the TV off Input Press once to access the input menu Note The image shown here is for illustrative purposes only and may be subject to change The actual number of ports and their locations may vary depen...

Страница 12: ... input GUIDE Display the info window BACK Go to the previous on screen menu OK Select the highlighted menu option EXIT Close the on screen menu WIDE Change the display mode MUTE Turn the audio off or on POWER Turn TV on or off ARROW Navigate the on screen menu MENU Display the on screen menu V BUTTON Open the USB media player NUMBER PAD Manually enter a channel VOLUME UP DOWN Increase or decrease ...

Страница 13: ...d your device on Set the TV s input to match the connection you used HDMI 1 HDMI 2 etc GOOD AV CABLE ANALOG SD VIDEO 480i 1 STEREO AUDIO BETTER COAXIAL CABLE ANALOG DIGITAL HD VIDEO 1080i 1 STEREO HD AUDIO BEST HDMI HDMI 2 DIGITAL HDVIDEO 1080p 1 HD AUDIO BETTER COMPONENT CABLE ANALOG HD VIDEO 1080p 1 STEREO AUDIO 1 Maximum Resolution Note The image shown here is for illustrative purposes only and...

Страница 14: ...MPONENT CABLE Component cables are designed to carry high definition video signals along with additional audio connections Colors are delivered with color information split up three different ways over three connectors for video separated into Red Blue and Green signals and the left and right audio connectors Red and White HD Video Resolutions up to 1080p Analog Connection Audio and Video Signals ...

Страница 15: ...t the appropriate cable not included to the TV and the device 4 Turn the TV and your device on Home Audio Receiver VIZIO Sound Bar BEST HDMI CABLE ARC 2 WAY COMMUNICATION 2 0 5 1 DIGITAL AUDIO PCM DTS DOLBY DIGITAL GOOD 3 5mm CABLE ANALOG STEREO CONNECTION 2 0 CHANNEL Note The image shown here is for illustrative purposes only and may be subject to change The actual number of ports and their locat...

Страница 16: ...MI CABLE HDMI technology transmits crystal clear digital multi channel surround audio through a single HDMI cable Audio Return Channel enabled ARC TVs allow audio to be sent over an already connected HDMI cable eliminating the need for a separate audio cable See Connecting an Audio Device ARC on page 18 ARC 2 way Communication Auto setup PCM DTS Dolby Digital 2 0 5 1 Scaleable Lossless Digital Aud...

Страница 17: ...ur PC and the RGB port on the back of the TV This cable transmits video 2 Connect a 3 5mm cable not included to your PC and the PC Audio In port on the back of the TV This cable transmits audio 3 Set your PC s resolution to match the resolution of your TV See Appendix B Specifications VGA Cable VIDEO 3 5mm Cable AUDIO Personal Computer Cable not included 17 ...

Страница 18: ... separate audio connection HDMI Cable HDMI Cable Your Blu Ray Player RCA Audio Your Home Audio Receiver With HDMI ARC With an HDMI ARC setup the audio connection between your TV and Home Audio Receiver can be removed The HDMI cable will transmit audio signal to and from your TV with an all digital audio video connection HDMI Cable HDMI Cable Your Blu Ray Player Built In Tuner Built In Tuner Your T...

Страница 19: ...lect Home Use for in home use Seleccione Home Use para Modo de Casa o Store Demo para Demostración en la Tienda Choisissez Home Use pour le Mode Domicile ou Store Demo pour la Démo en Magasin Store Demo Home Use INPUT EXIT GUIDE BACK 1 4 7 MENU OK VOL VOL CH CH 3 6 9 2 5 8 Press the Power button on the remote The TV powers on and the Setup App starts 1 2 Use the Arrow buttons on the remote to high...

Страница 20: ...se the arrow buttons on the remote to highlight Begin Scan and press OK Otherwise use the Arrow and OK buttons on the remote to select the input your TV source is connected to When you are finished the message Setup is complete will appear The First Time Setup is complete 5 Note Number of ports may differ by TV 20 ...

Страница 21: ...on screen menu To open the on screen menu press the MENU button on the remote From this menu you can Adjust the Picture settings Adjust the Audio settings Setting the Sleep Timers Adjust the Channel settings Set up Closed Captioning Name Inputs Adjust TV settings Access the Guided Setup Help VIZIO Network Sleep Timer Input CC ABC Audio Wide Normal Picture Settings Panoramic Wide Zoom 2D 3D Exit TV...

Страница 22: ...sixth of the image is cut off by the left and right sides of the screen 1080p and 1080i Not available Panoramic stretches a 4 3 aspect ratio picture to the left and right edges of the screen The center of the image is Panoramic Wide Zoom Normal Stretch Wide Zoom Normal Note Aspect ratio settings may vary by Input source not stretched but the sides of the image are extremely stretched If you are wa...

Страница 23: ... Picture Mode Edit Color Calibration 4 To manually change each of the picture settings use the Up Down Arrow buttons on the remote to highlight that picture setting then use the Left Right Arrow buttons to adjust the setting Auto Brightness Control The auto brightness control detects the light levels in the room and automatically adjusts the backlight for the best picture Select Off Low Medium or ...

Страница 24: ...screen Use the Left Right Arrow buttons to adjust the horizontal position of the displayed picture Use the Up Down Arrow buttons to adjust the vertical position of the displayed picture Press the OK button when you are finished Film Mode Optimizes the picture for watching film Select Auto or Off Gamma Set the shape of the Gamma curve Use lower Gamma values for bright room conditions and higher val...

Страница 25: ...URE MODE EDIT menu use the Arrow buttons to highlight Lock Picture Mode and then press OK The LOCK PICTURE MODE menu is displayed 2 Use the Number Pad on your remote to enter a unique 4 digit PIN 3 Highlight Save and press OK 4 Press the EXIT button to exit the menu screens To unlock all custom picture modes 1 From the PICTURE MODE EDIT menu use the Arrow buttons to highlight Unlock Picture Mode a...

Страница 26: ... that has been edited can be restored to the factory default settings To reset a customized preset picture mode 1 From the PICTURE MODE EDIT menu use the Arrow buttons to highlight Reset Picture Mode and then press OK The RESET PICTURE MODE window is displayed 2 Use the Left Right Arrow buttons to highlight Reset and press OK 3 Press the EXIT button to exit the menu screens Inputs assigned to a de...

Страница 27: ...w buttons to adjust the value When you are finished press the OK button to save the setting 3 When you are finished press the EXIT button 11 Point White Balance Gain Red Green Blue 5 0 0 0 Adjusting the Color Tuner Settings The Color Tuner settings allow you to adjust the HSB color and 11 point white balance turn color channels off for testing and display color bar flat and ramp test patterns To a...

Страница 28: ... press the Left Right Arrow buttons until the Ramp Test Pattern menu is displayed 2 Use the Arrow buttons on the remote to highlight Off Use the Left Right Arrow buttons to select the color for the ramp test pattern Selecting a color immediately shows that color ramp or To hide the Ramp Test Pattern use the Left Right Arrow buttons to highlight Off 3 When you are finished press the EXIT button Ram...

Страница 29: ... RCA connector when connected to a home theater audio system Select Variable if you are controlling the volume with the TV s volume controls or select Fixed if an external audio device sound bar or AV receiver will control the volume Equalizer Adjusts the boost or attenuation of different frequencies using either preset or custom settings See Changing the Equalizer Settings on page 29 Delete Audio...

Страница 30: ...enu is displayed 2 Use the Arrow buttons on the remote to highlight Audio and press OK The AUDIO menu is displayed 3 Use the Arrow buttons to highlight Delete Audio Mode and press OK The TV displays To delete the user created custom audio mode select the Delete button 4 Highlight Delete and press OK 5 Press the EXIT button on the remote 30 ...

Страница 31: ...T button on the remote Help VIZIO Network Sleep Timer Input CC ABC Audio Wide Normal Picture Settings Panoramic Wide Zoom 2D 3D Exit TIMERS Sleep Timer Off Auto Power Off 10 minutes Setting the Auto Power Off Feature To help save energy your TV is set by default to turn off after 10 minutes without a video or audio signal This feature can be deactivated To set the Auto Power Off feature 1 From the...

Страница 32: ...m 2D 3D Exit CHANNELS Channels not searched Channel Source Cable Find Channel Partial Channel Search Add Analog Channel Skip Channel Analog Audio Stereo Digital Language English Help VIZIO Network Sleep Timer Input CC ABC Audio Wide Normal Picture Settings Panoramic Wide Zoom 2D 3D Exit Help VIZIO Network Sleep Timer Input CC ABC Audio Wide Normal Picture Settings Panoramic Wide Zoom 2D 3D Exit FI...

Страница 33: ...to view You can remove these channels from the TV s memory with the Skip Channel feature Channels that have been removed with the Skip Channel feature can still be viewed if the channel is entered using the Number Pad If you wish to completely block a channel from being viewed use the parental controls See Locking and Unlocking Channels on page 39 To remove a channel 1 From the CHANNELS menu highl...

Страница 34: ...light Analog Audio and press OK The ANALOG AUDIO menu is displayed 2 Select Stereo SAP secondary audio programming or Mono Press OK 3 Press the EXIT button on the remote Help VIZIO Network Sleep Timer Input CC ABC Audio Wide Normal Picture Settings Panoramic Wide Zoom 2D 3D Exit ANALOG AUDIO Stereo SAP Mono To use the Digital Language feature 1 From the CHANNELS menu highlight Digital Language and...

Страница 35: ...s 1 From the CLOSED CAPTIONS menu use the Arrow buttons to highlight Digital Style and press OK 2 Use the Left Right Arrow buttons on the remote to select Custom The DIGITAL STYLE menu appears as shown 3 Use the Up Down Arrow buttons on the remote to highlight the setting you wish to change then use the Left Right Arrow buttons to change the setting Caption Style Choose As Broadcast to keep defaul...

Страница 36: ...t appears This is the typical As Broadcast mode Opaque background and window in the same color When text appears the entire line fills with color at once In the example below the closed caption text is green the background is black and the window is red CLOSED CAPTIONS SCREEN LAYOUT Text Window Background CLOSED CAPTION TEXT SAMPLE 36 ...

Страница 37: ... OK 4 To use a preset input name a Highlight the Input Port row and press OK b Highlight the input name you want to use and press OK or To enter a custom name a Enter your custom label using the on screen keyboard b Highlight OK and press OK c The Input Name changes to show the custom name that you created 5 When you have finished naming your input press the EXIT button on the remote Help VIZIO Ne...

Страница 38: ... on the remote The on screen menu is displayed 2 Use the Arrow buttons on the remote to highlight System and press OK The SYSTEM menu is displayed 3 Highlight System Information and press OK 4 Use the Up Down Arrow buttons to scroll through the system information 5 When you are finished reviewing the system information press the EXIT button on the remote Changing the On Screen Menu Language Your T...

Страница 39: ...devices have their own parental control settings Accessing the Parental Controls Menu To access the Parental Controls menu 1 Press the MENU button on the remote The on screen menu is displayed 2 Use the Arrow buttons on the remote to highlight System and press OK The SYSTEM menu is displayed 3 Use the Arrow buttons on the remote to highlight Parental Controls and press OK 4 Enter your parental PIN...

Страница 40: ...u may not want to block the channel completely using a channel lock but you may wish to block certain programs from being viewed When this is the case you can use the TV s Rating Block feature to block content based on its rating For a list of content ratings and their definitions visit www tvguidelines org To block or unblock content by its rating 1 From the PARENTAL CONTROLS menu highlight the c...

Страница 41: ...d right of the display image 720p and 720i HD Fills a 720p or 1080p screen 1080p and 1080i HD Fills a 720p or 1080p screen Stretch expands a widescreen image to fill the screen from top to bottom and stretches it half as much from right to left Figures appear tall and thin Standard Definition Not available 720p and 720i HD If you are watching widescreen 1 85 1 content the image will fill the scree...

Страница 42: ...t any programming Using CEC your VIZIO TV remote can control Power On Off Volume Mute Not all HDMI devices support CEC See your device s user manual for details To enable disable or adjust CEC settings 1 Set up your audio device and connect it to the HDMI 1 HDMI Arc input on the TV 2 On your audio device select the HDMI ARC input 3 Press the MENU button on the remote The on screen menu is displaye...

Страница 43: ...faults If you restore the TV to the factory default settings all changes you have made to the settings will be lost This includes any V I A Plus Apps that you have added and any changes you have made to the settings for those Apps To restore the TV to its factory default settings 1 Press the MENU button on the remote The on screen menu is displayed 2 Use the Arrow buttons on the remote to highligh...

Страница 44: ...IDED SETUP Channel Setup USING THE INFO WINDOW The Info Window can be displayed by pressing the INFO or GUIDE button on the remote Press the INFO or GUIDE button one time to display channel input and display information Press the INFO or GUIDE button two times to display the program title program rating audio information and the start and end times of the program DIGITAL EPISODE GUIDE INFO WINDOW ...

Страница 45: ... the USB drive from the list and press OK 4 Use the Arrow buttons to highlight Photo and press OK 5 Use the Arrow buttons to highlight the file you want to display Press OK The photos display You can display your photos in fullscreen Select the photo press OK then highlight Fullscreen and press OK Removing the USB Drive from the TV To safely remove your USB drive from the TV 1 Turn off the TV 2 Di...

Страница 46: ...mbnails Folders Adjust Slideshow Settings Start Fullscreen Slideshow PHOTO VIEWER Browse Music View Music Files Back Button Highlight this button and press OK to return to the previous screen Folder Contents This area displays the contents of the currently selected folder You can browse files and folders using the Arrow and OK buttons on the remote Page Information If your USB thumb drive has more...

Страница 47: ...chnical Problems Product Updates And More You can also contact our award winning support team at Phone 877 698 4946 TOLL FREE Hours Of Operation Monday Friday 7 am to 11 pm CST Saturday Sunday 9 am to 6 pm CST Live Chat Support Available Do You Have Questions Find Answers At SUPPORT VIZIO COM 47 ...

Страница 48: ...GISTER YOUR VIZIO PRODUCT NOW Customized Support Get assistance quickly with your information on hand News Offers Take advantage of the latest news and special offers from VIZIO Safety Satisfaction Stay up to date with important product updates and notifications Why Register 48 ...

Страница 49: ...close to a window for the best signal The sound is flat or dialog is not audible Turn off Volume Leveling See Adjusting the Audio Settings on page 29 The colors on the TV don t look right Adjust the Color and Tint settings in the Picture menu See Adjusting the Picture Settings on page 23 Select a pre set picture mode See Adjusting the Picture Settings on page 23 VIZIO recommends selecting Calibrat...

Страница 50: ...nna the signal strength of the channel may be low Ensure your antenna is connected securely to the TV and move the antenna around the room or close to a window for the best signal When I change input source the display image changes size The TV remembers the viewing mode on each input source If the viewing mode on the new input source differs from the one on the input source you switch from the di...

Страница 51: ... 0 38175mm H x 0 38175mm V Viewing Angle 178 H 178 V HDMI Inputs 1 Component Video Inputs 1 Composite Inputs 1 Shared with Component RF Antenna Input 1 USB Port 1 Audio Outputs Stero 3 5mm headset jack HDMI OSD Language English French Spanish Ambient Light Sensor Yes D24hn D1 Remote Control Model XRT020 Certifications UL cUL FCC Class B BETS7 ICES 003 Class B IC HDMI CEC ARC Dolby Digital Voltage ...

Страница 52: ...pressly approved by the party responsible for compliance with the FCC Rules could void the user s authority to operate this equipment Caution Always use an AC DC power adapter that is properly grounded Use the AC cords listed below for each area Canada Notice for License Exempt Radio Apparatus This device complies with Industry Canada s license exempt RSSs Operation is subject to the following two...

Страница 53: ...always clear all personal information from the product before it is serviced regardless of the servicer VIZIO s Responsibilities If VIZIO determines that a product is covered by this warranty VIZIO will at its option repair or replace it or refund the purchase price to you There will be no charge for parts or labor during the warranty period Replacement parts may be new or recertified at VIZIO s o...

Страница 54: ...ut of the binding arbitration agreement and class action waiver In addition you may pursue a claim in small claims court in your county of residence if in the United States or in Orange County California In such case the provisions of the section titled Binding Arbitration Agreement Class Action Waiver U S Residents will not apply Exclusions and Limitations TO THE GREATEST EXTENT PERMITTED BY APPL...

Страница 55: ...ownloaded applications Recovery and reinstallation of user data and downloaded applications is not covered under this warranty In order to protect your personal information VIZIO recommends that you always clear all personal information from the product before it is serviced regardless of the servicer VIZIO s Responsibilities If VIZIO determines that a product is covered by this warranty VIZIO wil...

Страница 56: ...e without notice but any change will not affect your original warranty Check www vizio mx for the most current version INFORMATION EXCLUSIVELY FOR MEXICO To make a warranty claim or to obtain parts components supplies and accessories you may contact the importer of record the warranty service provider or the establishment from whom you purchased the VIZIO product Importer of Record VIZIO Sales Mar...

Страница 57: ...ion described herein are subject to change without notice VIZIO Inc is not responsible for typographical technical or descriptive errors VIZIO the VIZIO logo the V logo and other terms and phrases are trademarks or registered trademarks of VIZIO Inc HDMI HDMI High Definition Multimedia Interface and the HDMI Logo are trademarks or registered trademarks of HDMI Licensing LLC The Bluetooth word mark...

Страница 58: ... 2015 VIZIO INC ALL RIGHTS RESERVED 102815AD US NC ...

Отзывы: