background image


VIVOTEK


User's Manual - 15  

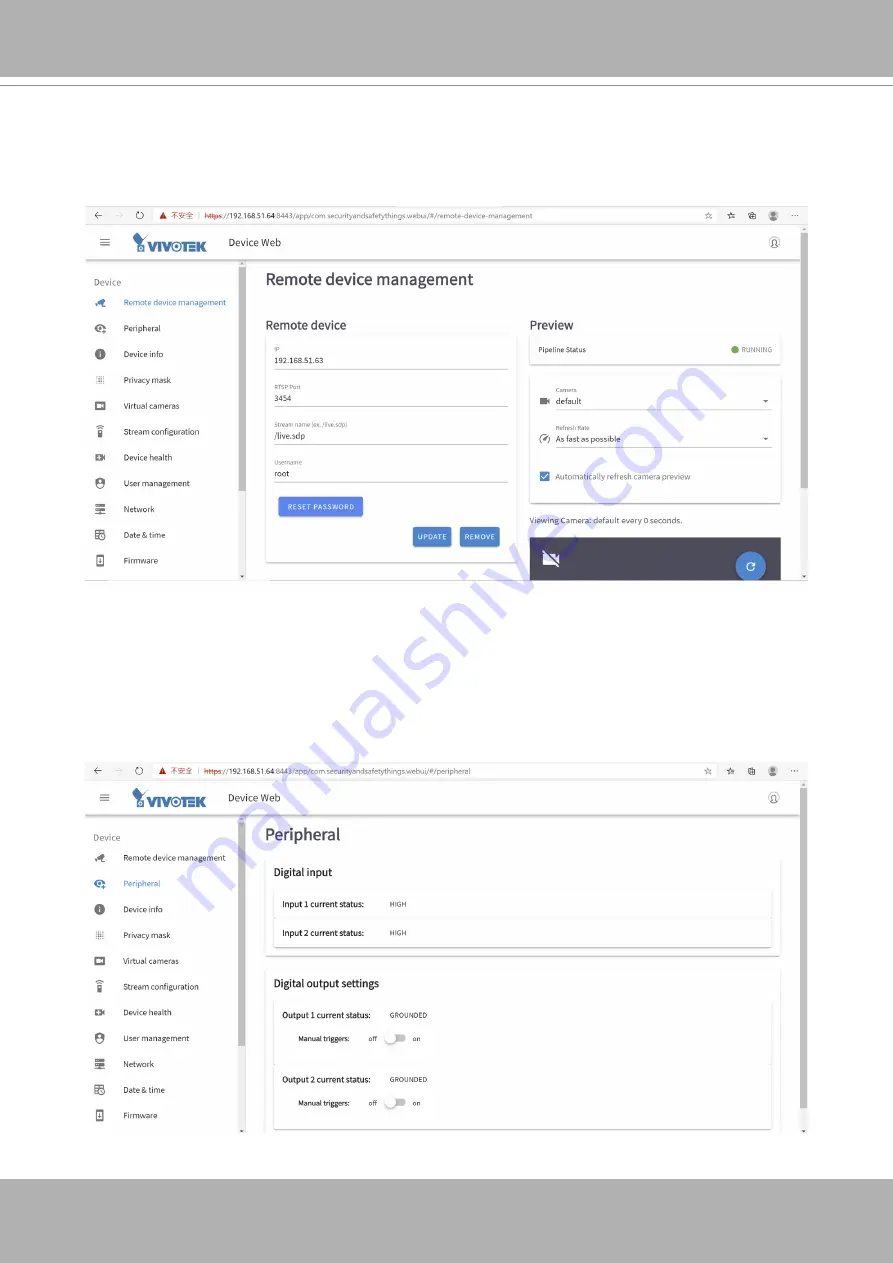
Remote Management

This page is used mainly to connect a 3rd-party network camera.   

Peripheral

On this page you can see the current connection statuses of digital inputs. If your digitald 

inputs are connected to sensor devices, its statuses will be automatically detected as being 

pulled high or pulled low. You can also manually trigger a digital output. Digital outputs can 

also be triggered via the Alarm settings. 

These settings are dependent on camera make and model.

Содержание Insight IE9111-O

Страница 1: ...QCS605 SoC with Built in AI Engine Video Processing and Machine Learning Supports VCA Solutions via Installation of S ST APPs Enables Any Type of Network Camera to act as AIoT Device AI Box IE9111 O...

Страница 2: ...llation 9 Configuration 10 Remote Management 15 Peripheral 15 Device Info 16 Privacy Mask 16 Virtual Camera 17 Stream Configuration 17 Device Health 18 User Management 18 Network 19 Date Time 19 Firmw...

Страница 3: ...g and Machine Learning Designed with OSSA Technology Stack running on S ST Android OS Supports a variety of VCA solutions through S ST APPs Enables Any Type of Network Camera to act as AIoT Device RJ...

Страница 4: ...ations including video sharing general security surveillance etc The Configuration chapter suggests ways to best utilize the Network Camera and ensure proper operations For creative and professional d...

Страница 5: ...ackage Contents IE9111 O Screw pack Wall Panel mount bracket Quick Installation Guide Any Type of Camera Add New Features to Existing Installation S ST Apps Events Metadata Video Streaming for Recordi...

Страница 6: ...VIVOTEK 6 User s Manual Outer View Physical Description GbE LAN DI DO terminal Reset PWR Status LEDs Bracket Dimensions...

Страница 7: ...us LED Behavior PWR Red ON Power is on PWR Red ON Status Green blinking System ready PWR Red Status Green blinking Reset taking place restoring default Consumption Power Input PoE 802 3af class3 RX RX...

Страница 8: ...lems remain after reset restore the factory settings and install again Use a flatten paper clip to press the button Reset Press the recessed reset button Wait for the Network Camera to reboot Restore...

Страница 9: ...nstallation 1 The optional bracket allows you to install the AI box to a wall or panel Secure the bracket to the box using the included sunk head screws 2 Secure the assembly to wall panel using the i...

Страница 10: ...1 Download the Device Management Tool The tool can be requested here https devices securityandsafetythings com tooldownload Make sure DHCP service is available in your local network 2 Use the Device...

Страница 11: ...https store securityandsafetythings com shop catalog c main 4 Enter URL https ip_address 8443 Enter admin admin as the default credential Since the connection is using a self signed certificate your...

Страница 12: ...VIVOTEK 12 User s Manual Click Proceed to xxx xxx xxx xxx Unsafe to open the web console Note the IP addresses below are for reference only Enter admin admin as the default credential...

Страница 13: ...a new password for security concern Enter a combination of alphabetic numeric and special characters that is strong enough for protection The new password must comprise of at least 10 characters cont...

Страница 14: ...AN 3rd party camera 5 From the Remote device management page you can enter the address and credentials for connecting to the 3rd party IP camera Enter 8554 as the RTSP port Enter live sdp as the strea...

Страница 15: ...On this page you can see the current connection statuses of digital inputs If your digitald inputs are connected to sensor devices its statuses will be automatically detected as being pulled high or p...

Страница 16: ...for each camera and will be displayed in the Device Management Portal Here you can also reboot the device or perform a Factory reset Privacy Mask Click and drag on the screen to block out sensitive ar...

Страница 17: ...dified with regards to encoding size bitrate and I frame interval Streams are defined as Full High Definition and Ultra High Definition streams Virtual Camera Allows the creation of additional sub str...

Страница 18: ...Device Health This page displays various device health information CPU Memory Storage usage Connectivity Temperature and App status User Management On this page you can add remove users and set user...

Страница 19: ...ge different network parameters disable the DHCP and set a specific IP Date Time This page allows the user to configure the current date time on the device synchronize with computer time and also to e...

Страница 20: ...VIVOTEK 20 User s Manual Firmware On this page you can perform a Firmware OS version OTA upgrade...

Страница 21: ...s version and they can also start stop or uninstall an application using the vertical 3 dot menu Data Magnet and VAST2 To enable the display of video analytics from apps on the VAST2 click on the App...

Страница 22: ...server IP 2 Data Magnet port usually 3443 3 Data Source Name Note that this name must be identical to that on the VAST2 Data Magnet setting page 4 VAST2 user name and password 5 Select the app install...

Страница 23: ...Third party data source 8 Enter the Data Source Name port usually 3443 select the associated camera and click Add Note that the camera should be the one that the IE9111 O is connected to The camera s...

Страница 24: ...VIVOTEK 24 User s Manual 9 You can then right click on a VAST2 view cell to display the Data magnet data The analytics detection results can display along with the live video...

Страница 25: ...ce to Security and Safety Things cloud where you can install and manage the applications buy additional licenses and monitor your camera s health Also if crash reporting is enabled all the information...

Страница 26: ...Device info page Then check if a Device ID is present Your device has a proper date time set This can be verified and set on the Date time page on the camera s front end Proceed with the following for...

Страница 27: ...Portal page you can enter some additional information regarding the device Camera name Client Location name Street address optional Click the SAVE button in order to save the changes and your camera w...

Страница 28: ...VIVOTEK 28 User s Manual On the Device Management Portal page you can see all connected devices cameras Click to select your device On the right pane click INSTALL APP...

Страница 29: ...VIVOTEK User s Manual 29 Scroll to select an app Select and click INSTALL...

Страница 30: ...VIVOTEK 30 User s Manual This page provides legal information for the OS Applications Legal...

Страница 31: ...Notices from HEVC Advance THIS PRODUCT IS SOLD WITH A LIMITED LICENSE AND IS AUTHORIZED TO BE USED ONLY IN CONNECTION WITH HEVC CONTENT THAT MEETS EACH OF THE THREE FOLLOWING QUALIFICATIONS 1 HEVC CON...

Страница 32: ...io or television reception which can be determined by turning the equipment off and on the user is encouraged to try to correct the interference by one or more of the following measures Reorient or re...

Отзывы: