background image

7

STEP 3:

 Mounting VESA Assembly

Have a question? Give us a quick call / chat!

309-278-5303 or vivo-us.com

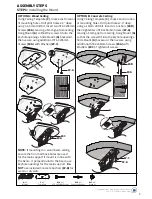
OPTION A: Flat Back TV

Align the VESA bracket assembly with the mounting holes in the back of the TV screen. Install 

assembly to TV using appropriate screws 

(M-A, M-B)

 and Square Washers 

(M-F) 

according to your 

screen’s requirements.

M-A

M-B

M-F

M-F

OPTION B: Curved/Recessed Back TV

Align the VESA bracket assembly with the mounting holes in the back of the TV screen. Install 

assembly to TV using appropriate screws

 (M-C, M-D, M-E)

, Square Washers 

(M-F) 

and Spacers 

(M-G, M-H)

 according to your screen’s requirements.

M-C

M-D

M-G

M-H

M-F

M-E
M-E

M-G

M-H

M-G


(x8)

Small Spacer

M-E 

(x4)

M8x50mm Screw

M-A


(x4)

M5x14mm Screw

M-B 

(x4)

M6x14mm Screw

M-C


(x4)

M6x30mm Screw

M-F 

(x4)


Square Washer

M-D 

(x4)

M8x30mm Screw

M-H


(x8)

Large Spacer

Содержание MOUNT-E-FD70

Страница 1: ...p by step with our video walk through by scanning the QR code with your mobile device or by following the product link vivo us com products mount e fd70 Instruction Manual SKU MOUNT E FD70 ASSEMBLY VIDEO AVAILABLE help vivo us com www vivo us com 309 278 5303 ...

Страница 2: ...ance with rapid response times from customer service agents and product techncians to help you every step of the way Monday Friday Chat Us www vivo us com Give us a Call 309 278 5303 Email Us help vivo us com If any parts are received damaged defective OR you are missing a part please reach out to us within 30 days of product delivery to have it replaced at no cost We are happy to replace parts to...

Страница 3: ...our product s warranty please visit the product s listing on our website or reach out to customer support vivo us com products mount e fd70 We offer a hassle free 30 day return on all products Contact customer support at 309 278 5303 or help vivo us com Please note For items ordered in error or no longer needed the return shipping charges will be at the buyer s expense WARNING CHOKING HAZARD SMALL...

Страница 4: ...ble your product If parts are missing or damaged please contact us Phillips Screwdriver TOOLS NEEDED A x1 Mount B x1 Center Plate C x1 Celing Template H x1 Remote D x2 Decorative Cover E x2 VESA Bracket F x2 Bracket Rail G x1 AC Adapter DIFFICULTY LEVEL Drill Pencil M H x8 Large Spacer W A x6 ST6 3x55mm Screw W B x6 Concrete Anchor W C x4 Washer I x4 Cable Tie J x2 Leveling Knob T A x1 3mm Allen W...

Страница 5: ...OTE If mounting to a wood beam ceiling ensure the front and back holes are used for the main support if mount is in line with the beam If perpendicular to the beam use keyhole openings for the main support Do NOT use included Concrete Anchors W B for wood or drywall OPTION B Concrete Ceiling Using Ceiling Template C mark exact location of mounting holes Drill pilot holes 2 4 deep using a 10mm dril...

Страница 6: ...sing M4x8m Screws S E and 3mm Allen Wrench T A S D S C E x2 VESA Bracket B x1 Center Plate F x2 Bracket Rail S B x4 M6x25mm Screw S C x4 M6 Washer S E x4 M4x8mm Screw T A x1 3mm Allen Wrench S D x4 M6 Nut B F E T A S E Adjust VESA Brackets E spacing to match TV mounting holes and lock in place using Set Screw S A and 3mm Allen Wrench T A Remove the four pre installed screws from Center Plate B and...

Страница 7: ... your screen s requirements M A M B M F M F OPTION B Curved Recessed Back TV Align the VESA bracket assembly with the mounting holes in the back of the TV screen Install assembly to TV using appropriate screws M C M D M E Square Washers M F and Spacers M G M H according to your screen s requirements M C M D M G M H M F M E M E M G M H M G x8 Small Spacer M E x4 M8x50mm Screw M A x4 M5x14mm Screw M...

Страница 8: ...ed J x2 Leveling Knob S A x4 Set Screw Place the TV with VESA bracket assembly on Mount A by inserting the center screw on Center Plate B into the keyhole on Mount A at the desired height Secure using previously removed screws STEP 2 and tighten with a Phillips screwdriver Clearance between the ceiling and top edge of TV should be no less than 15mm when TV is in the fully lowered position S A J A ...

Страница 9: ...fasten cables to the side of the arm NOTE Keep cables clear from inside of arm to avoid damage due to pinching D I D x2 Decorative Cover I x4 Cable Tie Plug AC Adapter G into Mount A and connect to AC outlet Follow Remote H instructions for operation NOTE Plugging power supply into AC outlet prior to the mount may cause a large spark when connecting to the mount Do not open the electrical cover Ne...

Страница 10: ... the best of our abilitiy We offer a wide array of home office products to fit your needs From height adjustable desks to monitor mounts to keyboard trays and more HEIGHT ADJUSTABLE DESKS MONITOR MOUNTS SPEAKER MOUNTS STANDS We offer electric manual crank standing desks corner frames desk top combos and more From single monitor mounts to hex mount gromment or clamp ons we ve got a mounting solutio...

Страница 11: ...esponse times from customer service agents and product techncians to help you every step of the way Call Us 309 278 5303 Average Resolution Time 5m 4s Chat Us www vivo us com Average Resolution Time 15m Email Us help vivo us com Average Resolution Time 1HR 8M 23 within 15m 38 within 30m 61 within 1hr 83 within 2hr 92 within 3hr ...

Страница 12: ...V1 Ready to share that new amazing setup Want to brag about that amazing new ergonomic solution Tag us in your photo FOR MORE GREAT VIVO PRODUCTS CHECK OUT OUR WEBSITE AT WWW VIVO US COM LOVE YOUR NEW VIVO SETUP VIVO us vivo_us ...

Отзывы: