3
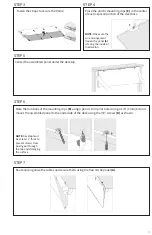
STEP 3
Place the plastic mounting clips
(E)
in the center
of each exposed portion of the steel bars.
STEP 4
Fasten the straps to secure the frame.
Center the assembled panel under the desktop.
STEP 5
NOTE:
Make sure the
wire management
flap on the panel
(A)
is facing the inside of
the desktop.
STEP 6
Mark the locations of the mounting clips
(E)
using a pencil. Drill pilot holes using a 1/8” (3mm) bit and
mount the assembled panel to the underside of the desk using the 7/8” screws
(D)
as shown.
STEP 7
Route and organize the cables and secure them using the flap on the panel
(A)
.
NOTE:
Desktop must
be at least 1” thick to
prevent screws from
poking out through
the top and damaging
the surface.


