background image


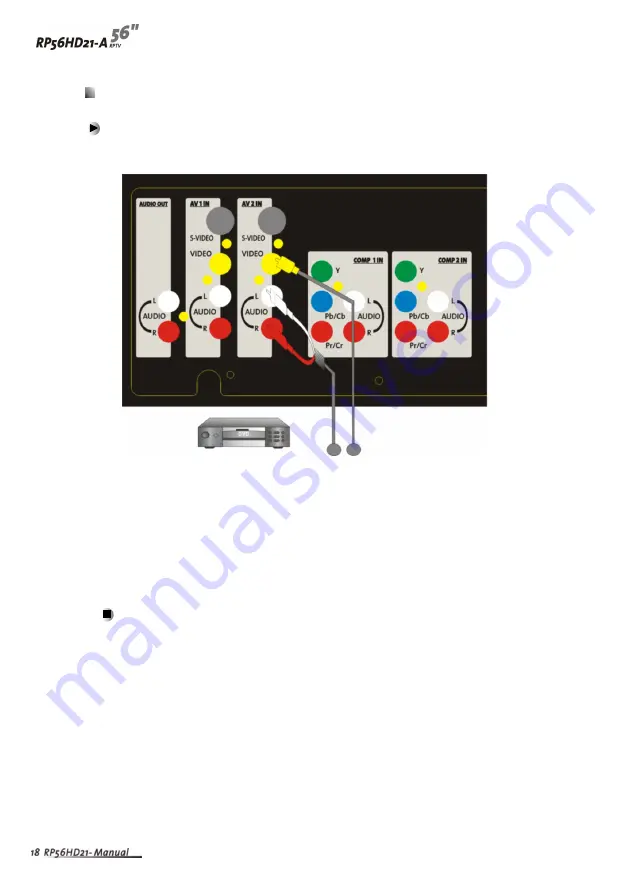
Using Composite Video


To connect your DVD player using composite video :


1  

Connect the yellow video jack on the back of your DVD player to the yellow AV 2 

IN jack on the back of your RPTV. 

2  

Connect the red (R) and white (L) audio jacks on the back of your DVD player to 

the R and L audio-in jacks on the back of your RPTV. 

3  

Select 

AV 2

 using the 

INPUT

 button on the front of your RPTV.


Audio Video

Содержание RP56HD21-A

Страница 1: ......

Страница 2: ... DVD Player 15 Using Component Video 15 Using S Video 16 Using DVI Video 17 Using Composite Video 18 Connecting your HDTV Set Top Box 19 Using Component Video 19 Using DVI Video 20 Using RGB Video 21 Connecting your VCR or Video Camera 22 Using S Video 22 Using Composite Video 23 Using Coaxial RF 24 Connecting off air TV or Cable TV 25 Connecting ExternalAmplified Speakers 26 Connecting an Externa...

Страница 3: ...Adjusting Your Micro Chip Display Projection TV Settings 30 Using the OSD 31 OSD Menu and Options 32 Maintenance and Troubleshooting 38 Cleaning and Maintenance 39 ...

Страница 4: ...ro Chip Display Projection TV This chapter provides basic information about Your Micro Chip Display Projection TV Read this chapter to learn about Features Warnings and Safeguards Package Contents Controls and Connections ...

Страница 5: ...ility using an external HDTV decoder with DVI RGB or component video outputs HDCP support for video protection Digital zoom mode to get rid of black bars around the display image Abuilt in BBE sound processor that maximizes the sound quality Abuilt in SRS sound processor that simulates surround effects using only two speakers Selectable fixed variable audio outputs Built in internal amplifier and ...

Страница 6: ...ct sunlight Use your Micro Chip Display Projection TV in a well ventilated area and do not cover the ventilation openings Do not modify your Micro Chip Display Projection TV or use an unshielded power cord or video input source cable or you may experience excessive interference Disconnect your Micro Chip Display Projection TV and unplug the power cord when not used for a long period of time If the...

Страница 7: ...Micro Chip Display Projection TV should be operated from the type of power source indicated on the label If the type of available power is unknown consult your electrician or local power company Your Micro Chip Display Projection TV is equipped with a 3 pin grounded plug The plug will only fit into a grounded power outlet This is a safety feature If you cannot plug the power cord into the outlet c...

Страница 8: ......

Страница 9: ...Power cord User guide ...

Страница 10: ...Accessories You can purchase these optional accessories for your Micro Chip Display Projection TV Filters Lamps Contact for these and other accessories ...

Страница 11: ... correctly grounded electrical outlet or surge protector 2 Press the POWER button on the front of your Micro Chip Display Projection TV The Status LED on the front turns blue Warning For added protection during a lightning storm or when it is left unattended or unused for long periods of time unplug your Micro Chip Display Projection TV from the wall outlet and disconnect the antenna or cable syst...

Страница 12: ...Front Controls Remote Control Sensor Volume and Adjust Channel and Adjust OK MENU Input Power Power LED LED Lamp Status ...

Страница 13: ...age 31 OK Opens menus in the OSD For more information see Using the OSD on page 31 MENU EXIT Opens Closes menus in the OSD For more information see Using the OSD on page 31 Input Switches between available input sources Power Press once to turn your RPTV on Press twice to turn you RPTV off When you turn Micro Chip Display Projection TV off wait two minutes before pressing this button again Power L...

Страница 14: ... device such as a DVD player or set top box RGBAudio In Connects to the audio on an RGB device such as a computer or set top box RGB In Connects to an RGB video device such as a computer or set top box DVIAudio In Connects to the audio on a DVI device such as a computer or set top box TV Cable In Connects to a VHF UHF antenna or cable TV DVI In Connects to a DVI video device such as a computer or ...

Страница 15: ...er or digital camera Main Sub MAIN Plug headphone in here to listen to the audio for the main picture The built in speakers are disabled SUB Plug headphones in here to listen to the audio for the sub picture Video In Connects to an RGB video device such as a computer Audio In Connects to the audio on an RGB device such as a computer S VIDEO VIDEO Main L AUDIO R Sub VIDEO IN AUDIO IN ...

Страница 16: ...his chapter to lean how to connect DVD Players HDTV decoder set top boxes VCRs Off air TV and cable TV External audio devices Computers Warning Before connecting any external components unplug your Micro Chip Display Projection TV ...

Страница 17: ...ble the other three connection types only handle video and require separate connections for sound Coaxial is the only way to connect an antenna to your RPTV Good Composite The video signal is carried through a single pin This connection method is the one that is most commonly found on devices Better S Video The video signal is split into two signals black and white and color Text displayed on scre...

Страница 18: ...lored PR or CR jack on the back of your DVD player to the red colored PR CR jack on the back of your RPTV 3 Connect the blue colored PB or CB jack on the back of your DVD player to the blue colored PB CB jack on the back of your RPTV 4 Connect the red R and white L audio jacks on the back of your DVD player to the R and Laudio in jacks on the back of your RPTV 5 Select COMP 1 using the INPUT butto...

Страница 19: ...k on the back of your DVD player to the S VIDEO jack on the back of your RPTV 2 Connect the red R and white L audio jacks on the back of your DVD player to the R and Laudio in jacks on the back of your RPTV 3 Select AV 2 using the INPUT button on the front of your RPTV Audio Video ...

Страница 20: ...elect DVI using the INPUT button on the front of your RPTV The DVI port supports High bandwidth Digital Content Protection HDCP HDCP encrypts the transmission between the video source and the digital display for added security and protection Connecting the Micro Chip Display Projection TV and DVD player by using HDMI DVI cable can show you the high definition Display Please refer to page 46 48 as ...

Страница 21: ...ideo jack on the back of your DVD player to the yellowAV 2 IN jack on the back of your RPTV 2 Connect the red R and white L audio jacks on the back of your DVD player to the R and Laudio in jacks on the back of your RPTV 3 Select AV 2 using the INPUT button on the front of your RPTV Audio Video ...

Страница 22: ...t the red PR or CR jack on the back of your HDTV set top box to the red PR CR jack on the back of your RPTV 3 Connect the blue PB or CB jack on the back of your HDTV set top box to the blue PB CB jack on the back of your RPTV 4 Connect the red R and white L audio jacks on the back of your HDTV set top box to the R and Laudio in jacks on the back of your RPTV 5 Select COMP 2 using the INPUT button ...

Страница 23: ...the back of your RPTV 3 Select DVI using the INPUT button on the front of your RPTV The DVI port supports High bandwidth Digital Connect Protection HDCP HDCP encrypts the transmission between the video source and the digital display for added security and protection Connecting the Micro Chip Display Projection TV and DVD player by using HDMI DVI cable can show you the high definition Display Pleas...

Страница 24: ... jacks on the back of your HDTV set top box to the R and Laudio in jacks on the back of your RPTV 3 Select RGB using the INPUT button on the front of your RPTV After you connect your HDTV set top box to the RGB input jack on your RPTV your may need to adjust various RPTV picture settings to correctly match the output from the HDTV set top box Please refer to page 46 48 as the related resolution su...

Страница 25: ...he S Video jack on the back of your VCR or video camera to the S VIDEO jack on the back of your RPTV 2 Connect the red R and white L audio jacks on the back of your VCR or video camera to the R and Laudio in jacks on the back of your RPTV 3 Select AV 1 using the INPUT button on the front of your RPTV Audio Video ...

Страница 26: ...jack on the back of your VCR or video camera to the yellowAV 1 IN jack on the back of your RPTV 2 Connect the red R and white L audio jacks on the back of your VCR or video camera to the R and Laudio in jacks on the back of your RPTV 3 Select AV 1 using the INPUT button on the front of your RPTV Audio Video ...

Страница 27: ... of your RPTV then go to channel 3 or 4 If you have an off air antenna or cable box connect your off air antenna or cable TV cable to the TV CABLE IN connector on the back of your VCR Warning If an outdoor antenna or cable system is connected to your RPTV make sure that the antenna or cable system is correctly grounded For more information see Television antenna connectors protection for systems f...

Страница 28: ...he TV CABLE IN connector on the back of your RPTV 2 Select TV using the INPUT button on the front of your RPTV Warning If an outdoor antenna or cable system is connected to your RPTV make sure that the antenna or cable system is correctly grounded For more information see Television antenna connectors protection for systems fitted with TV cable TV tuner cards on page 52 ...

Страница 29: ...s using theAUDIO OUT jacks located on the back of your RPTV To connect your external amplified speakers 1 Connect the red R and white L audio jacks on the back of your speakers to the AUDIO OUT jacks on the back of your RPTV 2 Set the REARAUDIO OUTPUT in the OSD to VARIABLE For information about the OSD see Using the OSD on page 31 ...

Страница 30: ...r 1 Connect the red R and white L audio jacks on the back of your external amplifier or receiver to theAUDIO OUT jacks on the back of your RPTV 2 Set the REARAUDIO OUTPUT in the OSD to VARIABLE if you want to use the volume controls on your RPTV or FIXED if you want to use the volume controls on your amplifier or receiver For information about the OSD see Using the OSD on page 31 ...

Страница 31: ...RPTV 3 Select DVI using the INPUT button on the front of your RPTV The DVI port supports High bandwidth Digital Connect Protection HDCP HDCP encrypts the transmission between the video source and the digital display for added security and protection Connecting the Micro Chip Display Projection TV and DVD player by using HDMI DVI cable can show you the high definition display Please refer to page 4...

Страница 32: ...ur computer to the RGB IN connector on the back of your RPTV 2 Connect theAudio Out jack on your computer to the RGBAudio In jacks on the back of your RPTV 3 Select RGB using the INPUT button on the front of your RPTV Please refer to page 46 48 as the related resolution supported timing table Audio Video ...

Страница 33: ...Adjusting Your Rear Projection TV Settings Read this chapter to learn how to adjust your Micro Chip Display Projection TV settings using the on screen display OSD ...

Страница 34: ...s 2 Press the ADJUST V or U button on the front of your RPTV to select the menu you want 3 Press the OK button on the front of your RPTV to open the menu 4 Press the ADJUST V or U button on the front of your RPTV to select the menu option you want 5 Press the OK button on the front of your RPTV to open the menu option 6 Press the ADJUST Y or Z button on the front of your RPTV to adjust the option ...

Страница 35: ...re BRIGHTNESS Adjusts the brightness of the picture You may need to readjust brightness after the RPTV warms up COLOR Adjusts the color saturation making colors more intense TINT Adjusts the color of flesh tones SHARPNESS Adjusts the amount of detail enhancement WIDE FORMAT Adjusts the screen width to STRETCH CENTER PANORAMIC or ZOOM viewing mode PICTURE ADJUST CONTRAST 50 BRIGHTNESS 50 COLOR 50 T...

Страница 36: ...the vertical screen position AUTO CONFIG Automatically adjusts to the best settings ADC CLOCK Removes any vertical distortion and clears or sharpens the displayed characters ADC PHASE Removes any horizontal distortion and clears or sharpens the displayed characters WIDE FORMAT Adjusts the screen width to STRETCH CENTER PANORAMIC or ZOOM viewing mode CONTRAST 50 PICTURE ADJUST BRIGHTNESS 50 H POSIT...

Страница 37: ... pictures on the right MAIN 7 The main picture is on the bottom left and there are four small sub picture windows across the top and three small sub pictures on the right SCAN The screen is divided into 12 small sub pictures When PIP STYLE is set to PIP the following sub options are available WIDE FORMAT Changes the sub picture size Choose between 4 3 and 16 9 SIZE Changes the size of the sub pict...

Страница 38: ... TV is the selected video input source your RPTV adds all channels that have a signal to the channel list CHANNEL Displays the current TV channel and lets you skip or add the current channel to the channel list CLOSED CAPTION Turns closed captioning on and off AUTO automatically turns captioning on when your LCD TV is muted CAPTION STYLE Sets the display style for closed captioning NOISE REDUCTION...

Страница 39: ... Turns the built in speakers on or off REARAUDIO OUT Changes the audio output options for the RPTV FIXED Bypasses your RPTV s internal sound controls VARIABLE Adjusts the type of output your RPTV sends to the internal speakers or the audio output jack SUB HEADPHONE VOL Adjusts the volume to the sub picture headphones jack EFFECT Adds simulated audio effects Switch between BBE SRS VIVAHD3D EALA and...

Страница 40: ...nu is displayed before it turns off automatically COLOR TEMPERATURE Adjusts the color temperature to three preset modes Select COOL NEUTRAL or WARM LANGUAGE Changes the language of the OSD menu Select ENGLISH FRENCH or SPANISH SYSTEM INFO Displays current system information RESETALL SETTINGS Resets all settings except the parental controls and lamp timer to the factory defaults RESET LAMP TIMER Re...

Страница 41: ...ubleshooting Read this chapter to learn how to maintain and troubleshoot your Micro Chip Display Projection TV Cleaning and maintenance Status LEDs Troubleshooting Preset Timing Chart Reference Timing Table Support Notice ...

Страница 42: ...s Cleaning the Exterior Your Micro Chip Display Projection TV is cooled by air circulated through the vents on the case so keep the vents free of dust With your Micro Chip Display Projection TV turned off and unplugged brush the dust away from the vents with a damp cloth Be careful not to drip any water into the vents Do not attempt to clean dust from the inside of your Micro Chip Display Projecti...

Страница 43: ...te your Micro Chip Display Projection TV without a filter Check the filter every six months and replace as necessary to prevent heat damage To replace the filter 1 Remove the two filter access panel screws then remove the access panel 2 Remove the old filter and insert a new one using the four tabs to hold the filter in place 3 Replace the filter access panel and secure it with the two screws Scre...

Страница 44: ... Micro Chip Display Projection TV is turned off power is disconnected and the lamp is completely cool minimum of 45 minutes before replacing the lamp To replace the lamp 1 Turn off your Micro Chip Display Projection TV 2 Disconnect the power cord and all other external cables 3 Let the lamp cool completely approximately 45 minutes 4 Remove the two lamp access panel screws then remove the access pa...

Страница 45: ...t you do not touch the lamp The oils from your hands can cause the lamp to fail prematurely 8 Replace the two lamp module retaining screws Important Make sure that the screws are fastened securely to make sure that the lamp will not shake Safety discard the used lamp 9 Replace the lamp bay access panel then replace the two access panel screws 10 Connect the power cable and all external cables ...

Страница 46: ...de Blue Not lit AC power is connected the power button has been pressed and the lamp has warmed up Error Codes Error Code Power LED Lamp LED Description 21 Flashes blue twice then orange once Not lit One of the cooling fans has failed See Support on page 49 32 Flashes blue three times then orange twice Flashing Lamp trouble or failure Your RPTV automatically shut down and restart itself If this do...

Страница 47: ...interference from electrical appliances cars motorcycles or fluorescent lights Try moving your RPTV to another location The color is abnormal Make sure that the input source cable is connected securely and correctly to the back of your RPTV The picture has abnormal patterns Make sure that the input source cable is attached securely and correctly to the back of your RPTV Make sure that the video in...

Страница 48: ...However sometimes some pixels of your RPTV may not display Pixel defects within industry specifications are inherent to this type of product and do not constitute a defective product You see noise or trash on the screen When your RPTV s digital capabilities exceed a digital broadcast signal the signal is up converted increased to match your RPTV s display capabilities Up converting can cause noise...

Страница 49: ... 2 032 64 1 556 56 72 C h back porch us pixels 1 907 48 96 1 907 48 128 3 810 120 2 222 80 128 D h active us pixels 25 422 640 640 25 422 640 640 20 317 640 17 778 640 800 E h front porch us pixels 16 32 0 318 16 24 0 508 16 1 556 56 24 Vertical freq hz 70 087 85 08 59 94 72 809 75 85 008 56 25 Sync Polarity O v total ms lines 14 268 449 445 16 684 525 520 13 333 500 11 764 509 625 P v sync ms lin...

Страница 50: ...ck porch us pixels 2 20 88 1 280 64 3 232 160 2 702 152 2 462 160 1 920 144 D h active us pixels 20 000 800 16 000 800 16 162 800 14 222 800 15 754 1024 13 653 1024 E h front porch us pixels 1 000 40 1 120 56 0 323 16 0 569 32 0 369 24 0 320 24 Vertical freq hz 60 317 72 188 75 00 85 061 60 70 069 Sync Polarity O v total ms lines 16 579 628 13 853 666 13 333 625 11 756 631 16 666 806 14 272 806 P ...

Страница 51: ... 31 7 856 22 222 1648 2200 B h sync us pixels 1 219 96 108 36 2 37 64 0 54 40 44 C h back porch us pixels 2 235 176 54 144 2 07 56 3 636 270 192 D h active us pixels 13 003 1024 720 720 26 67 720 17 24 1280 E h front porch us pixels 0 203 16 18 36 Vertical freq hz 75 029 70 077 85 039 60 0 60 00 30 Sync Polarity O v total ms lines 13 328 800 449 446 16 644 525 16 667 750 562 5 P v sync ms lines 0 ...

Страница 52: ...s troubleshooting information does not resolve your problem or if you have other questions relating to you Micro Chip Display Projection TV visit www vivitek us You can also call our Service Center at 1 877 603 3582 ...

Страница 53: ...munications Commission FCC Unintentional emitter per FCC Part 15 This device has been tested and found to comply with the limits for a Class B digital device pursuant to Part 15 of the FCC rules These limits are designed to provide reasonable protection against harmful interference in a residential installation ...

Страница 54: ...accessories are required to be used in order to ensure compliance with FCC rules FCC declaration of conformity Responsible party Vivitek Corp 48017 Fremont Blvd Fremont CA94538 Toll Free 1 877 603 3582 Product VIVITEK RPHD21 RP TV This device complies with Part 15 of the FCC Rules Operation of this product is subject to the following two conditions 1 this device may not cause harmful interference ...

Страница 55: ......

Страница 56: ...itions Vivitek may improve and or change products described in this publication at any time Due to continuing system improvements Vivitek is not responsible for inaccurate information which may appear in this manual For the latest product updates consult the Vivitek Web site at www vivitek us In no event will Vivitek be liable for direct indirect special exemplary incidental or consequential damag...

Страница 57: ...TV 25 audio in connection 12 power cord 8 audio in connector 12 VCR 22 audio out connection 11 video camera 22 connections B antenna 11 back panel connections 11 audio and video 12 batteries 5 audio in 12 brightness 33 audio out 11 back panel 11 C componentAV in 11 cable kits 7 compositeAV in 11 cable TV composite video 11 12 connecting coaxial RF 25 DVI audio in 11 channel button 10 DVI in 11 cle...

Страница 58: ...u 33 front panel buttons 9 PIP mode 34 PIP setup menu 34 H special features menu 36 HDCP 17 20 28 timeout 36 HDTV decoder set top box TV tuner setup menu 35 connecting component video 19 wide format 33 connecting DVI video 20 connecting RGB video 21 P headphone jack 12 PC audio in connection 11 PIP mode 34 I power Input button 10 button 10 LED 10 43 L power cord 6 Lamp connection 8 LED 10 43 repla...

Страница 59: ...LEDs 43 support 46 S Video 14 connection 11 12 T timeout 36 troubleshooting 37 44 V VCR connecting coaxial RF 24 connecting composite video 23 connecting S Video 22 video camera connecting composite video 23 connecting S Video 22 video connections types of 14 volume button 10 W wide format 33 ...

Страница 60: ...NOTE ...

Страница 61: ...NOTE ...

Страница 62: ......

Отзывы: