background image


NovoTouch User Manual                                                                                     

Copyright © 2017 Vivitek. Vivitek is a trademark of Delta Electronics, Inc.


Page

 35 

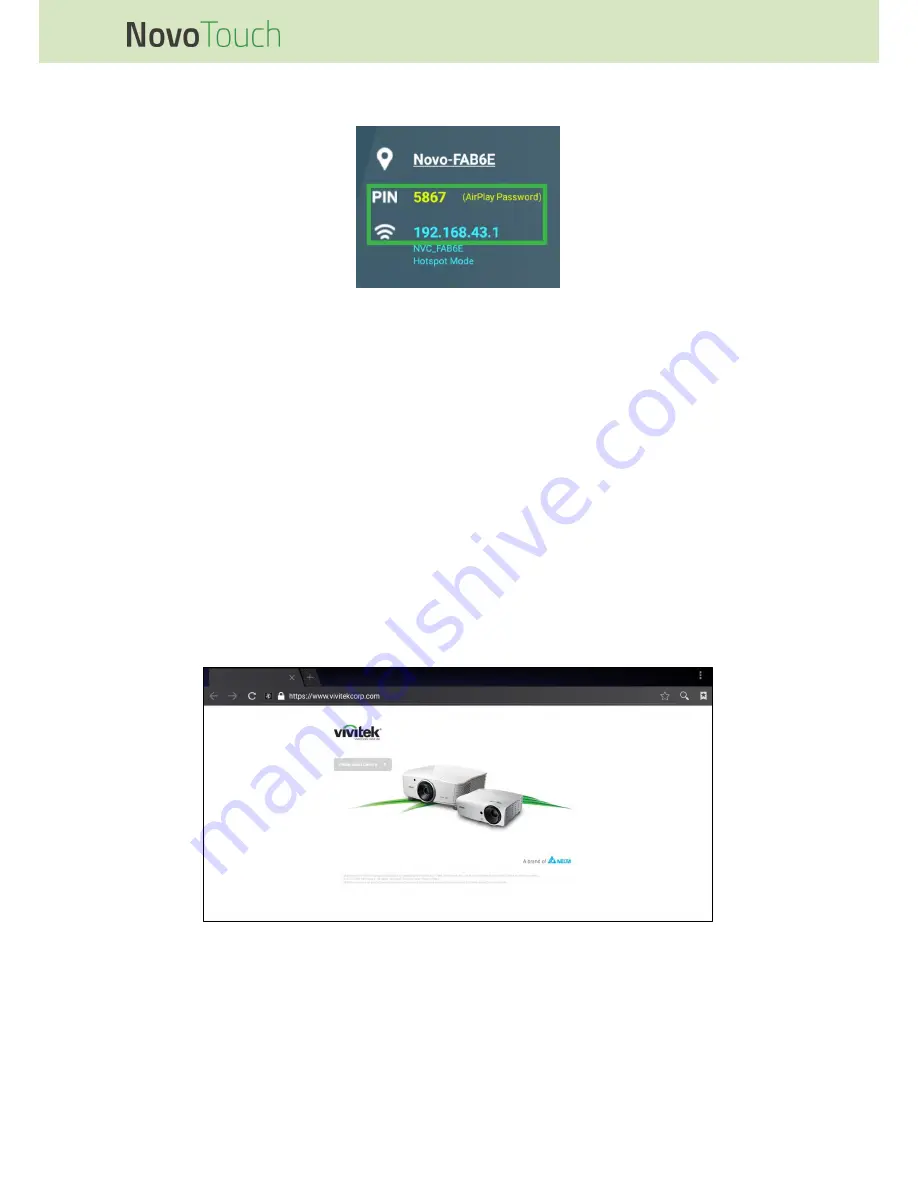
4.  Enter the IP address and PIN displayed in the top right corner of the Remote Viewer 

home page into the login menu of Desktop Streamer or NovoPresenter. 


5.  The first user who logs into the presentation session will automatically see their 

device’s screen projected on NovoTouch’s touchscreen. Subsequent users can also 

log in using the same login information. 

NOTE: For subsequent users, the IP address and PIN information can be viewed on the login 

page of the first user.     

For more information on Remote Viewer, Desktop Streamer and NovoPresenter, 

including full descriptions of their various functions and options, download the 

NovoTouch Remote Viewer user manual from the Vivitek website. 

Browser 

The Browser app allows you to browse the internet on the NovoTouch after connecting 

the display to an internet connection via either an Ethernet connection or a wireless 

connection. See the LAN (RJ-45) section or the Setting up a Wi-Fi Connection section for 

more information on connecting the display to the internet.   


Содержание NOVOTOUCH LK6530i

Страница 1: ...User Manual For LK6530i LK7530i and LK8630i models ...

Страница 2: ...lay Right View 12 Display Bottom View 13 Remote Control 14 Installing Batteries 15 Remote Control Usage 15 Installing the Wall Mount 16 Installing the VKA05 OPS Module 19 Connections 20 HDMI In 1 4 2 0 20 DisplayPort In 20 VGA In 21 Audio In 21 LAN RJ 45 22 Touch 22 AV In 23 RS 232 23 USB 2 0 3 0 23 microSD 24 HDMI Out 24 Audio Out 24 Coax Out 25 Getting Started 26 Powering the Display 26 Switchin...

Страница 3: ...i Fi Connection 28 Display Settings 30 Audio 31 Screen 31 Display 32 Adjust 32 Using the Display 33 Home Screen 33 NovoTouch Remote Viewer 34 Browser 35 Note 36 System Settings 37 Finder 38 Tools 39 Cleaning the Display 40 Specifications 41 Troubleshooting 42 Appendix RS 232 Specifications 43 Copyright Statement 46 ...

Страница 4: ... cable from the product packaging and don t modify or lengthen it Please check and ensure that the AC source is connected with the ground The power cable that comes with the display is for use exclusively by this device LED Screen Never use any hard or sharp object in place of the styluses Do not use permanent or dry erase markers on the screen If dry erase markers are used on the screen remove th...

Страница 5: ...nstalled Check the mounting location for loose screws gaps distortions signs of damage or weakness that can occur over time Disposal of Old Electric and Electronic Equipment The symbol on your product or the package represents that the product should not be treated as the normal household waste when discarded but should be carried to the recycling location of the waste electric and electronic equi...

Страница 6: ...ions 1 this device may not cause harmful interference and 2 this device must accept any interference received including interference that may cause undesired operation Canada This class A digital apparatus complies with Canadian ICES 003 CE Declaration of Conformity This device complies with the requirements set out in the Council Directive on the Approximation of the Laws of the Member States rel...

Страница 7: ... harmful interference in which case the user will be required to correct the interference at his own expense Safety Certifications FCC A cTUVus CE CB EAC RoHS Disposal and Recycling This product may contain other electronic waste that can be hazardous if not disposed of properly Recycle or dispose in accordance with local state or federal Laws For more information contact the Electronic Industries...

Страница 8: ...onics Inc Page 8 Package Contents Ensure that all of the proper items are included with the display in the packaging The items that should be included in the packaging are NovoTouch VKA05 OPS Module with Antenna Remote Control Power Cable Wall Mount Kit Audio Cable USB Cable VGA Cable ...

Страница 9: ...anual Copyright 2017 Vivitek Vivitek is a trademark of Delta Electronics Inc Page 9 Stylus x 3 Documentation CD Batteries x 2 Quick Guide Optional Accessories LauncherPlus QL300 Smart Pen VKP05 VKW21 Windows OPS Module ...

Страница 10: ...y is off Press to power on the display When display is on Press to place the display on standby Press and hold for 2 seconds to power off the display Status Indicator LED Blue The display is powered on or in standby mode Red The display is connected to a power source but not powered on Off The display is not connected to a power source Flashing Red Blue 1 The display is in standby mode 2 the displ...

Страница 11: ...ear View The following illustration shows the rear of the display and its various components No Item Description 1 Handles Allows you to safely carry move the display 2 Wall Mount Screw Holes Used to install the wall mount included with the display See the Installing the Wall Mount section for more information ...

Страница 12: ...ojector to duplicate or extend the video shown on the display 8 USB 2 0 Port Connects to a USB flash drive to view media files or to a mouse keyboard 9 HDMI In Port 1 2 0 Connects to Blu Ray DVD players set top boxes digital media players computers or other video sources to broadcast video and audio 10 HDMI In Port 2 1 4 Connects to Blu Ray DVD players set top boxes digital media players computers...

Страница 13: ...nnector Connects to a power outlet 3 USB 2 0 Port Connects to a USB flash drive to view media files or to a mouse keyboard 4 AV In Jack Connects to DVD players set top boxes and other sources to broadcast analog video and audio 5 Coax Out Port Connects to external speakers to broadcast audio 6 RS 232 Port Connects to a computers or servers for control commands 7 Audio Out Jack Connects to external...

Страница 14: ...tons Navigates between various applications and menus shown on screen 11 Quick Draw Launches the displays drawing tools See the Tools section for more information 12 Page Up Down Performs the same action as the Page Up Down buttons on a PC keyboard 13 Function Buttons Functional buttons 14 F1 F12 Performs the same action as the F1 F12 keys on a PC keyboard 15 Mute Disables the display s audio 16 A...

Страница 15: ...s ensuring that the and terminals on the battery match their corresponding terminals in the battery compartment WARNING Failure to install the correct batteries in the correct orientation may result in damage or possibly injury 3 Replace the battery compartment cover on the remote control Remote Control Usage When using the remote control ensure that the remote control is pointed at the IR sensor ...

Страница 16: ...y down to install the wall mount place it face down on a flat and stable surface covered by a protective sheet or cloth and a table cushion as shown in the illustration provided DO NOT place the display on an uncovered surface Ensure that all the following parts are included in the wall mount kit Letter Item Quantity A Wall Mount Frame 1 B Wall Mount Brackets 2 C Bracket Screws 4 D Frame Screws 2 ...

Страница 17: ... Page 17 1 Install the two B the wall mount brackets onto the display using the four C bracket screws 2 Install the eight G anchor screws into the wall you want to mount NovoTouch on 3 Install the A wall mount frame onto the wall by securing the eight F wall screws and E washers to the anchors ...

Страница 18: ...l Copyright 2017 Vivitek Vivitek is a trademark of Delta Electronics Inc Page 18 4 Mount the displays wall mount brackets onto the wall mount frame 5 Secure the wall mount brackets to the frame using the two D frame screws ...

Страница 19: ...S module before you begin using the display the display will not have all the functions available for use To install the VKA05 OPS module follow the instructions below 1 Remove the 2 screws securing the slot cover onto the display and then remove the slot cover 2 Slide the OPS module into the OPS slot 3 Tighten the two captive screws on the OPS module until the module is properly secure in the dis...

Страница 20: ...her sources to broadcast video and audio on the NovoTouch When connecting a device to the HDMI In port Use an HDMI cable with a standard Type A HDMI connector Select the corresponding HDMI input in the input source menu on the NovoTouch See the Switching Input Source section for more information on selecting input sources DisplayPort In The DisplayPort In port connects to computers to broadcast vi...

Страница 21: ...ection for more information on selecting input sources If you want the NovoTouch to also broadcast audio from the connected devices connect an audio cable from the audio out jack of the source to the audio in jack of the NovoTouch as described in the Audio In section below Audio In The Audio In jack is used particularly for connections that feature video only streams such as a VGA connection by co...

Страница 22: ...ct to the LAN port located on the bottom of the NovoTouch Touch The touch port allows you to connect a computer via any of its USB ports to the NovoTouch and use the touchscreen on the NovoTouch to control the computer s on screen interface When connecting a computer to the touch port Use a Type A to Type B USB cable Ensure that a video connection for the computer is made and the corresponding inp...

Страница 23: ...e NovoTouch See the Switching Input Source section for more information on selecting input sources RS 232 The AV In port connects to a computer or server to provide data and control signals to the NovoTouch When connecting a device to the RS 232 port Use a standard RS 232 cable USB 2 0 3 0 The USB ports allow you to connect USB flash drives for direct playback of stored media as well as USB device...

Страница 24: ...more information HDMI Out The HDMI Out port connects to the HDMI in port on other displays or projectors to duplicate or extend the video shown on the NovoTouch on the connected display projector When connecting another display device to the HDMI Out port Use a standard HDMI cable Select the corresponding HDMI input on the second display Audio Out The Audio Out jack connects to external speakers t...

Страница 25: ...tek Vivitek is a trademark of Delta Electronics Inc Page 25 Coax Out The Coax Out jack connects to external speakers to broadcast the audio from the NovoTouch When connecting external speakers to the Coax Out jack Use a standard coaxial cable ...

Страница 26: ... in the desired location you must supply power to the display using the following steps 1 Plug the supplied power cable into the display and a power source NOTE Only use the power cable provided in the packaging with the display 2 Turn the power switch located at the bottom of the display on 3 Press the power button on the display or the remote control to power on the display ...

Страница 27: ...n the input source menu to select which input source to show on the display To open the input source menu choose one of the following methods Press the Settings button located on the front side of the display Press the Input button on the remote control Touch and hold the bottom of the touchscreen then swipe up Tap the Input menu shortcut located on the home screen ...

Страница 28: ...ected NOTE If no video input source is available you can select NovoTouch to enter the NovoTouch user interface described in the Using the Display section Setting up an Internet Connection NovoTouch is able to connect to the internet using one of the following methods A wired connection via the RJ 45 port see the LAN RJ 45 section for more information A Wi Fi connection Setting up a Wi Fi Connecti...

Страница 29: ...tek is a trademark of Delta Electronics Inc Page 29 2 Select Wi Fi in the Settings menu 3 Turn the Wi Fi switch on in the Wi Fi menu 4 Select the Wi Fi access point router that you want NovoTouch to connect to 5 Enter a security password if necessary ...

Страница 30: ...which allows you to configure various video audio related settings for the display To open the display settings menu choose one of the following methods Open the input source menu and then select at the top left corner of the input source menu Press the Menu button on the remote control The display settings menu includes the following for sub menus Audio Screen Display Adjust ...

Страница 31: ...eset Settings Provides various preset audio settings for the display The available settings include Standard Meeting Class and Custom Mute Disables the display s audio Screen The Screen settings menu allows you to adjust the following settings Item Description Pixel Shift Enables Disables pixel shift which is a tool to prevent image burn in by periodically moving the video frame so there are no st...

Страница 32: ...Preset Settings Provides various preset video settings for the display The available settings include Standard Bright Soft Custom Cold and Warm NOTE Bright Soft Custom and Cold Warm settings can be set independent of each other Adjust The Adjust settings menu allows you to adjust the following settings Item Description H Position Adjusts the horizontal position of the video V Position Adjusts the ...

Страница 33: ...s and collaborative projects 2 Browser Opens the web browser app 3 Note Opens the sketchpad app 4 Input Opens the input source menu 5 Tools Menu Opens a menu of quick interactive tools for the touchscreen NOTE The tools menu is also accessible when any app is opened on NovoTouch 6 All Apps Opens a menu of all the apps installed on NovoTouch 7 Finder Opens the file navigation app 8 Settings Opens t...

Страница 34: ... session follow the steps below 1 Download and install the presentation software needed on your device based on the following table Type of Device Software Needed Download Location PC Mac Desktop Streamer www vivitekcorp com iPad iPhone NovoPresenter Google Play Store Android Tablet Smartphone NovoPresenter iOS App Store 2 If NovoTouch is connected to Wi Fi In your device s Wi Fi menu connect to t...

Страница 35: ...ation NOTE For subsequent users the IP address and PIN information can be viewed on the login page of the first user For more information on Remote Viewer Desktop Streamer and NovoPresenter including full descriptions of their various functions and options download the NovoTouch Remote Viewer user manual from the Vivitek website Browser The Browser app allows you to browse the internet on the Novo...

Страница 36: ...nd move items drawn on the touchscreen 4 Drawing Tool Allows you to draw as well as configure the size and color of the drawing tool you want to use 5 Eraser Tool Allows you to erase items drawn on the touchscreen 6 Clear All Tool Allows you to erase all items drawn on the touchscreen at once 7 Shapes Tool Allows you to add lines and shapes on the drawing 8 Zoom Tool Allows you to change the scale...

Страница 37: ...nual Copyright 2017 Vivitek Vivitek is a trademark of Delta Electronics Inc Page 37 System Settings The system settings menu allows you to configure or view various settings related to the system software for NovoTouch ...

Страница 38: ...s you to search for specific files 5 Exit Exits the Finder app 6 Sort Sorts the files either by name type size or time 7 Thumbnail Changes the navigation window to thumbnail view 8 List Changes the navigation window to list view 9 Select Allows you to select multiple files in the navigation window Once files are selected a file management menu will open allowing you to copy paste cut delete etc th...

Страница 39: ...play to the home screen Launches the quick annotation tool which allows you to create annotations directly on the image shown on the display Launches the freeze screen tool which allows you to freeze the image shown on the display and then zoom in or out on the frozen image Opens menu of additional interactive tools including the following Spotlight Illuminates only a portion of the image shown on...

Страница 40: ...ttached to the display Do not use any chemicals on the panels Do not use anything abrasive to wipe the display use a clean soft lint free cloth instead to wipe the display Do not spray water directly on the display fill a spray bottle with water and spray directly on to the cleaning cloth instead After wiping the display with the wet cleaning cloth use another clean soft lint free cloth to dry the...

Страница 41: ...oid v6 0 Connectivity Input Display HDMI v2 x1 HDMI v1 4 x2 DisplayPort x1 VGA In x1 Audio Audio In 3 5mm x1 AV In x1 Output Display HDMI Out 1080P x1 Audio Audio Out 3 5mm x1 Coaxial Out RCA x1 Internet LAN RJ45 x1 Control RS232 x1 USB Front USB 2 0 x2 USB 3 0 x1 Side USB 2 0 x1 USB 3 0 x1 USB Type B x2 For Touch Port Bottom USB 2 0 x1 NovoPro Android Module Slot 1 Standard 120pin Windows PC Modu...

Страница 42: ...u Touch functionality issues Touch function invalid 1 Check whether the touchscreen driver is installed 2 Check whether the size of point of contact is comparable to finger Touch position is not correct 1 Check whether the touchscreen driver is installed 2 Check whether touch pen is facing the screen Videos do not function normally No picture and no sound 1 Check whether the machine is in a powere...

Страница 43: ...m No 4 to No 6 8 0xDD End Fixed Value 9 0xEE Fixed Value 10 0xFF Fixed Value Code List Function Mode Code Remark Power ON AA BB CC 01 00 00 01 DD EE FF OFF AA BB CC 01 01 00 02 DD EE FF Source VGA1 AA BB CC 02 03 00 05 DD EE FF HDMI1 AA BB CC 02 06 00 08 DD EE FF HDMI2 AA BB CC 02 07 00 09 DD EE FF HDMI3 AA BB CC 02 05 00 07 DD EE FF PC AA BB CC 02 08 00 0A DD EE FF ANDROID AA BB CC 02 0A 00 0C DD...

Страница 44: ...D EE FF UP AA BB CC 07 47 00 4E DD EE FF DOWN AA BB CC 07 4D 00 54 DD EE FF LEFT AA BB CC 07 49 00 50 DD EE FF RIGHT AA BB CC 07 4B 00 52 DD EE FF ENTER AA BB CC 07 4A 00 51 DD EE FF Point AA BB CC 07 06 00 0D DD EE FF Back AA BB CC 07 0A 00 11 DD EE FF CH AA BB CC 07 02 00 09 DD EE FF CH AA BB CC 07 09 00 10 DD EE FF VOL AA BB CC 07 03 00 0A DD EE FF VOL AA BB CC 07 41 00 48 DD EE FF PageUp AA BB...

Страница 45: ... BB CC 81 03 00 84 DD EE FF VGA1 AA BB CC 81 0E 00 8F DD EE FF ANDROID AA BB CC 81 05 00 86 DD EE FF HDMI3 AA BB CC 81 06 00 87 DD EE FF HDMI1 AA BB CC 81 07 00 88 DD EE FF HDMI2 AA BB CC 81 08 00 89 DD EE FF PC AA BB CC 81 0A 00 8B DD EE FF ANDROID AA BB CC 81 11 00 92 DD EE FF DP PC Status AA BB CC 09 02 00 0b DD EE FF AA BB CC 83 00 00 82 DD EE FF ON AA BB CC 83 01 00 84 DD EE FF OFF AA BB CC 8...

Страница 46: ...hange without notice The manufacturer does not provide any statement or warranty of the contents in the manual and clearly give up the implied warranties of merchantability and of fitness for a particular purpose The manufacturer reserves the rights to modify the publication and change the contents of the materials at any time without notice to any person About the Manual The manual describes how ...

Страница 47: ...A T 1 510 668 5100 F 1 510 668 0680 Vivitek Asia 7F No 186 Ruey Kuang Road Neihu Taipei 11491 Taiwan R O C T 886 2 8797 2088 F 886 2 6600 2358 Vivitek Europe Zandsteen 15 2132 MZ Hoofddorp The Netherlands T 31 20 800 3960 F 31 20 655 0999 www vivitekcorp com ...

Отзывы: